


-
Turn Yourself Into an Action Figure Using ChatGPT

ChatGPT Action Figure Prompts:
Create an action figure from the photo. It must be visualised in a realistic way. There should be accessories next to the figure like a UX designer have, Macbook Pro, a camera, drawing tablet, headset etc. Add a hole to the top of the box in the action figure. Also write the text “UX Mate” and below it “Keep Learning! Keep Designing
Use this image to create a picture of a action figure toy of a construction worker in a blister package from head to toe with accessories including a hammer, a staple gun and a ladder. The package should read “Kirk The Handy Man”
Create a realistic image of a toy action figure box. The box should be designed in a toy-equipment/action-figure style, with a cut-out window at the top like classic action figure packaging. The main color of the box and moleskine notebook should match the color of my jacket (referenced visually). Add colorful Mexican skull decorations across the box for a vibrant and artistic flair. Inside the box, include a “Your name” action figure, posed heroically. Next to the figure, arrange the following “equipment” in a stylized layout: • item 1 • item 2 … On the box, write: “Your name” (bold title font) Underneath: “Your role or anything else” The entire scene should look like a real product mockup, highly realistic, lit like a studio product photo. On the box, write: “Your name” (bold title font) Underneath: “Your role or description” The entire scene should look like a real product mockup, highly realistic, lit like a studio product photo. Prompt on Kling AI The figure steps out of its toy packaging and begins walking forward. As he continues to walk, the camera gradually zooms out in sync with his movement.
“Create image. Create a toy of the person in the photo. Let it be an action figure. Next to the figure, there should be the toy’s equipment, each in its individual blisters. 1) a book called “Tecnoforma”. 2) A 3-headed dog with a tag that says “Troika” and a bone at its feet with word “austerity” written on it. 3) a three-headed Hydra with with a tag called “Geringonça”. 4) a book titled “D. Sebastião”. Don’t repeat the equipment under any circumstance. The card holding the blister should be strong orange. Also, on top of the box, write ‘Pedro Passos Coelho’ and underneath it, ‘PSD action figure’. The figure and equipment must all be inside blisters. Visualize this in a realistic way.”


-
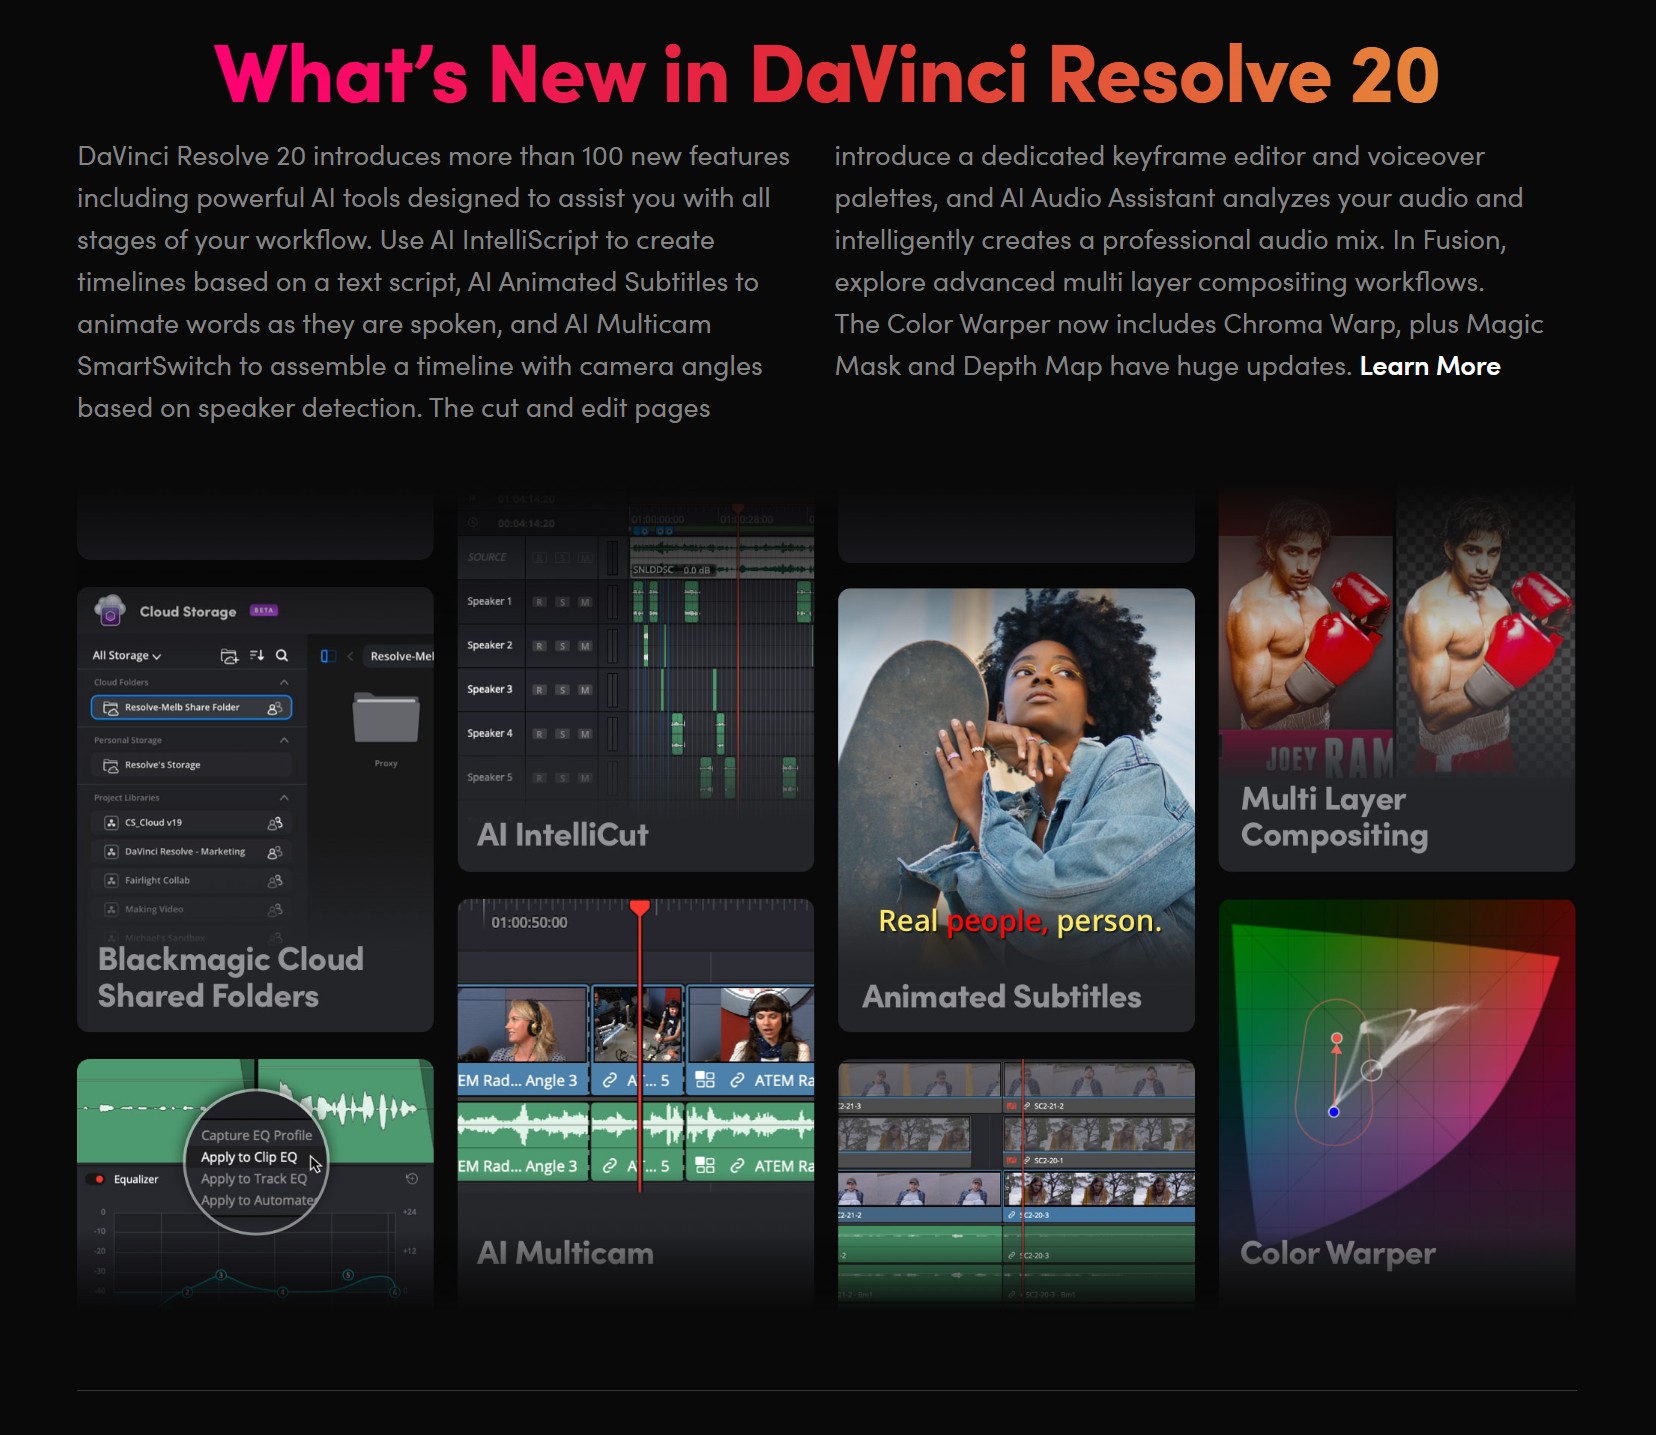
Blackmagic DaVinci Resolve 20
A major new update which includes more than 100 new features including powerful AI tools designed to assist you with all stages of your workflow. Use AI IntelliScript to create timelines based on a text script, AI Animated Subtitles to animate words as they are spoken, and AI Multicam SmartSwitch to create a timeline with camera angles based on speaker detection. The cut and edit pages also include a dedicated keyframe editor and voiceover palettes, and AI Fairlight IntelliCut can remove silence and checkerboard dialogue between speakers. In Fusion, explore advanced multi layer compositing workflows. The Color Warper now includes Chroma Warp, and the Magic Mask and Depth Map have huge updates.
https://www.blackmagicdesign.com/products/davinciresolve
-
ZAppLink – a plugin that allows you to seamlessly integrate your favorite image editing software — such as Adobe Photoshop — into your ZBrush workflow
While in ZBrush, call up your image editing package and use it to modify the active ZBrush document or tool, then go straight back into ZBrush.
ZAppLink can work on different saved points of view for your model. What you paint in your image editor is then projected to the model’s PolyPaint or texture for more creative freedom.
With ZAppLink you can combine ZBrush’s powerful capabilities with all the painting power of the PSD-capable 2D editor of your choice, making it easy to create stunning textures.
ZAppLink features
- Send your document view to the PSD file editor of your choice for texture creation and modification: Photoshop, Gimp and more!
- Projections in orthogonal or perspective mode.
- Multiple view support: With a single click, send your front, back, left, right, top, bottom and two custom views in dedicated layers to your 2D editor. When your painting is done, automatically reproject all the views back in ZBrush!
- Create character sheets based on your saved views with a single click.
- ZAppLink works with PolyPaint, Textures based on UV’s and canvas pixols.
-
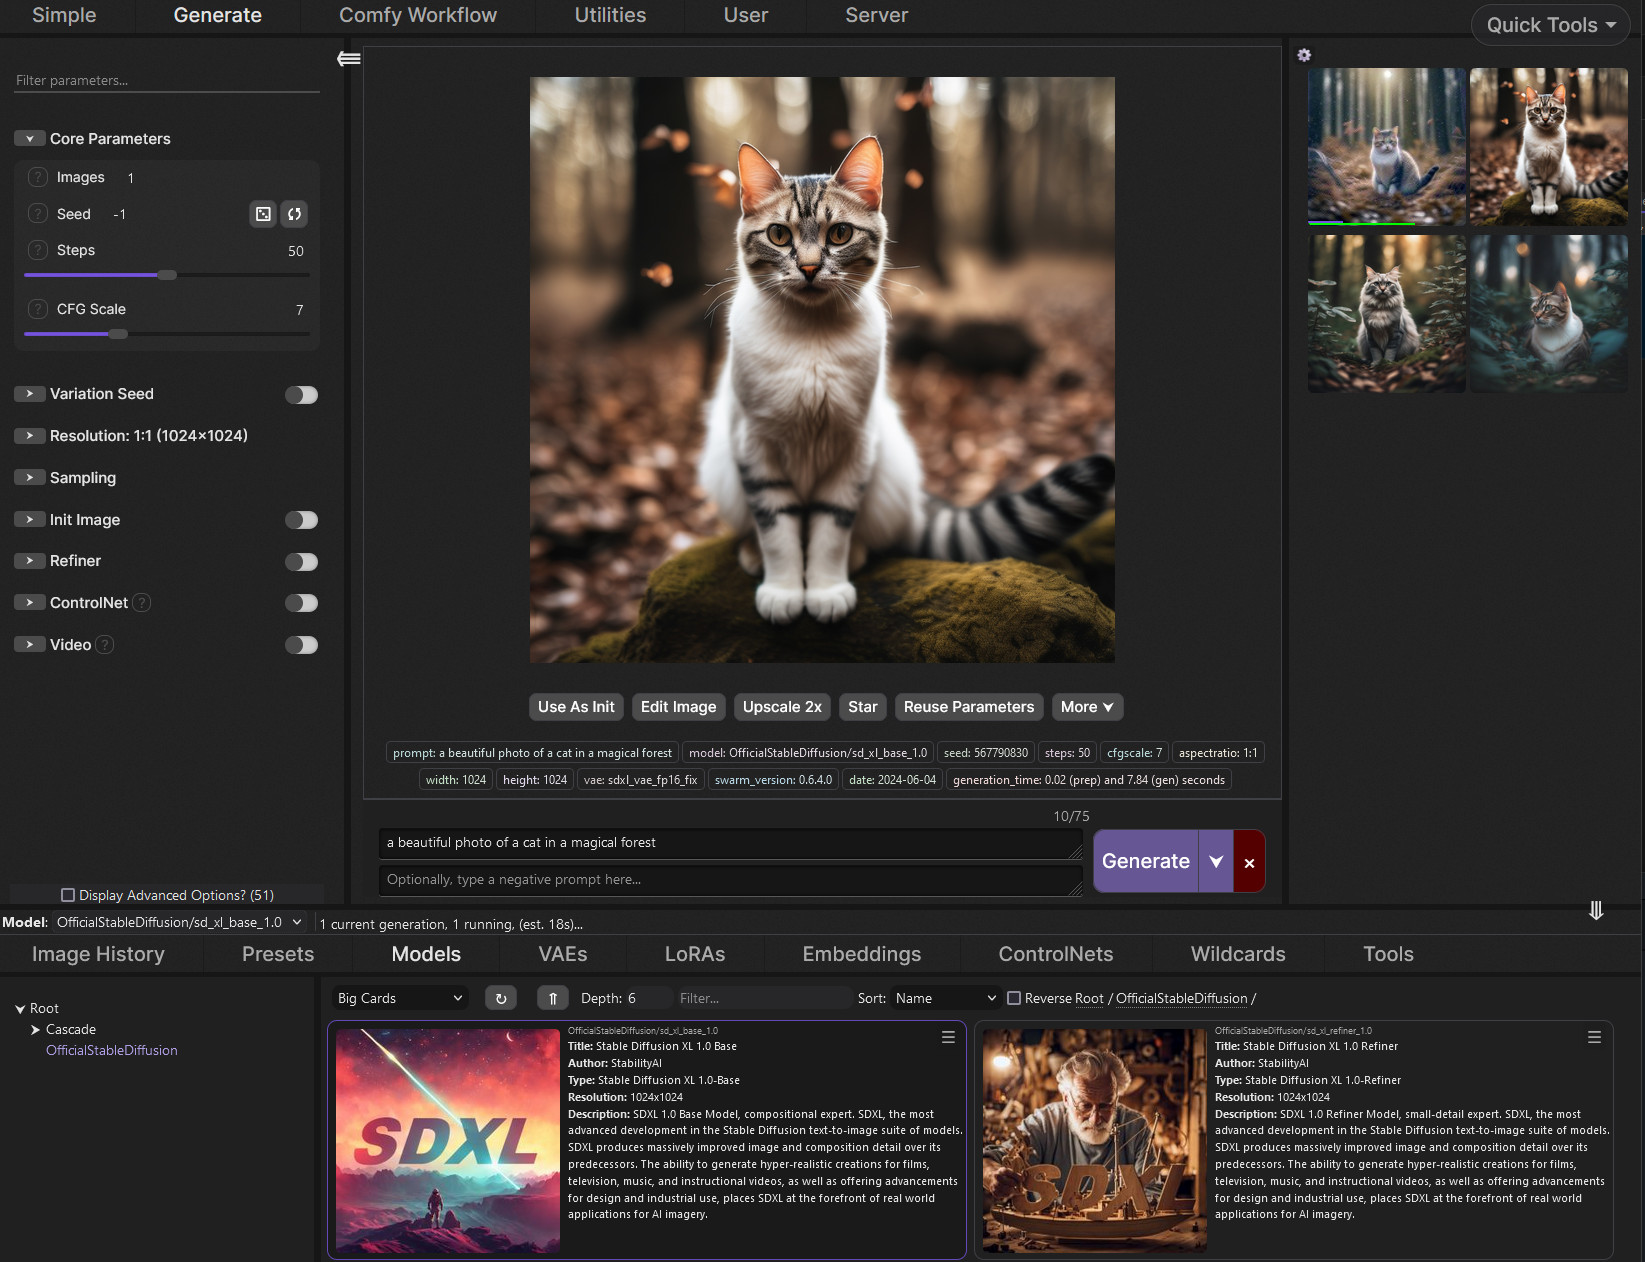
SwarmUI.net – A free, open source, modular AI image generation Web-User-Interface
https://github.com/mcmonkeyprojects/SwarmUI
A Modular AI Image Generation Web-User-Interface, with an emphasis on making powertools easily accessible, high performance, and extensibility. Supports AI image models (Stable Diffusion, Flux, etc.), and AI video models (LTX-V, Hunyuan Video, Cosmos, Wan, etc.), with plans to support eg audio and more in the future.
SwarmUI by default runs entirely locally on your own computer. It does not collect any data from you.
SwarmUI is 100% Free-and-Open-Source software, under the MIT License. You can do whatever you want with it.
-
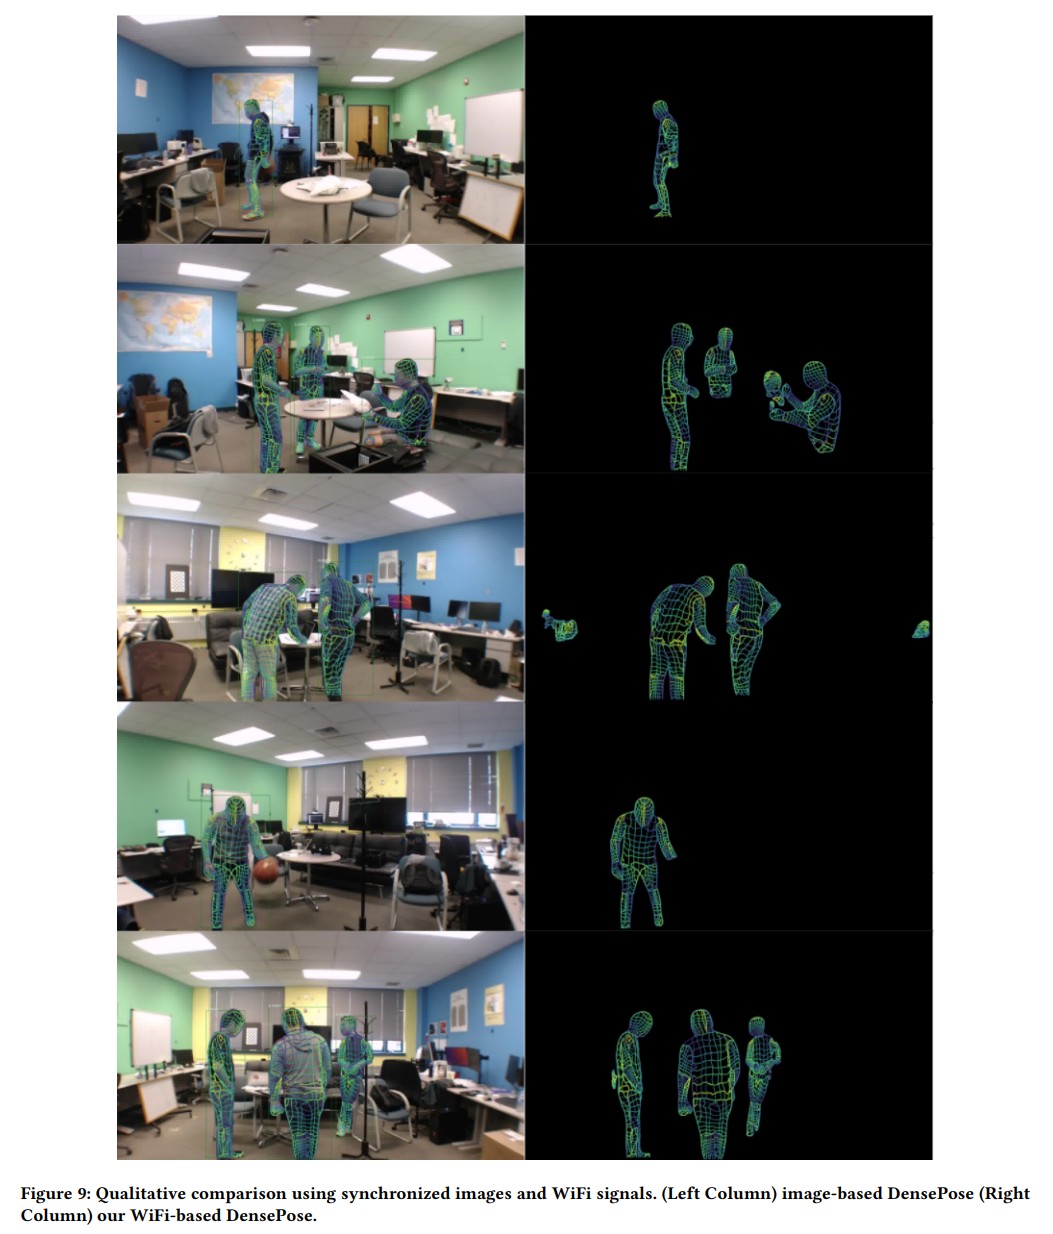
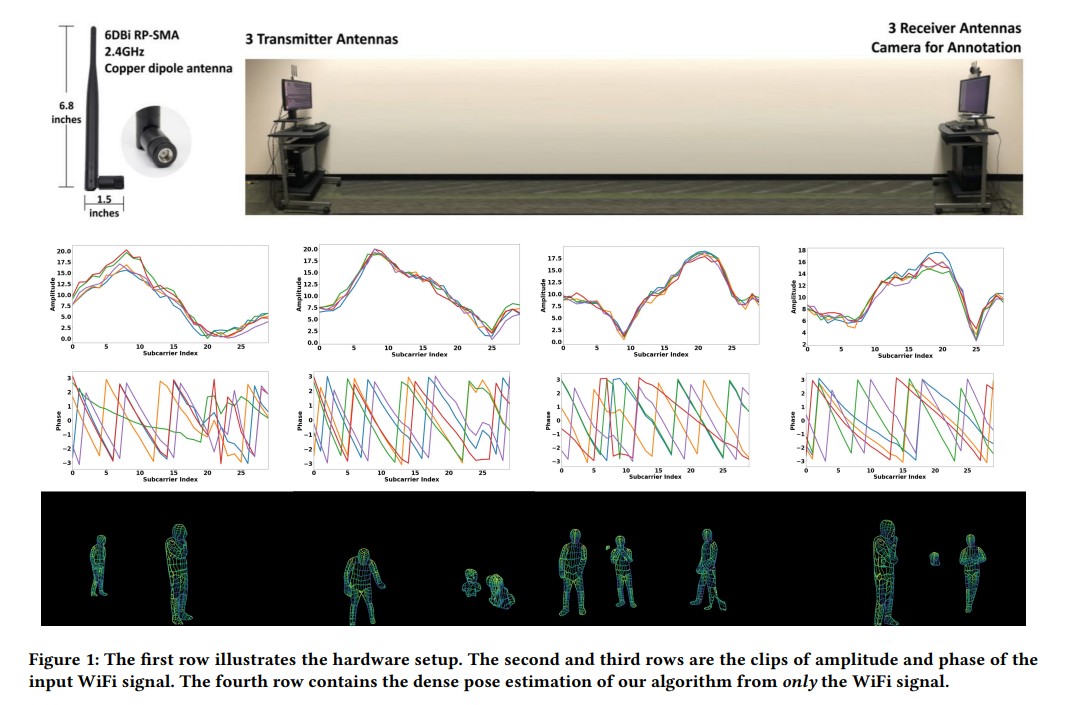
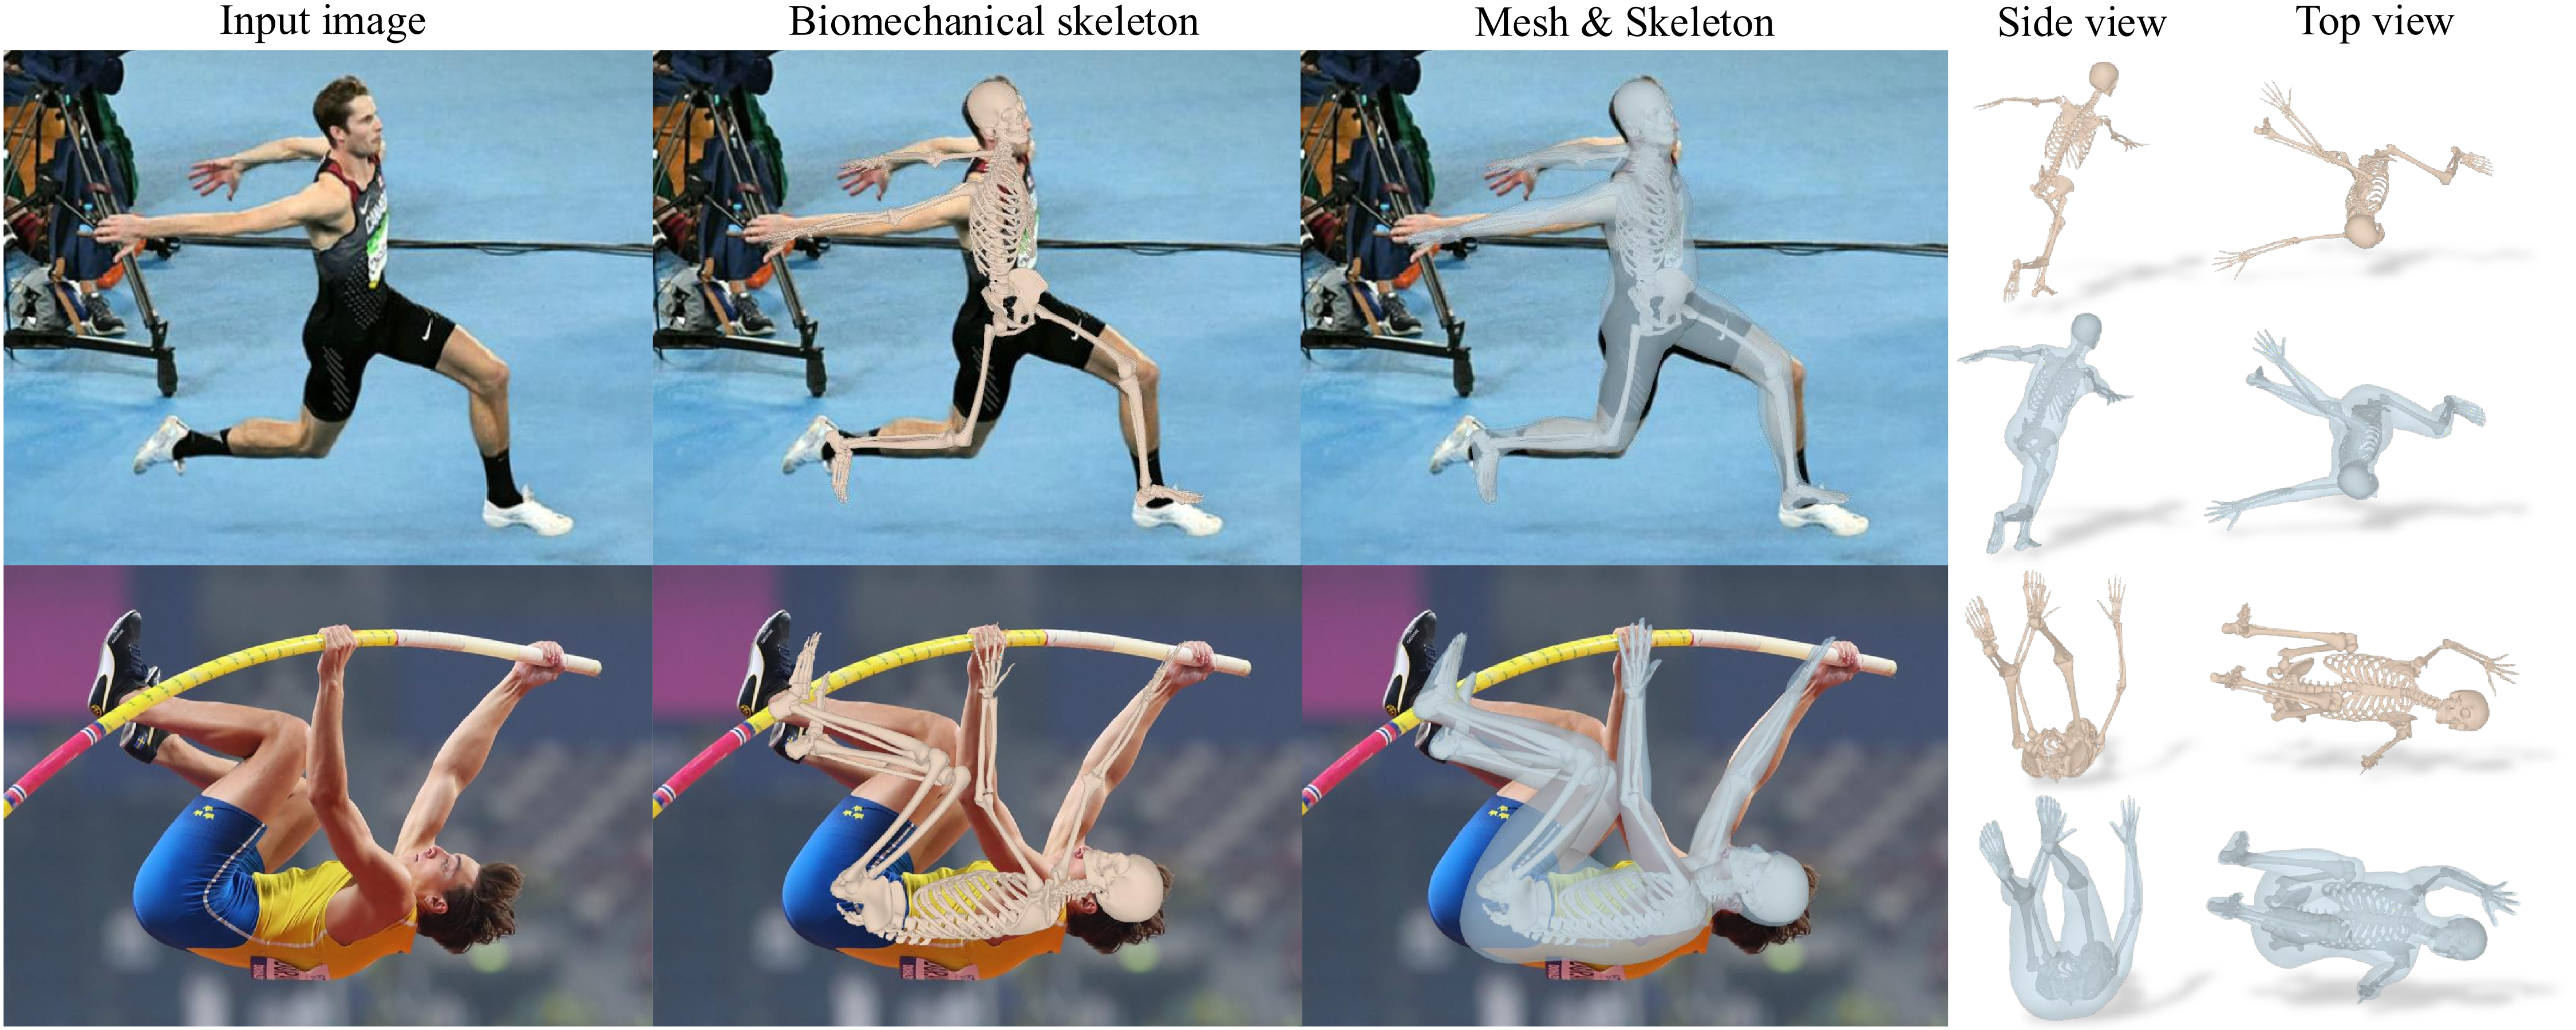
DensePose From WiFi using ML
https://arxiv.org/pdf/2301.00250
https://www.xrstager.com/en/ai-based-motion-detection-without-cameras-using-wifi
Advances in computer vision and machine learning techniques have led to significant development in 2D and 3D human pose estimation using RGB cameras, LiDAR, and radars. However, human pose estimation from images is adversely affected by common issues such as occlusion and lighting, which can significantly hinder performance in various scenarios.
Radar and LiDAR technologies, while useful, require specialized hardware that is both expensive and power-intensive. Moreover, deploying these sensors in non-public areas raises important privacy concerns, further limiting their practical applications.
To overcome these limitations, recent research has explored the use of WiFi antennas, which are one-dimensional sensors, for tasks like body segmentation and key-point body detection. Building on this idea, the current study expands the use of WiFi signals in combination with deep learning architectures—techniques typically used in computer vision—to estimate dense human pose correspondence.
In this work, a deep neural network was developed to map the phase and amplitude of WiFi signals to UV coordinates across 24 human regions. The results demonstrate that the model is capable of estimating the dense pose of multiple subjects with performance comparable to traditional image-based approaches, despite relying solely on WiFi signals. This breakthrough paves the way for developing low-cost, widely accessible, and privacy-preserving algorithms for human sensing.
-
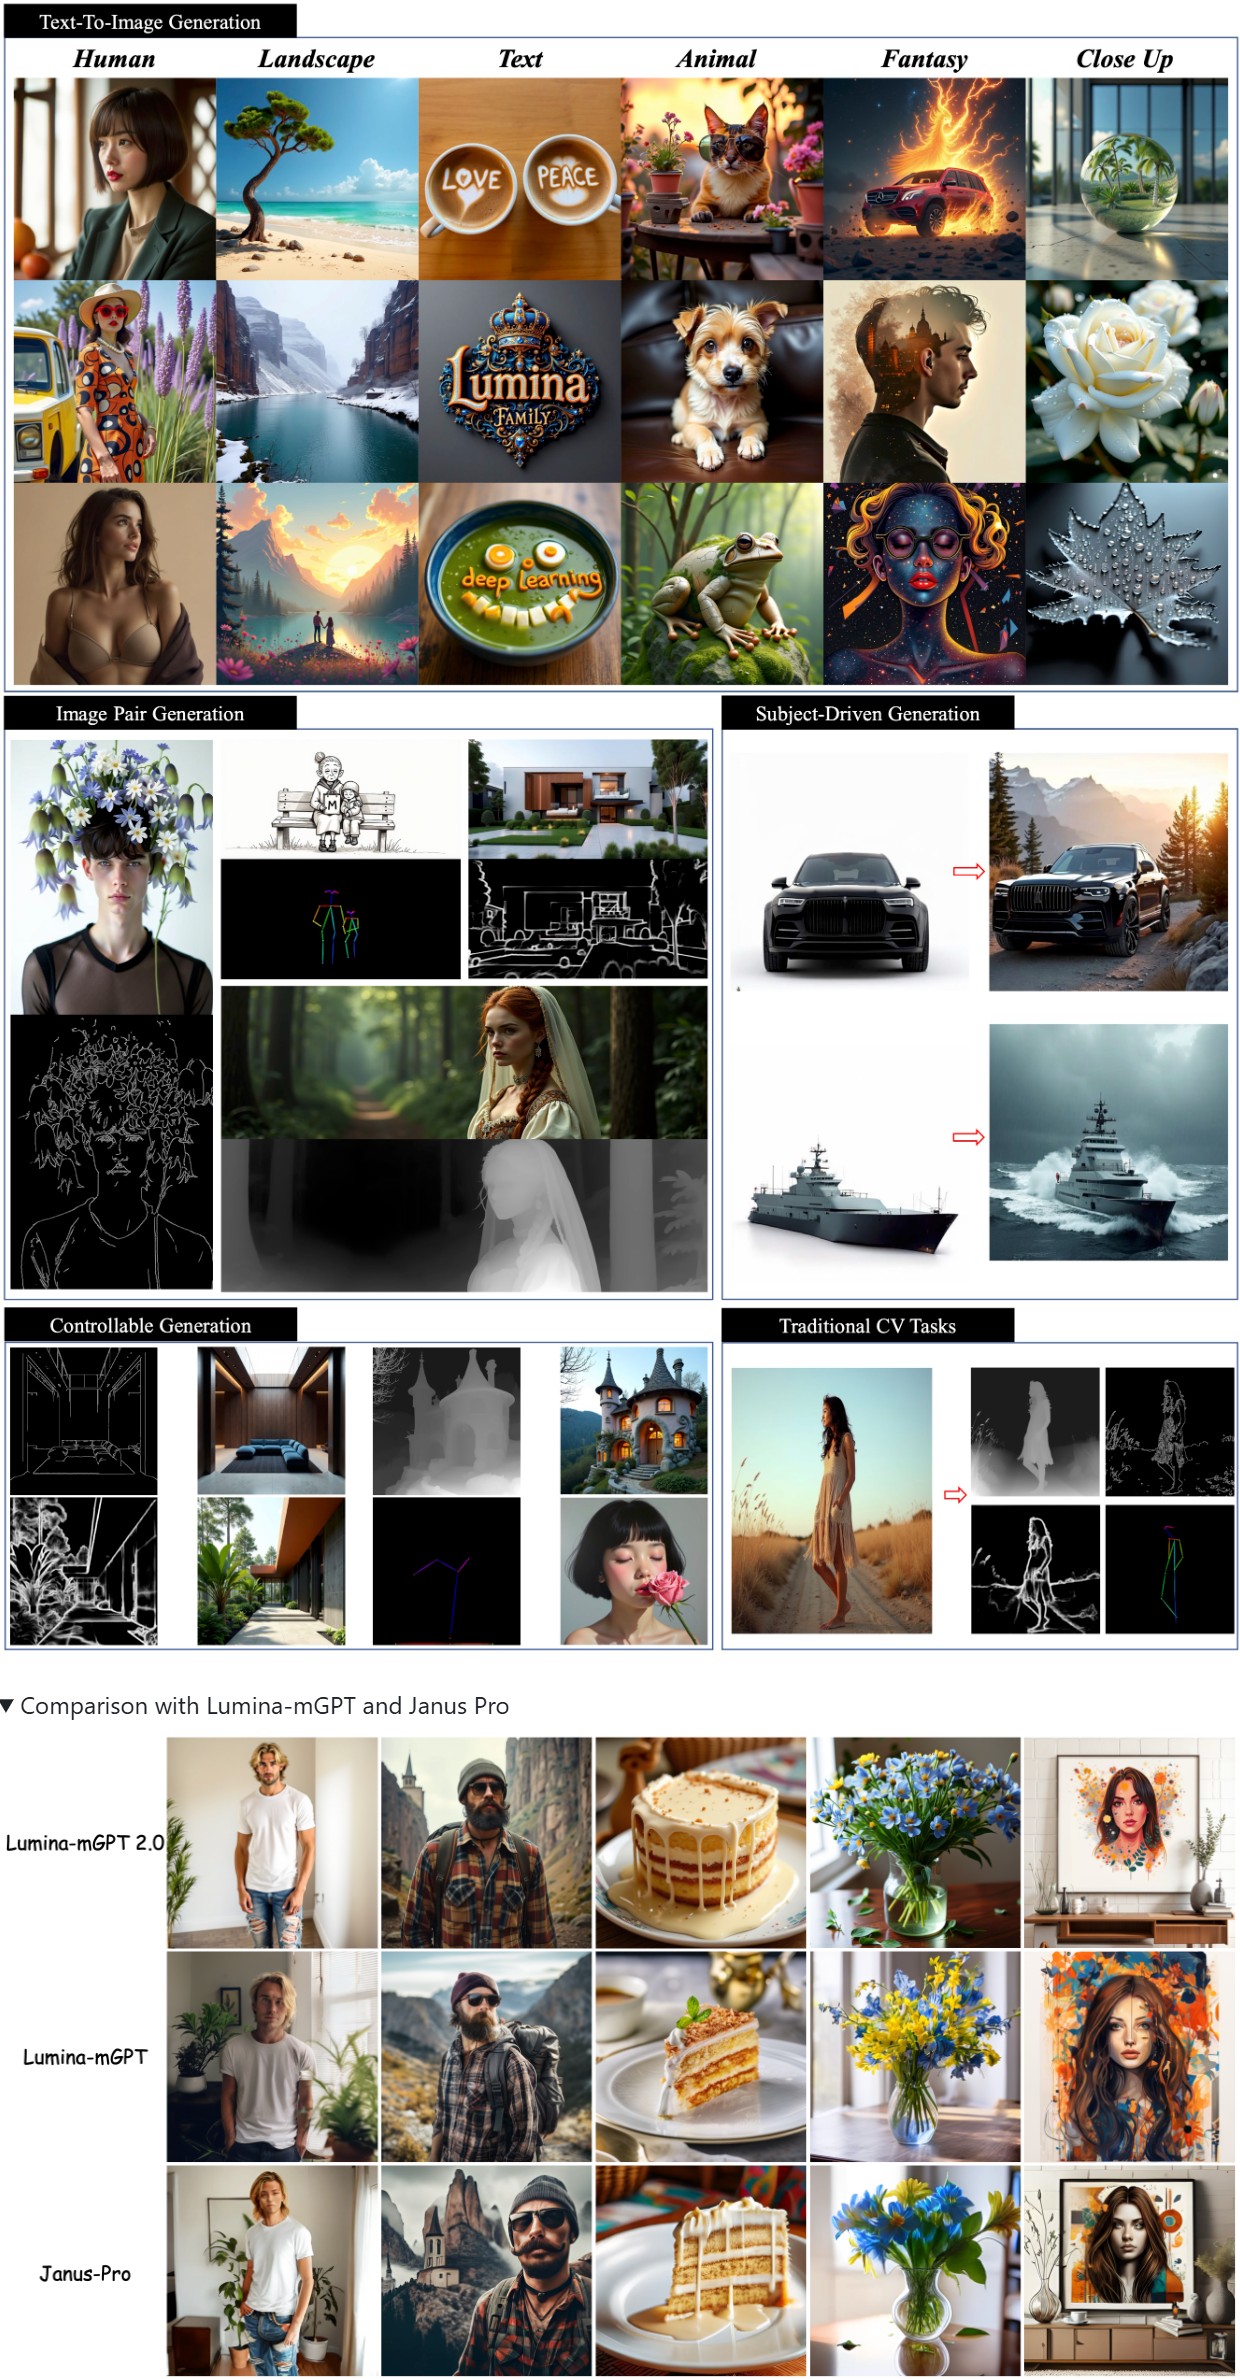
Lumina-mGPT 2.0 – Stand-alone Autoregressive Image Modeling
A stand-alone, decoder-only autoregressive model, trained from scratch, that unifies a broad spectrum of image generation tasks, including text-to-image generation, image pair generation, subject-driven generation, multi-turn image editing, controllable generation, and dense prediction.
https://github.com/Alpha-VLLM/Lumina-mGPT-2.0
-
Mamba and MicroMamba – A free, open source general software package managers for any kind of software and all operating systems
https://mamba.readthedocs.io/en/latest/user_guide/micromamba.html
https://mamba.readthedocs.io/en/latest/installation/micromamba-installation.html
https://micro.mamba.pm/api/micromamba/win-64/latest
https://prefix.dev/docs/mamba/overview
With mamba, it’s easy to set up
software environments. A software environment is simply a set of different libraries, applications and their dependencies. The power of environments is that they can co-exist: you can easily have an environment called py27 for Python 2.7 and one called py310 for Python 3.10, so that multiple of your projects with different requirements have their dedicated environments. This is similar to “containers” and images. However, mamba makes it easy to add, update or remove software from the environments.
To create a python environment under Windows:
micromamba create -n myenv python=3.10
This will create a myenv allocation under:
C:\Users\<USERNAME>\AppData\Roaming\mamba\envs\myenv
Once the environment is created, activate it with:
micromamba activate myenv
Or to execute a single command in this environment, use:
micromamba run -n myenv mycommandTo add a Windows shortcut to launching the micromamba environment:
cmd.exe /K micromamba activate myenv


COLLECTIONS
| Featured AI
| Design And Composition
| Explore posts
POPULAR SEARCHES
unreal | pipeline | virtual production | free | learn | photoshop | 360 | macro | google | nvidia | resolution | open source | hdri | real-time | photography basics | nuke
FEATURED POSTS
-
How do LLMs like ChatGPT (Generative Pre-Trained Transformer) work? Explained by Deep-Fake Ryan Gosling
-
Gamma correction
-
Mastering The Art Of Photography – PixelSham.com Photography Basics
-
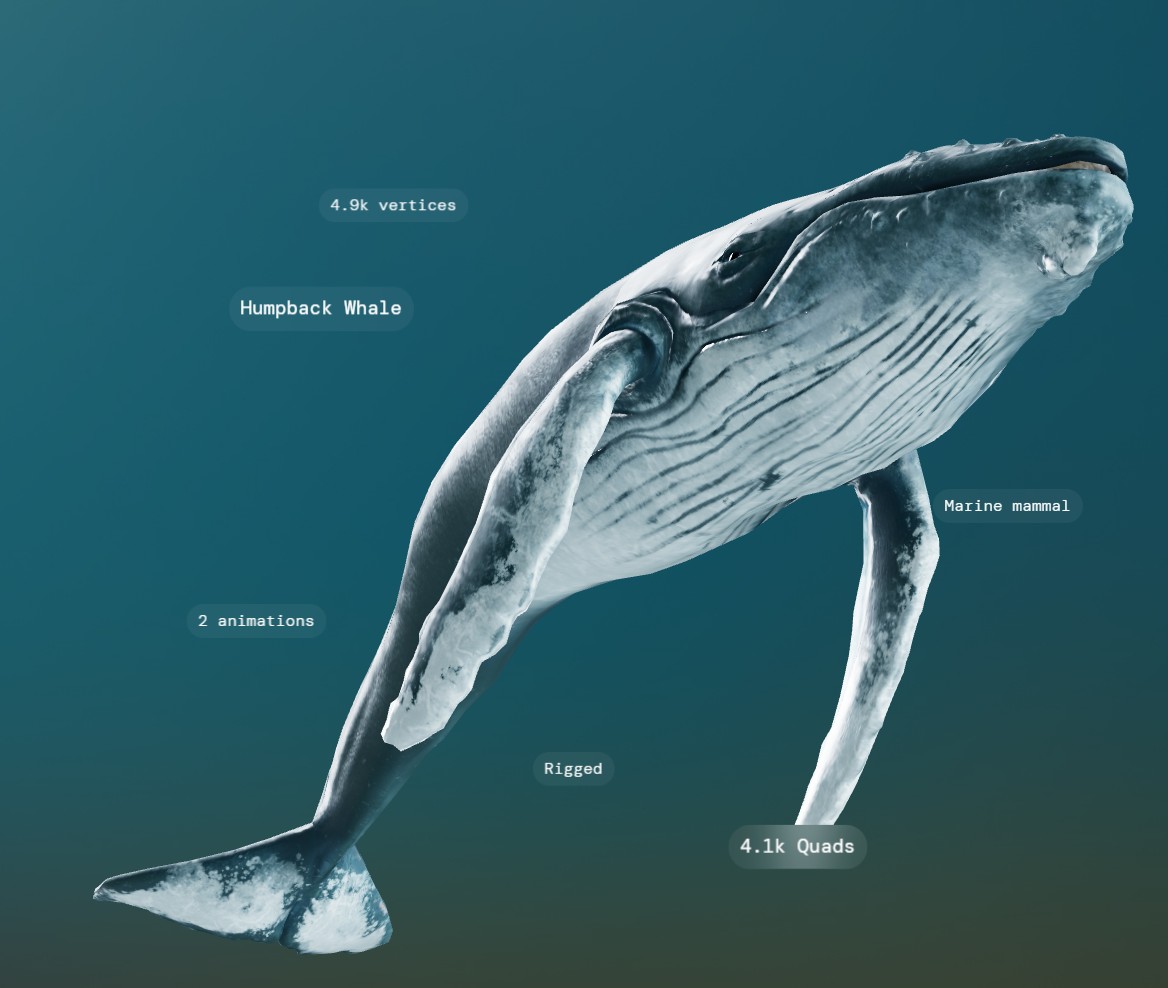
Convert 2D Images to 3D Models
-
copypastecharacter.com – alphabets, special characters and symbols library
-
RawTherapee – a free, open source, cross-platform raw image and HDRi processing program
-
Kling 1.6 and competitors – advanced tests and comparisons
-
Web vs Printing or digital RGB vs CMYK
Social Links
DISCLAIMER – Links and images on this website may be protected by the respective owners’ copyright. All data submitted by users through this site shall be treated as freely available to share.
