- Manual mode
- ISO 200
- Aperture F8
- Shutter speed 1/200
- Overhead flash manual mode to 1/16
- Flash diffuser


3Dprinting (178) A.I. (846) animation (350) blender (210) colour (233) commercials (52) composition (153) cool (364) design (649) Featured (80) hardware (314) IOS (109) jokes (139) lighting (289) modeling (145) music (186) photogrammetry (192) photography (755) production (1291) python (94) quotes (497) reference (314) software (1356) trailers (307) ves (555) VR (221)
https://color-lab-eilat.github.io/Spectral-sensitivity-estimation-web/
A number of problems in computer vision and related fields would be mitigated if camera spectral sensitivities were known. As consumer cameras are not designed for high-precision visual tasks, manufacturers do not disclose spectral sensitivities. Their estimation requires a costly optical setup, which triggered researchers to come up with numerous indirect methods that aim to lower cost and complexity by using color targets. However, the use of color targets gives rise to new complications that make the estimation more difficult, and consequently, there currently exists no simple, low-cost, robust go-to method for spectral sensitivity estimation that non-specialized research labs can adopt. Furthermore, even if not limited by hardware or cost, researchers frequently work with imagery from multiple cameras that they do not have in their possession.
To provide a practical solution to this problem, we propose a framework for spectral sensitivity estimation that not only does not require any hardware (including a color target), but also does not require physical access to the camera itself. Similar to other work, we formulate an optimization problem that minimizes a two-term objective function: a camera-specific term from a system of equations, and a universal term that bounds the solution space.
Different than other work, we utilize publicly available high-quality calibration data to construct both terms. We use the colorimetric mapping matrices provided by the Adobe DNG Converter to formulate the camera-specific system of equations, and constrain the solutions using an autoencoder trained on a database of ground-truth curves. On average, we achieve reconstruction errors as low as those that can arise due to manufacturing imperfections between two copies of the same camera. We provide predicted sensitivities for more than 1,000 cameras that the Adobe DNG Converter currently supports, and discuss which tasks can become trivial when camera responses are available.


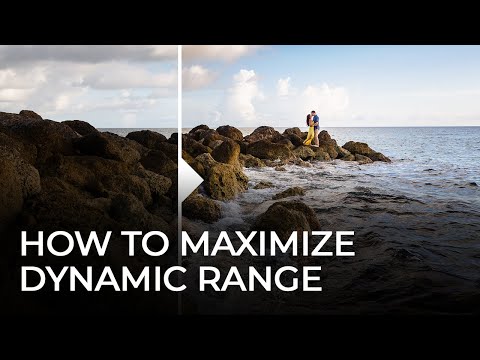
https://www.studiobinder.com/blog/what-is-dynamic-range-photography/
https://www.hdrsoft.com/resources/dri.html#bit-depth


The dynamic range is a ratio between the maximum and minimum values of a physical measurement. Its definition depends on what the dynamic range refers to.
For a scene: Dynamic range is the ratio between the brightest and darkest parts of the scene.
For a camera: Dynamic range is the ratio of saturation to noise. More specifically, the ratio of the intensity that just saturates the camera to the intensity that just lifts the camera response one standard deviation above camera noise.
For a display: Dynamic range is the ratio between the maximum and minimum intensities emitted from the screen.


Also see: https://www.pixelsham.com/2015/05/16/how-aperture-shutter-speed-and-iso-affect-your-photos/
In photography, exposure value (EV) is a number that represents a combination of a camera’s shutter speed and f-number, such that all combinations that yield the same exposure have the same EV (for any fixed scene luminance).

The EV concept was developed in an attempt to simplify choosing among combinations of equivalent camera settings. Although all camera settings with the same EV nominally give the same exposure, they do not necessarily give the same picture. EV is also used to indicate an interval on the photographic exposure scale. 1 EV corresponding to a standard power-of-2 exposure step, commonly referred to as a stop
EV 0 corresponds to an exposure time of 1 sec and a relative aperture of f/1.0. If the EV is known, it can be used to select combinations of exposure time and f-number.
Note EV does not equal to photographic exposure. Photographic Exposure is defined as how much light hits the camera’s sensor. It depends on the camera settings mainly aperture and shutter speed. Exposure value (known as EV) is a number that represents the exposure setting of the camera.
Thus, strictly, EV is not a measure of luminance (indirect or reflected exposure) or illuminance (incidental exposure); rather, an EV corresponds to a luminance (or illuminance) for which a camera with a given ISO speed would use the indicated EV to obtain the nominally correct exposure. Nonetheless, it is common practice among photographic equipment manufacturers to express luminance in EV for ISO 100 speed, as when specifying metering range or autofocus sensitivity.
The exposure depends on two things: how much light gets through the lenses to the camera’s sensor and for how long the sensor is exposed. The former is a function of the aperture value while the latter is a function of the shutter speed. Exposure value is a number that represents this potential amount of light that could hit the sensor. It is important to understand that exposure value is a measure of how exposed the sensor is to light and not a measure of how much light actually hits the sensor. The exposure value is independent of how lit the scene is. For example a pair of aperture value and shutter speed represents the same exposure value both if the camera is used during a very bright day or during a dark night.
Each exposure value number represents all the possible shutter and aperture settings that result in the same exposure. Although the exposure value is the same for different combinations of aperture values and shutter speeds the resulting photo can be very different (the aperture controls the depth of field while shutter speed controls how much motion is captured).
EV 0.0 is defined as the exposure when setting the aperture to f-number 1.0 and the shutter speed to 1 second. All other exposure values are relative to that number. Exposure values are on a base two logarithmic scale. This means that every single step of EV – plus or minus 1 – represents the exposure (actual light that hits the sensor) being halved or doubled.
https://www.streetdirectory.com/travel_guide/141307/photography/exposure_value_ev_and_exposure_compensation.html
https://en.wikipedia.org/wiki/Exposure_value
https://www.scantips.com/lights/math.html
![]()
which means 2EV = N² / t
where
EV 0 corresponds to an exposure time of 1 sec and an aperture of f/1.0.
Example: If f/16 and 1/4 second, then this is:
(N² / t) = (16 × 16 ÷ 1/4) = (16 × 16 × 4) = 1024.
Log₂(1024) is EV 10. Meaning, 210 = 1024.
The exposure meter in the camera does not know whether the subject itself is bright or not. It simply measures the amount of light that comes in, and makes a guess based on that. The camera will aim for 18% gray, meaning if you take a photo of an entirely white surface, and an entirely black surface you should get two identical images which both are gray (at least in theory)
https://en.wikipedia.org/wiki/Light_meter
For reflected-light meters, camera settings are related to ISO speed and subject luminance by the reflected-light exposure equation:
![]()
where
For incident-light meters, camera settings are related to ISO speed and subject illuminance by the incident-light exposure equation:

where
Two values for K are in common use: 12.5 (Canon, Nikon, and Sekonic) and 14 (Minolta, Kenko, and Pentax); the difference between the two values is approximately 1/6 EV.
For C a value of 250 is commonly used.
Nonetheless, it is common practice among photographic equipment manufacturers to also express luminance in EV for ISO 100 speed. Using K = 12.5, the relationship between EV at ISO 100 and luminance L is then :
L = 2(EV-3)
The situation with incident-light meters is more complicated than that for reflected-light meters, because the calibration constant C depends on the sensor type. Illuminance is measured with a flat sensor; a typical value for C is 250 with illuminance in lux. Using C = 250, the relationship between EV at ISO 100 and illuminance E is then :
E = 2.5 * 2(EV)
https://nofilmschool.com/2018/03/want-easier-and-faster-way-calculate-exposure-formula
Three basic factors go into the exposure formula itself instead: aperture, shutter, and ISO. Plus a light meter calibration constant.
f-stop²/shutter (in seconds) = lux * ISO/C
If you at least know four of those variables, you’ll be able to calculate the missing value.
So, say you want to figure out how much light you’re going to need in order to shoot at a certain f-stop. Well, all you do is plug in your values (you should know the f-stop, ISO, and your light meter calibration constant) into the formula below:
lux = C (f-stop²/shutter (in seconds))/ISO
Exposure Value Calculator:
https://snapheadshots.com/resources/exposure-and-light-calculator
https://www.scantips.com/lights/exposurecalc.html
https://www.pointsinfocus.com/tools/exposure-settings-ev-calculator/#google_vignette
From that perspective, an exposure stop is a measurement of Exposure and provides a universal linear scale to measure the increase and decrease in light, exposed to the image sensor, due to changes in shutter speed, iso & f-stop.
+-1 stop is a doubling or halving of the amount of light let in when taking a photo.
1 EV is just another way to say one stop of exposure change.
One major use of EV (Exposure Value) is just to measure any change of exposure, where one EV implies a change of one stop of exposure. Like when we compensate our picture in the camera.
If the picture comes out too dark, our manual exposure could correct the next one by directly adjusting one of the three exposure controls (f/stop, shutter speed, or ISO). Or if using camera automation, the camera meter is controlling it, but we might apply +1 EV exposure compensation (or +1 EV flash compensation) to make the result goal brighter, as desired. This use of 1 EV is just another way to say one stop of exposure change.
On a perfect day the difference from sampling the sky vs the sun exposure with diffusing spot meters is about 3.2 exposure difference.
 ~15.4 EV for the sun
 ~12.2 EV for the sky
That is as a ballpark. All still influenced by surroundings, accuracy parameters, fov of the sensor…

EV calculator
https://www.scantips.com/lights/evchart.html#calc
http://www.fredparker.com/ultexp1.htm
Exposure value is basically used to indicate an interval on the photographic exposure scale, with a difference of 1 EV corresponding to a standard power-of-2 exposure step, also commonly referred to as a “stop”.
https://contrastly.com/a-guide-to-understanding-exposure-value-ev/
All you can hope to measure with your camera and some images is the relative reflected luminance. Even if you have the camera settings. https://en.wikipedia.org/wiki/Relative_luminance
If you REALLY want to know the amount of light in absolute radiometric units, you’re going to need to use some kind of absolute light meter or measured light source to calibrate your camera. For references on how to do this, see: Section 2.5 Obtaining Absolute Radiance from http://www.pauldebevec.com/Research/HDR/debevec-siggraph97.pdf
IF you are still trying to gauge relative brightness, the level of the sun in Nuke can vary, but it should be in the thousands. Ie: between 30,000 and 65,0000 rgb value depending on time of the day, season and atmospherics.
The values for a 12 o’clock sun, with the sun sampled at EV 15.5 (shutter 1/30, ISO 100, F22) is 32.000 RGB max values (or 32,000 pixel luminance).
The thing to keep an eye for is the level of contrast between sunny side/fill side. The terminator should be quite obvious, there can be up to 3 stops difference between fill/key in sunny lit objects.
Note: In Foundry’s Nuke, the software will map 18% gray to whatever your center f/stop is set to in the viewer settings (f/8 by default… change that to EV by following the instructions below).
You can experiment with this by attaching an Exposure node to a Constant set to 0.18, setting your viewer read-out to Spotmeter, and adjusting the stops in the node up and down. You will see that a full stop up or down will give you the respective next value on the aperture scale (f8, f11, f16 etc.).
One stop doubles or halves the amount or light that hits the filmback/ccd, so everything works in powers of 2.
So starting with 0.18 in your constant, you will see that raising it by a stop will give you .36 as a floating point number (in linear space), while your f/stop will be f/11 and so on.
If you set your center stop to 0 (see below) you will get a relative readout in EVs, where EV 0 again equals 18% constant gray.
Note: make sure to set your Nuke read node to ‘raw data’

In other words. Setting the center f-stop to 0 means that in a neutral plate, the middle gray in the macbeth chart will equal to exposure value 0. EV 0 corresponds to an exposure time of 1 sec and an aperture of f/1.0.
To switch Foundry’s Nuke’s SpotMeter to return the EV of an image, click on the main viewport, and then press s, this opens the viewer’s properties. Now set the center f-stop to 0 in there. And the SpotMeter in the viewport will change from aperture and fstops to EV.
If you are trying to gauge the EV from the pixel luminance in the image:
– Setting the center f-stop to 0 means that in a neutral plate, the middle 18% gray will equal to exposure value 0.
– So if EV 0 = 0.18 middle gray in nuke which equal to a pixel luminance of 0.18, doubling that value, doubles the EV.
.18 pixel luminance = 0EV
.36 pixel luminance = 1EV
.72 pixel luminance = 2EV
1.46 pixel luminance = 3EV
...
This is a Geometric Progression function: xn = ar(n-1)
The most basic example of this function is 1,2,4,8,16,32,… The sequence starts at 1 and doubles each time, so
And we get:
{a, ar, ar2, ar3, … }
= {1, 1×2, 1×22, 1×23, … }
= {1, 2, 4, 8, … }
In this example the function translates to: n = 2(n-1)
You can graph this curve through this expression: x = 2(y-1) :

You can go back and forth between the two values through a geometric progression function and a log function:
(Note: in a spreadsheet this is: = POWER(2; cell# -1) and =LOG(cell#, 2)+1) )
| 2(y-1) | log2(x)+1 |
| x | y |
| 1 | 1 |
| 2 | 2 |
| 4 | 3 |
| 8 | 4 |
| 16 | 5 |
| 32 | 6 |
| 64 | 7 |
| 128 | 8 |
| 256 | 9 |
| 512 | 10 |
| 1024 | 11 |
| 2048 | 12 |
| 4096 | 13 |
Translating this into a geometric progression between an image pixel luminance and EV:
https://www.translatorscafe.com/unit-converter/en-US/illumination/1-11/

The power output of a light source is measured using the unit of watts W. This is a direct measure to calculate how much power the light is going to drain from your socket and it is not relatable to the light brightness itself.
The amount of energy emitted from it per second. That energy comes out in a form of photons which we can crudely represent with rays of light coming out of the source. The higher the power the more rays emitted from the source in a unit of time.
Not all energy emitted is visible to the human eye, so we often rely on photometric measurements, which takes in account the sensitivity of human eye to different wavelenghts


Details in the post
(more…)
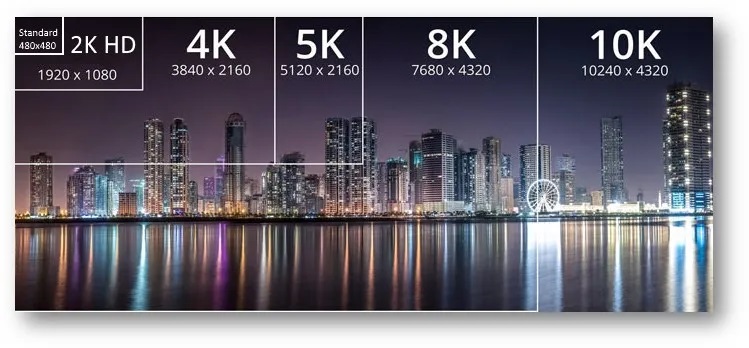
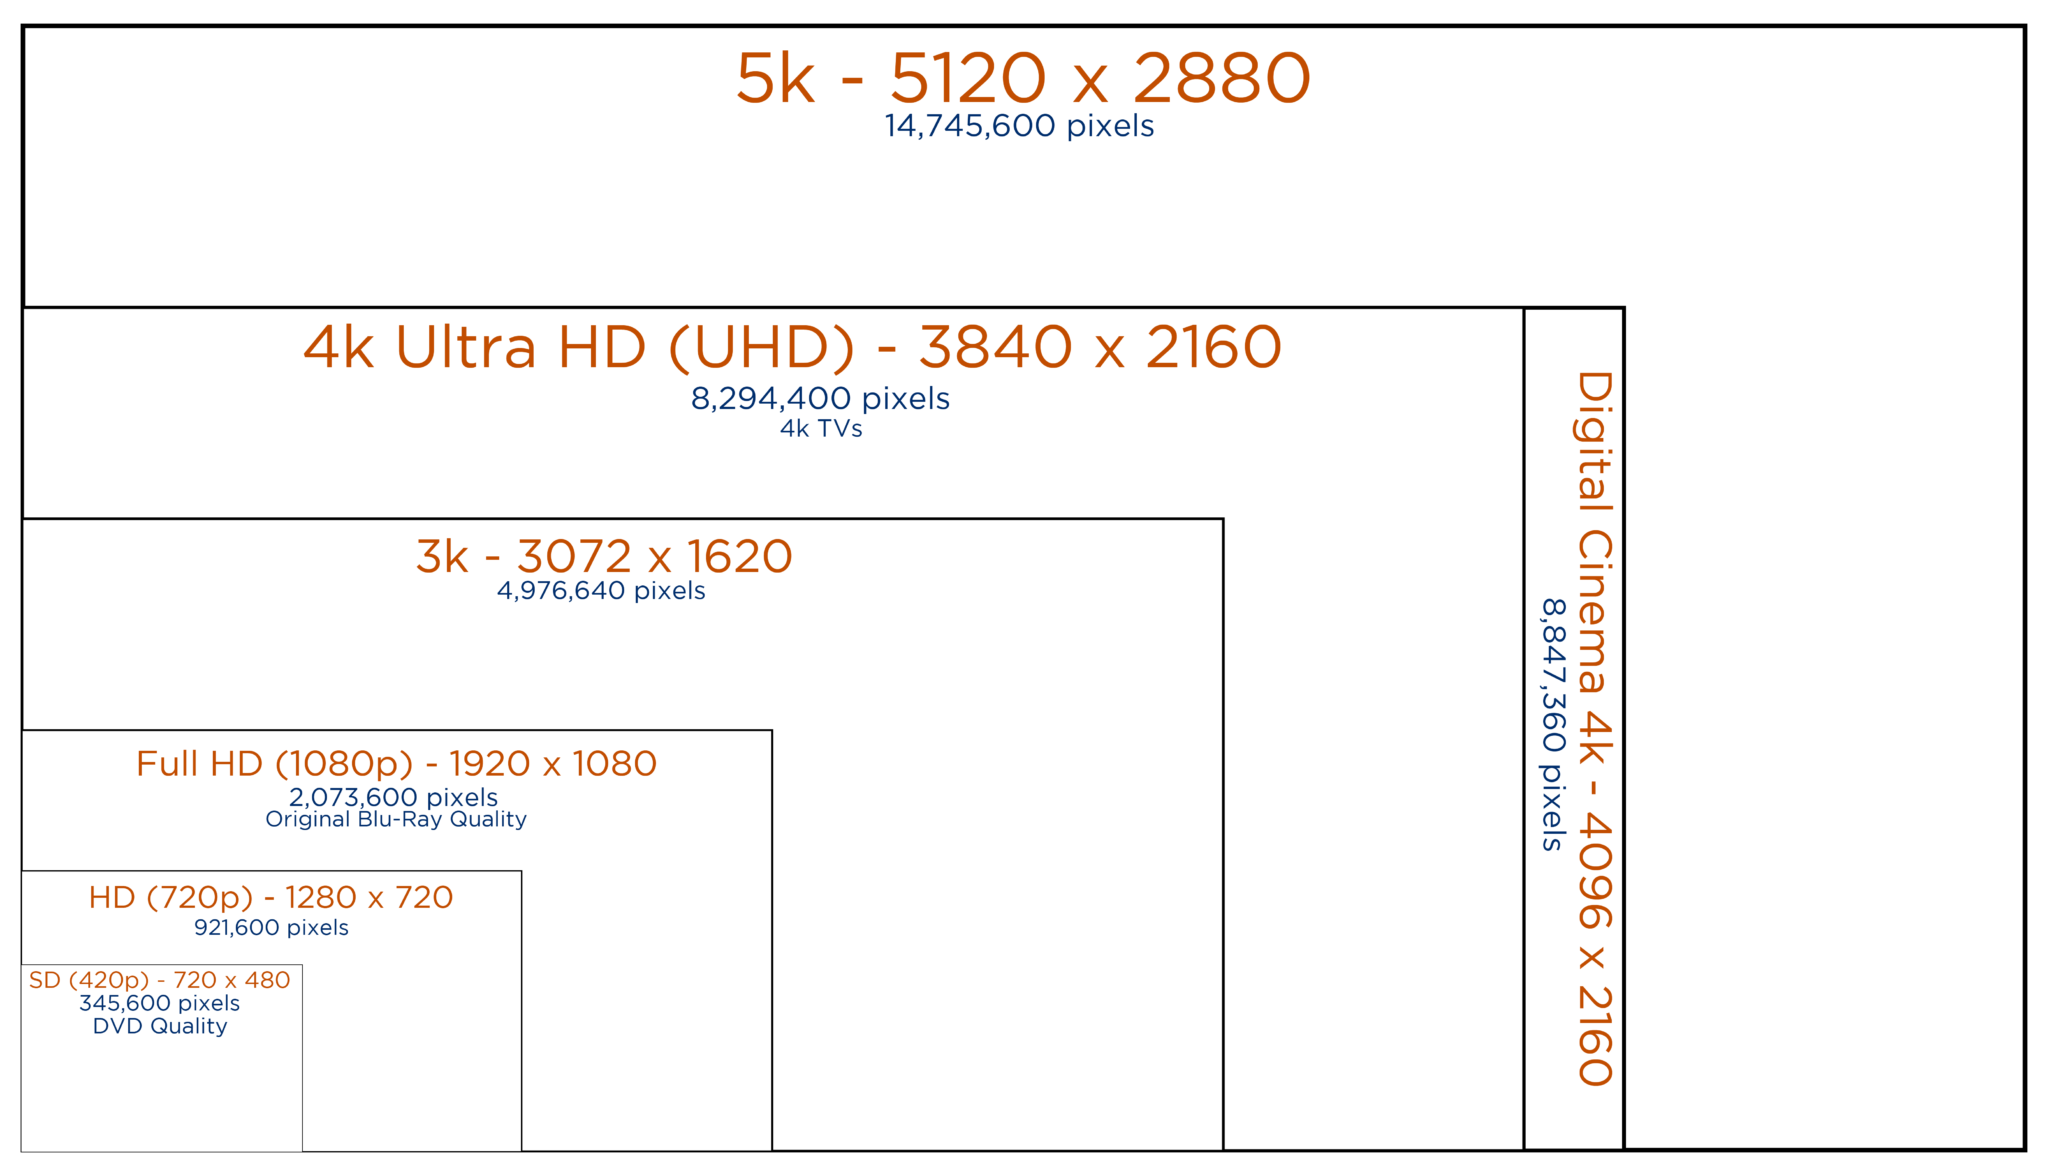
| Resolution – Aspect Ratio | 4:03 | 16:09 | 16:10 | 3:02 | 5:03 | 5:04 |
| CGA | 320 x 200 | |||||
| QVGA | 320 x 240 | |||||
| VGA (SD, Standard Definition) | 640 x 480 | |||||
| NTSC | 720 x 480 | |||||
| WVGA | 854 x 450 | |||||
| WVGA | 800 x 480 | |||||
| PAL | 768 x 576 | |||||
| SVGA | 800 x 600 | |||||
| XGA | 1024 x 768 | |||||
| not named | 1152 x 768 | |||||
| HD 720 (720P, High Definition) | 1280 x 720 | |||||
| WXGA | 1280 x 800 | |||||
| WXGA | 1280 x 768 | |||||
| SXGA | 1280 x 1024 | |||||
| not named (768P, HD, High Definition) | 1366 x 768 | |||||
| not named | 1440 x 960 | |||||
| SXGA+ | 1400 x 1050 | |||||
| WSXGA | 1680 x 1050 | |||||
| UXGA (2MP) | 1600 x 1200 | |||||
| HD1080 (1080P, Full HD) | 1920 x 1080 | |||||
| WUXGA | 1920 x 1200 | |||||
| 2K | 2048 x (any) | |||||
| QWXGA | 2048 x 1152 | |||||
| QXGA (3MP) | 2048 x 1536 | |||||
| WQXGA | 2560 x 1600 | |||||
| QHD (Quad HD) | 2560 x 1440 | |||||
| QSXGA (5MP) | 2560 x 2048 | |||||
| 4K UHD (4K, Ultra HD, Ultra-High Definition) | 3840 x 2160 | |||||
| QUXGA+ | 3840 x 2400 | |||||
| IMAX 3D | 4096 x 3072 | |||||
| 8K UHD (8K, 8K Ultra HD, UHDTV) | 7680 x 4320 | |||||
| 10K (10240×4320, 10K HD) | 10240 x (any) | |||||
| 16K (Quad UHD, 16K UHD, 8640P) | 15360 x 8640 |
http://www.calculator.org/property.aspx?name=solid+angle

A measure of how large the object appears to an observer looking from that point. Thus. A measure for objects in the sky. Useful to retuen the size of the sun and moon… and in perspective, how much of their contribution to lighting. Solid angle can be represented in ‘angular diameter’ as well.
http://en.wikipedia.org/wiki/Solid_angle
http://www.mathsisfun.com/geometry/steradian.html
A solid angle is expressed in a dimensionless unit called a steradian (symbol: sr). By default in terms of the total celestial sphere and before atmospheric’s scattering, the Sun and the Moon subtend fractional areas of 0.000546% (Sun) and 0.000531% (Moon).
http://en.wikipedia.org/wiki/Solid_angle#Sun_and_Moon
On earth the sun is likely closer to 0.00011 solid angle after athmospheric scattering. The sun as perceived from earth has a diameter of 0.53 degrees. This is about 0.000064 solid angle.
http://www.numericana.com/answer/angles.htm
The mean angular diameter of the full moon is 2q = 0.52° (it varies with time around that average, by about 0.009°). This translates into a solid angle of 0.0000647 sr, which means that the whole night sky covers a solid angle roughly one hundred thousand times greater than the full moon.
More info
http://lcogt.net/spacebook/using-angles-describe-positions-and-apparent-sizes-objects
http://amazing-space.stsci.edu/glossary/def.php.s=topic_astronomy
Angular Size
The apparent size of an object as seen by an observer; expressed in units of degrees (of arc), arc minutes, or arc seconds. The moon, as viewed from the Earth, has an angular diameter of one-half a degree.
The angle covered by the diameter of the full moon is about 31 arcmin or 1/2°, so astronomers would say the Moon’s angular diameter is 31 arcmin, or the Moon subtends an angle of 31 arcmin.

Also see:
https://www.pixelsham.com/2018/11/22/exposure-value-measurements/
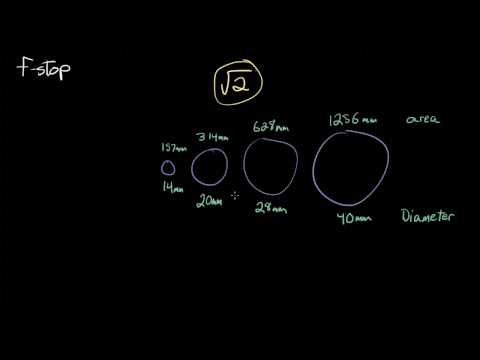
https://www.pixelsham.com/2016/03/03/f-stop-vs-t-stop/

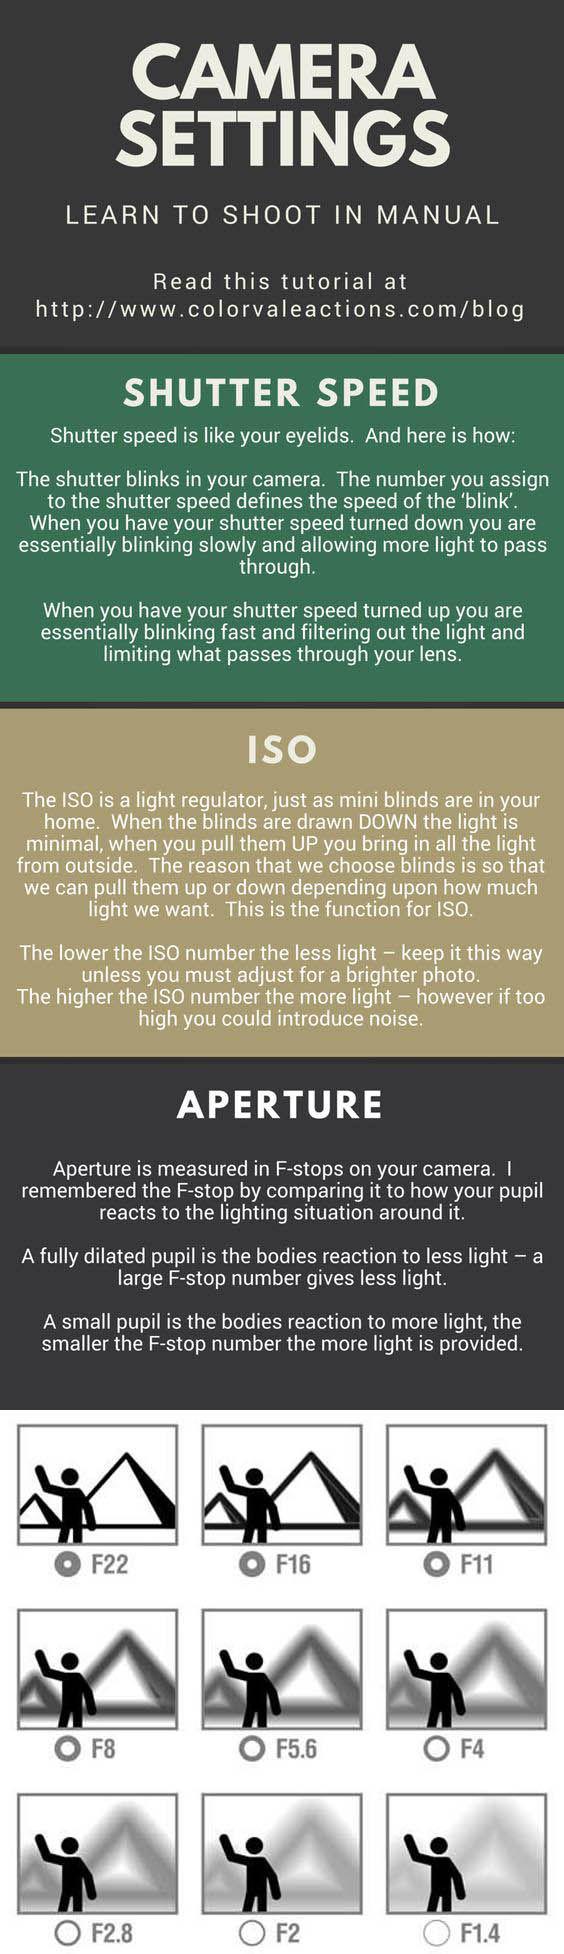
An exposure stop is a unit measurement of Exposure as such it provides a universal linear scale to measure the increase and decrease in light, exposed to the image sensor, due to changes in shutter speed, iso and f-stop.
+-1 stop is a doubling or halving of the amount of light let in when taking a photo
1 EV (exposure value) is just another way to say one stop of exposure change.
https://www.photographymad.com/pages/view/what-is-a-stop-of-exposure-in-photography
Same applies to shutter speed, iso and aperture.
Doubling or halving your shutter speed produces an increase or decrease of 1 stop of exposure.
Doubling or halving your iso speed produces an increase or decrease of 1 stop of exposure.


Because of the way f-stop numbers are calculated (ratio of focal length/lens diameter, where focal length is the distance between the lens and the sensor), an f-stop doesn’t relate to a doubling or halving of the value, but to the doubling/halving of the area coverage of a lens in relation to its focal length. And as such, to a multiplying or dividing by 1.41 (the square root of 2). For example, going from f/2.8 to f/4 is a decrease of 1 stop because 4 = 2.8 * 1.41. Changing from f/16 to f/11 is an increase of 1 stop because 11 = 16 / 1.41.

A wider aperture means that light proceeding from the foreground, subject, and background is entering at more oblique angles than the light entering less obliquely.
Consider that absolutely everything is bathed in light, therefore light bouncing off of anything is effectively omnidirectional. Your camera happens to be picking up a tiny portion of the light that’s bouncing off into infinity.
Now consider that the wider your iris/aperture, the more of that omnidirectional light you’re picking up:

When you have a very narrow iris you are eliminating a lot of oblique light. Whatever light enters, from whatever distance, enters moderately parallel as a whole. When you have a wide aperture, much more light is entering at a multitude of angles. Your lens can only focus the light from one depth – the foreground/background appear blurred because it cannot be focused on.
https://frankwhitephotography.com/index.php?id=28:what-is-a-stop-in-photography

The great thing about stops is that they give us a way to directly compare shutter speed, aperture diameter, and ISO speed. This means that we can easily swap these three components about while keeping the overall exposure the same.
http://lifehacker.com/how-aperture-shutter-speed-and-iso-affect-pictures-sh-1699204484

https://www.techradar.com/how-to/the-exposure-triangle

https://www.videoschoolonline.com/what-is-an-exposure-stop
Note. All three of these measurements (aperture, shutter, iso) have full stops, half stops and third stops, but if you look at the numbers they aren’t always consistent. For example, a one third stop between ISO100 and ISO 200 would be ISO133, yet most cameras are marked at ISO125.

Third-stops are especially important as they’re the increment that most cameras use for their settings. These are just imaginary divisions in each stop.
From a practical standpoint manufacturers only standardize the full stops, meaning that while they try and stay somewhat consistent there is some rounding up going on between the smaller numbers.


Note that ND Filters directly modify the exposure triangle.


Color Temperature of a light source describes the spectrum of light which is radiated from a theoretical “blackbody” (an ideal physical body that absorbs all radiation and incident light – neither reflecting it nor allowing it to pass through) with a given surface temperature.
https://en.wikipedia.org/wiki/Color_temperature
Or. Most simply it is a method of describing the color characteristics of light through a numerical value that corresponds to the color emitted by a light source, measured in degrees of Kelvin (K) on a scale from 1,000 to 10,000.
More accurately. The color temperature of a light source is the temperature of an ideal backbody that radiates light of comparable hue to that of the light source.
As such, the color temperature of a light source is a numerical measurement of its color appearance. It is based on the principle that any object will emit light if it is heated to a high enough temperature, and that the color of that light will shift in a predictable manner as the temperature is increased. The system is based on the color changes of a theoretical “blackbody radiator” as it is heated from a cold black to a white hot state.
So, why do we measure the hue of the light as a “temperature”? This was started in the late 1800s, when the British physicist William Kelvin heated a block of carbon. It glowed in the heat, producing a range of different colors at different temperatures. The black cube first produced a dim red light, increasing to a brighter yellow as the temperature went up, and eventually produced a bright blue-white glow at the highest temperatures. In his honor, Color Temperatures are measured in degrees Kelvin, which are a variation on Centigrade degrees. Instead of starting at the temperature water freezes, the Kelvin scale starts at “absolute zero,” which is -273 Centigrade.
More about black bodies here: https://www.pixelsham.com/2013/03/14/black-body-color

Details in the post
https://en.wikipedia.org/wiki/Focal_length
The focal length of an optical system is a measure of how strongly the system converges or diverges light.
Without getting into an in-depth physics discussion, the focal length of a lens is an optical property of the lens.
The exact definition is: Focal length measures the distance, in millimeters, between the “nodal point” of the lens and the camera’s sensor.
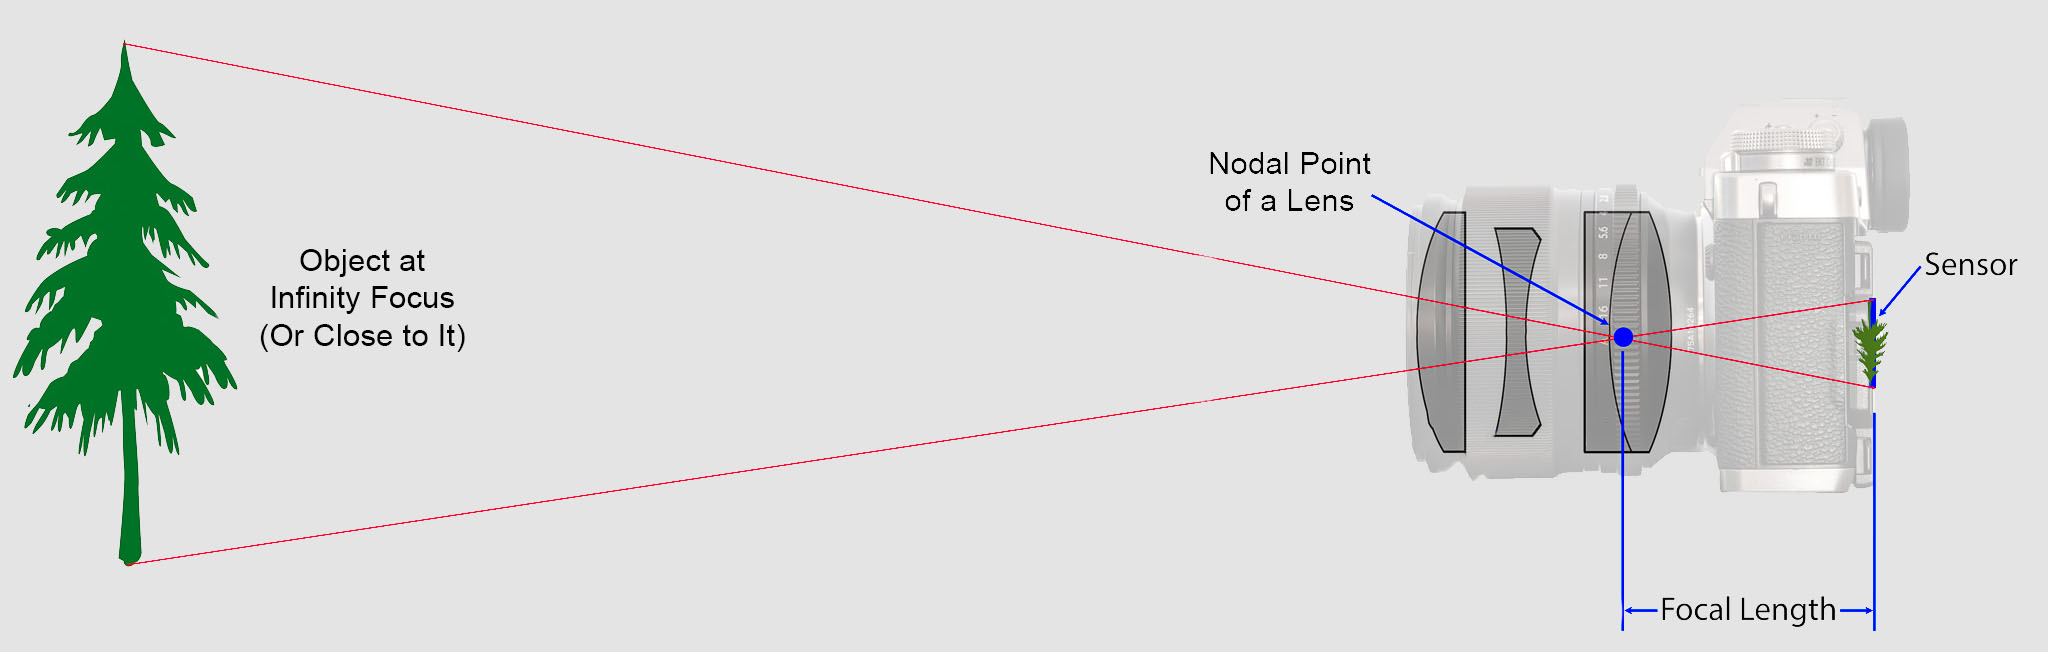
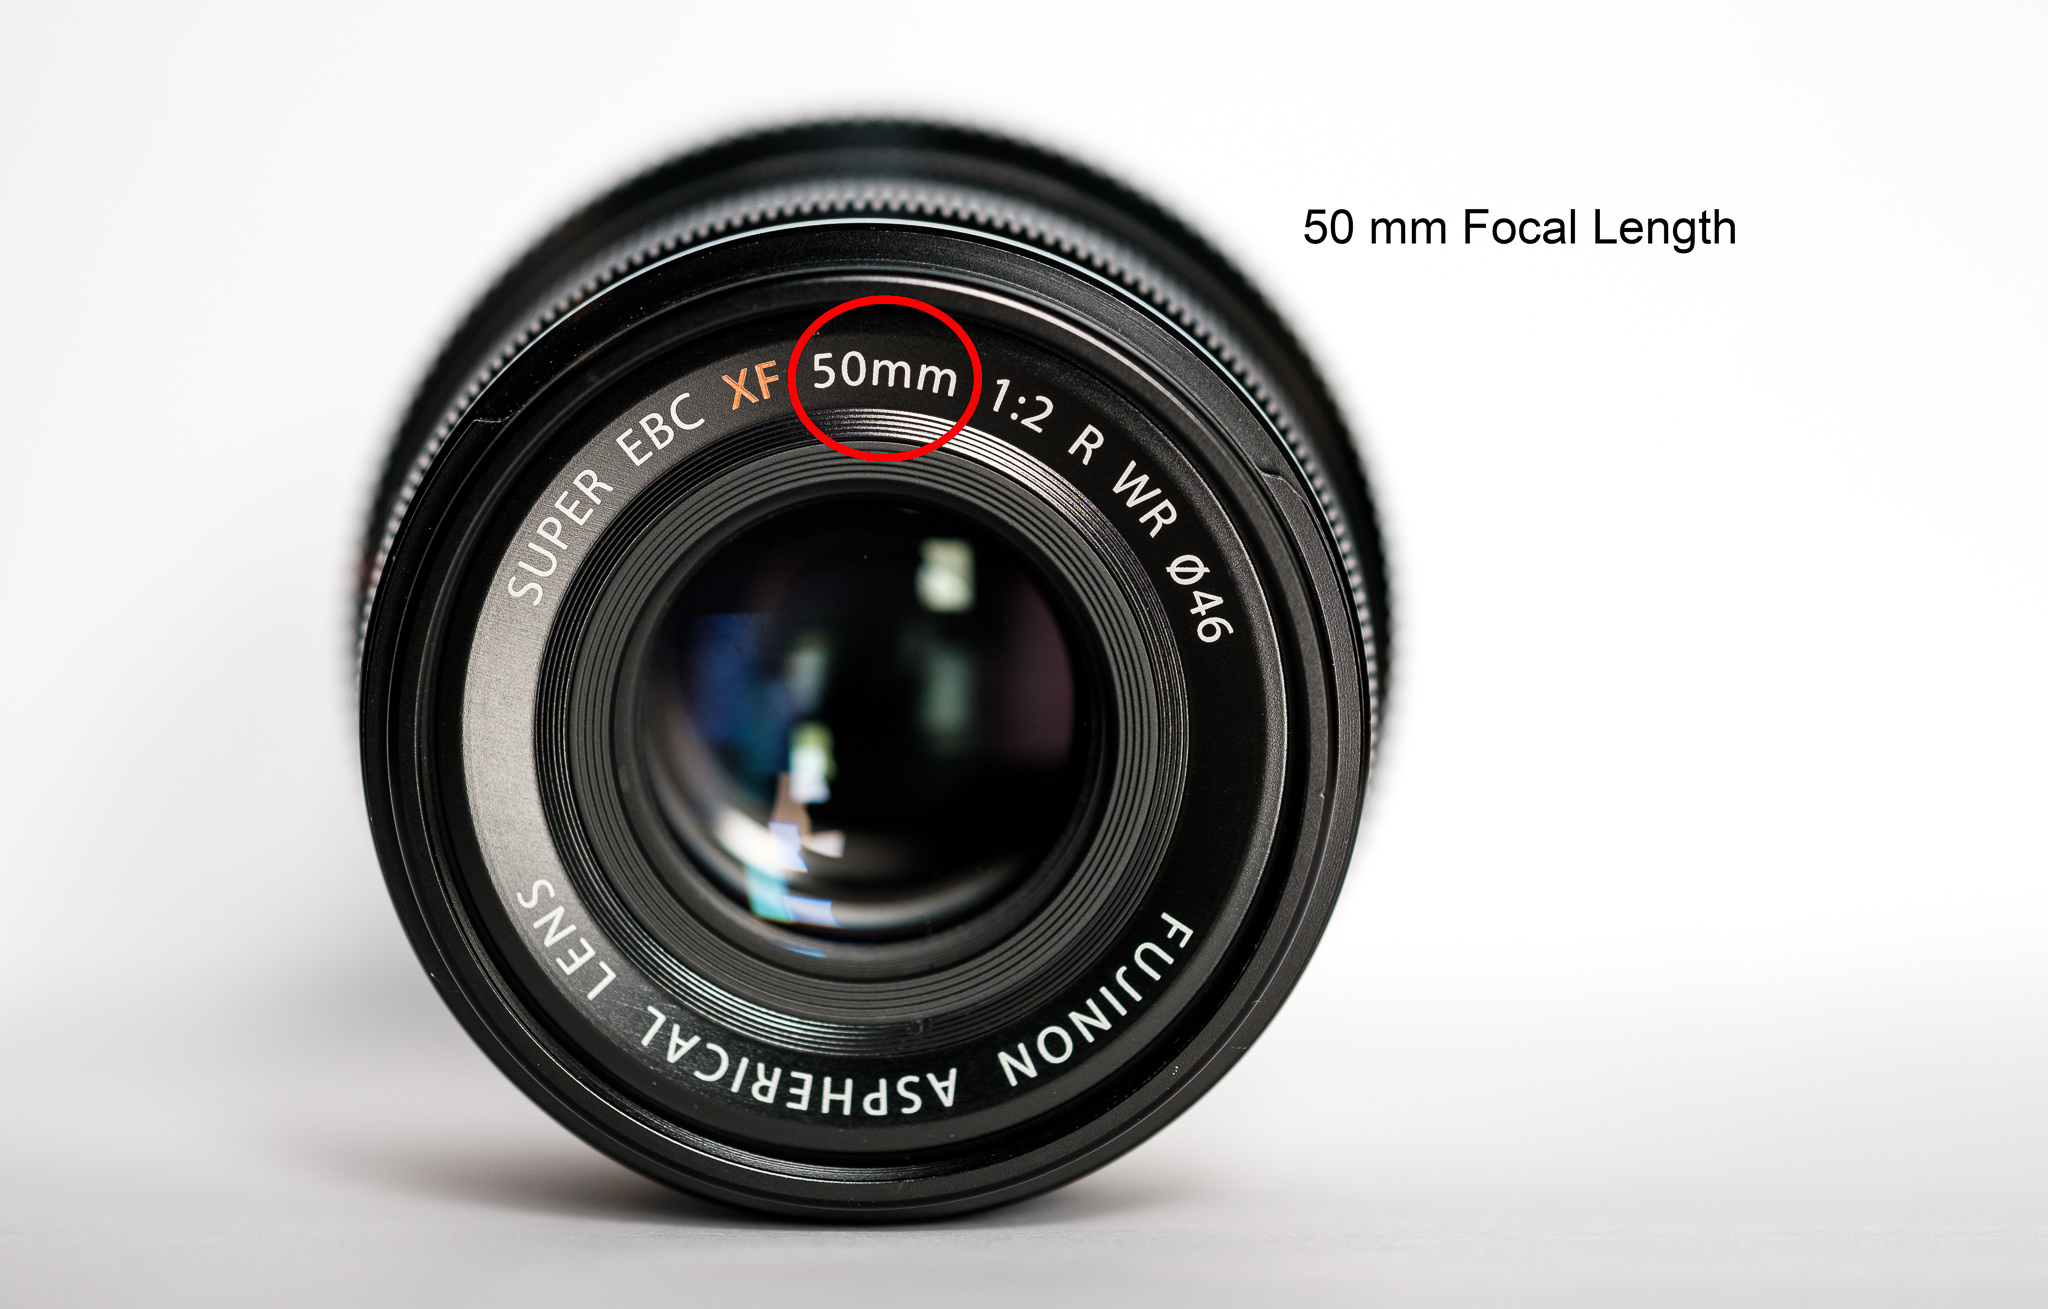
Lenses are named by their focal length. You can find this information on the barrel of the lens, and almost every camera lens ever made will prominently display the focal length. For example, a 50mm lens has a focal length of 50 millimeters.
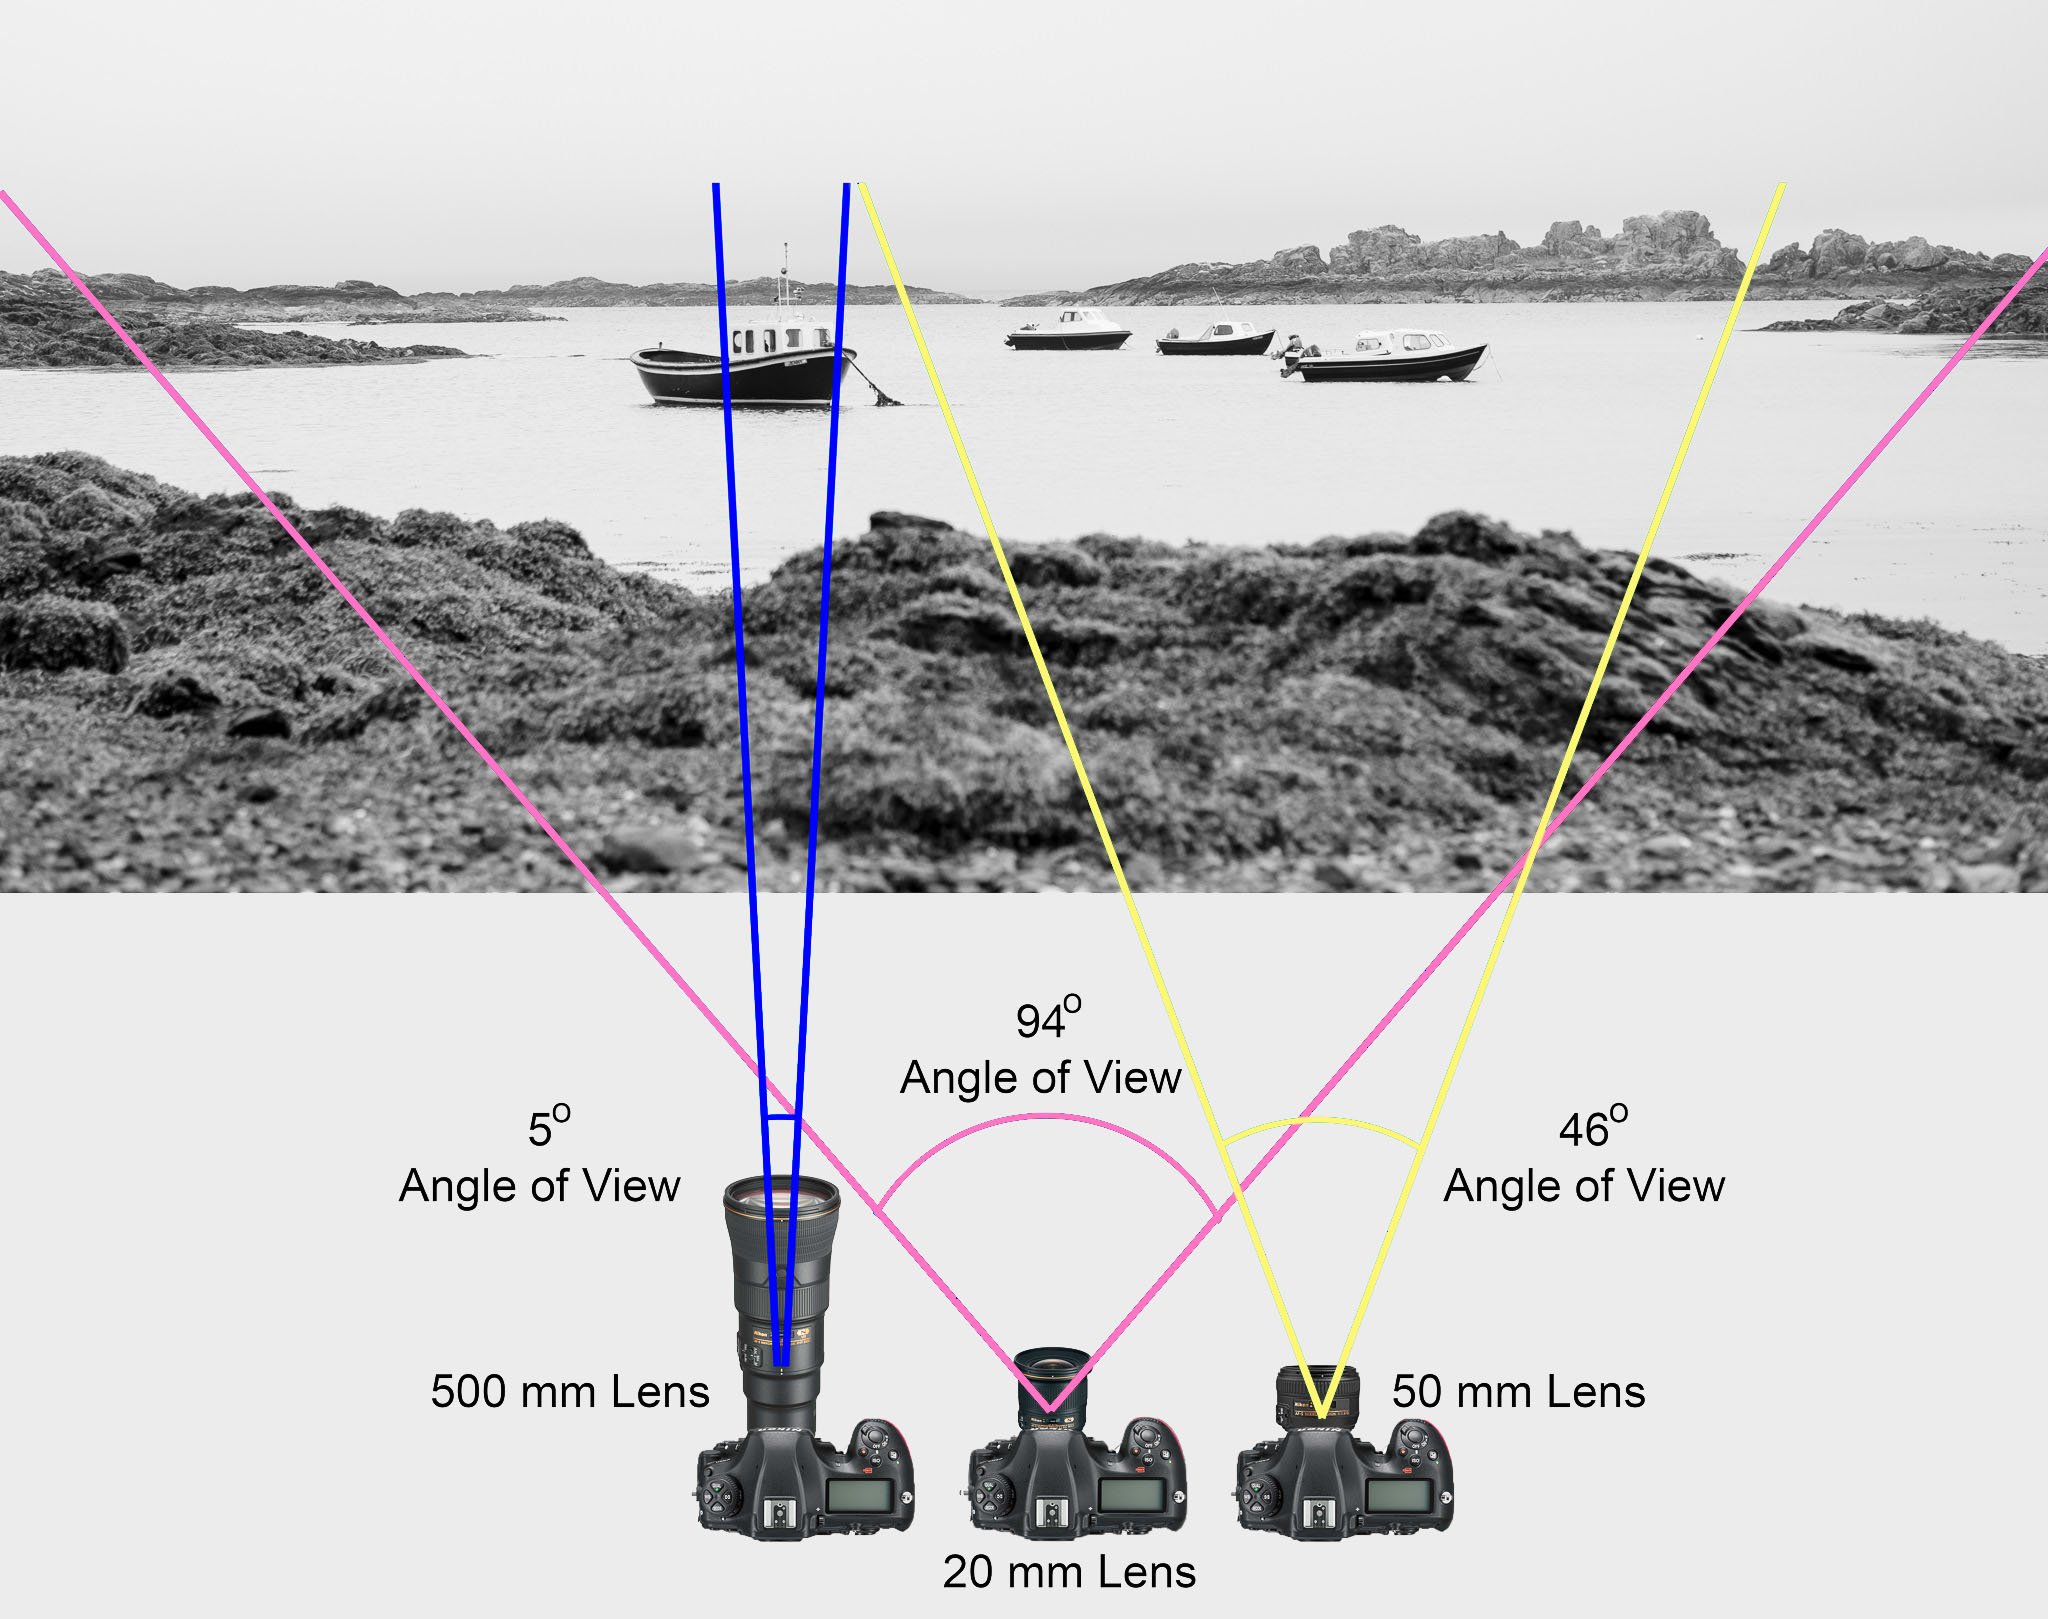
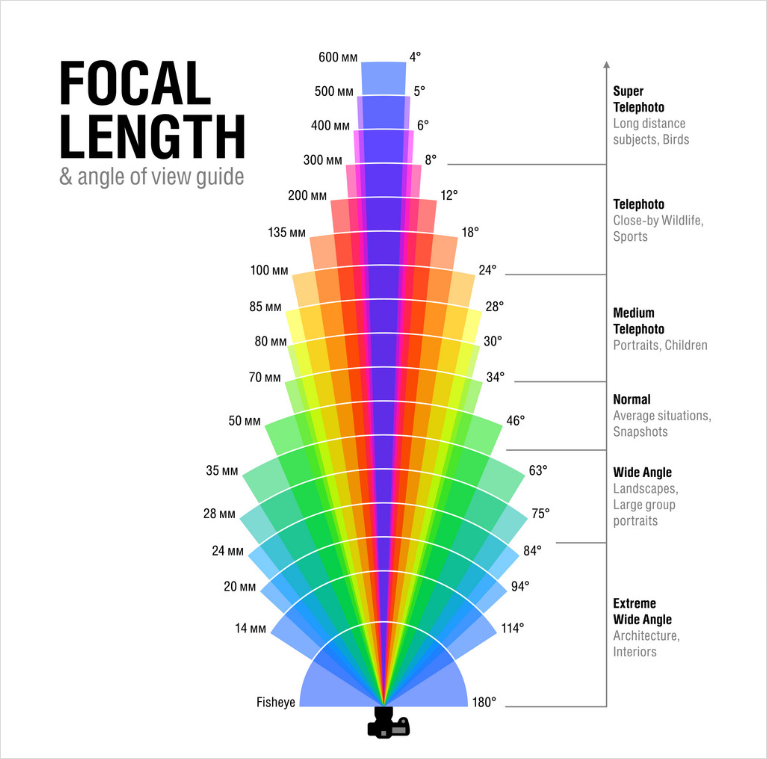
In most photography and all telescopy, where the subject is essentially infinitely far away, longer focal length (lower optical power) leads to higher magnification and a narrower angle of view;
Conversely, shorter focal length or higher optical power is associated with lower magnification and a wider angle of view.
On the other hand, in applications such as microscopy in which magnification is achieved by bringing the object close to the lens, a shorter focal length (higher optical power) leads to higher magnification because the subject can be brought closer to the center of projection.
Focal length is important because it relates to the field of view of a lens – that is, how much of the scene you’ll capture. It also explains how large or small a subject in your photo will appear.
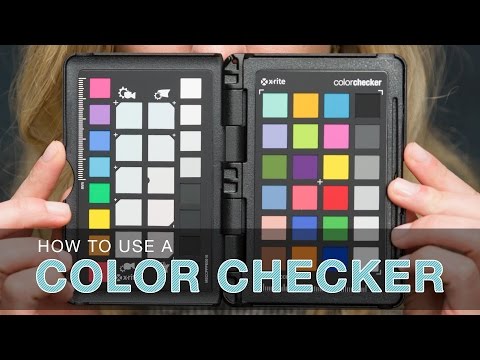
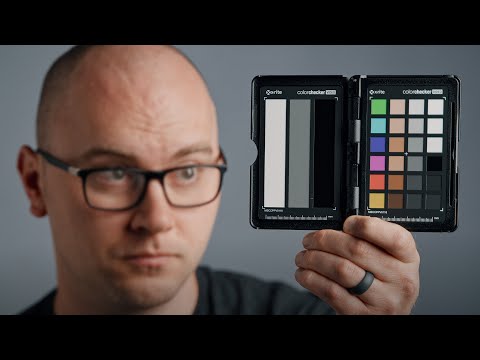
Start here: https://www.pixelsham.com/2013/05/09/gretagmacbeth-color-checker-numeric-values/
https://www.studiobinder.com/blog/what-is-a-color-checker-tool/


In LightRoom
in Final Cut
in Nuke
Note: In Foundry’s Nuke, the software will map 18% gray to whatever your center f/stop is set to in the viewer settings (f/8 by default… change that to EV by following the instructions below).
You can experiment with this by attaching an Exposure node to a Constant set to 0.18, setting your viewer read-out to Spotmeter, and adjusting the stops in the node up and down. You will see that a full stop up or down will give you the respective next value on the aperture scale (f8, f11, f16 etc.).
One stop doubles or halves the amount or light that hits the filmback/ccd, so everything works in powers of 2.
So starting with 0.18 in your constant, you will see that raising it by a stop will give you .36 as a floating point number (in linear space), while your f/stop will be f/11 and so on.
If you set your center stop to 0 (see below) you will get a relative readout in EVs, where EV 0 again equals 18% constant gray.
In other words. Setting the center f-stop to 0 means that in a neutral plate, the middle gray in the macbeth chart will equal to exposure value 0. EV 0 corresponds to an exposure time of 1 sec and an aperture of f/1.0.
This will set the sun usually around EV12-17 and the sky EV1-4 , depending on cloud coverage.
To switch Foundry’s Nuke’s SpotMeter to return the EV of an image, click on the main viewport, and then press s, this opens the viewer’s properties. Now set the center f-stop to 0 in there. And the SpotMeter in the viewport will change from aperture and fstops to EV.
Depth of field is the range within which focusing is resolved in a photo.
Aperture has a huge affect on to the depth of field.

Changing the f-stops (f/#) of a lens will change aperture and as such the DOF.
f-stops are a just certain number which is telling you the size of the aperture. That’s how f-stop is related to aperture (and DOF).
If you increase f-stops, it will increase DOF, the area in focus (and decrease the aperture). On the other hand, decreasing the f-stop it will decrease DOF (and increase the aperture).
The red cone in the figure is an angular representation of the resolution of the system. Versus the dotted lines, which indicate the aperture coverage. Where the lines of the two cones intersect defines the total range of the depth of field.
This image explains why the longer the depth of field, the greater the range of clarity.

https://www.premiumbeat.com/blog/understanding-lenses-aperture-f-stop-t-stop/
F-stops are the theoretical amount of light transmitted by the lens; t-stops, the actual amount. The difference is about 1/3 stop, often more with zooms.
f-stop is the measurement of the opening (aperture) of the lens in relation to its focal length (the distance between the lens and the sensor). The math is focal length / lens diameter.
It mainly controls depth of field, given a known amount of light.
https://www.scantips.com/lights/fstop2.html
The smaller f-stop (larger aperture) the more depth of field and light.
Note that the numbers in an aperture—f/2.8, f/8—signify a certain amount of light, but that doesn’t necessarily mean that’s directly how much light is getting to your sensor.
T stop on the other hand is the measurement of how much light passes through aforementioned opening and actually makes it to the sensor. There is no such a lens which does not steal some light on the way to the sensor.
In short, is the corrected f-stop number you want to collect, based on the amount of light reaching the sensor after bouncing through all the lenses, to know exactly what is making it to film. The smaller, the more light.
http://www.dxomark.com/Lenses/Ratings/Optical-Metric-Scores
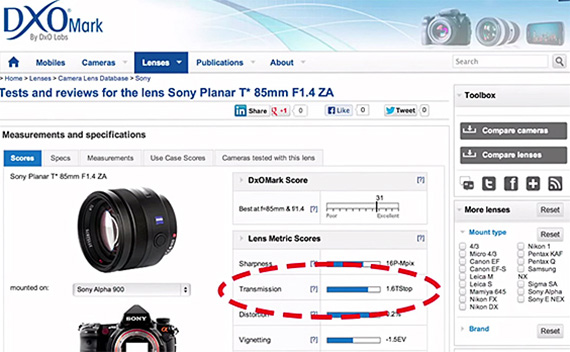
Note that exposure stop is a measurement of sensibility to light not of lens capabilities.
http://www.shutterangle.com/2012/cinematic-look-frame-rate-shutter-speed/
https://www.cinema5d.com/global-vs-rolling-shutter/
https://www.wikihow.com/Choose-a-Camera-Shutter-Speed
https://www.provideocoalition.com/shutter-speed-vs-shutter-angle/
Shutter is the device that controls the amount of light through a lens. Basically in general it controls the amount of time a film is exposed.
Shutter speed is how long this device is open for, which also defines motion blur… the longer it stays open the blurrier the image captured.
The number refers to the amount of light actually allowed through.
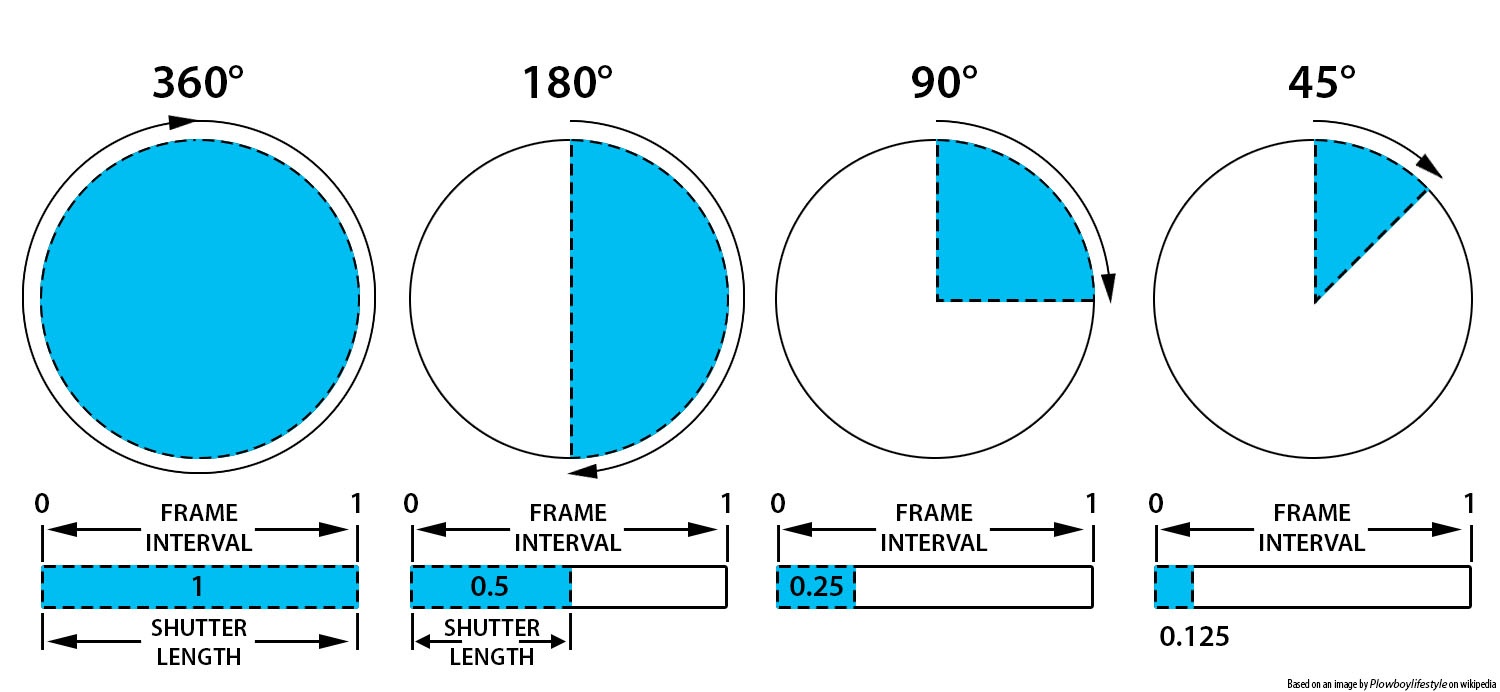
As a reference, shooting at 24fps, at 180 shutter angle or 1/48th of shutter speed (0.0208 exposure time) will produce motion blur which is similar to what we perceive at naked eye
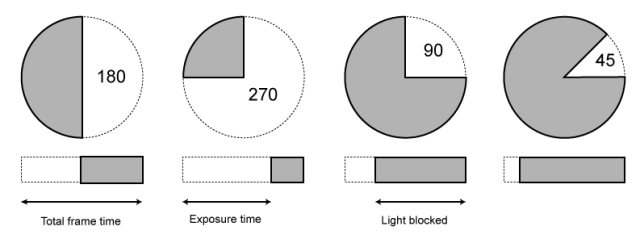
Talked of as in (shutter) angles, for historical reasons, as the original exposure mechanism was controlled through a pie shaped mirror in front of the lens.
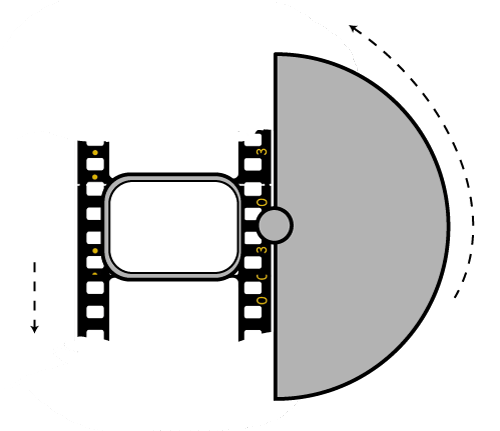
A shutter of 180 degrees is blocking/allowing light for half circle. (half blocked, half open). 270 degrees is one quarter pie shaped, which would allow for a higher exposure time (3 quarter pie open, vs one quarter closed) 90 degrees is three quarter pie shaped, which would allow for a lower exposure (one quarter open, three quarters closed)
The shutter angle can be converted back and fort with shutter speed with the following formulas:
https://www.provideocoalition.com/shutter-speed-vs-shutter-angle/
shutter angle =
(360 * fps) * (1/shutter speed)
or
(360 * fps) / shutter speed
shutter speed =
(360 * fps) * (1/shutter angle)
or
(360 * fps) / shutter angle
For example here is a chart from shutter angle to shutter speed at 24 fps:
270 = 1/32
180 = 1/48
172.8 = 1/50
144 = 1/60
90 = 1/96
72 = 1/120
45 = 1/198
22.5 = 1/348
11 = 1/696
8.6 = 1/1000
The above is basically the relation between the way a video camera calculates shutter (fractions of a second) and the way a film camera calculates shutter (in degrees).
Smaller shutter angles show strobing artifacts. As the camera only ever sees at least half of the time (for a typical 180 degree shutter). Due to being obscured by the shutter during that period, it doesn’t capture the scene continuously.
This means that fast moving objects, and especially objects moving across the frame, will exhibit jerky movement. This is called strobing. The defect is also very noticeable during pans. Smaller shutter angles (shorter exposure) exhibit more pronounced strobing effects.
Larger shutter angles show more motion blur. As the longer exposure captures more motion.
Note that in 3D you want to first sum the total of the shutter open and shutter close values, than compare that to the shutter angle aperture, ie:
shutter open -0.0625
shutter close 0.0625
Total shutter = 0.0625+0.0625 = 0.125
Shutter angle = 360*0.125 = 45
shutter open -0.125
shutter close 0.125
Total shutter = 0.125+0.125 = 0.25
Shutter angle = 360*0.25 = 90
shutter open -0.25
shutter close 0.25
Total shutter = 0.25+0.25 = 0.5
Shutter angle = 360*0.5 = 180
shutter open -0.375
shutter close 0.375
Total shutter = 0.375+0.375 = 0.75
Shutter angle = 360*0.75 = 270
Faster frame rates can resolve both these issues.

COLLECTIONS
| Featured AI
| Design And Composition
| Explore posts
POPULAR SEARCHES
unreal | pipeline | virtual production | free | learn | photoshop | 360 | macro | google | nvidia | resolution | open source | hdri | real-time | photography basics | nuke
FEATURED POSTS
Social Links
DISCLAIMER – Links and images on this website may be protected by the respective owners’ copyright. All data submitted by users through this site shall be treated as freely available to share.