80.lv/articles/scientists-create-salt-grain-sized-hi-res-camera/


3Dprinting (178) A.I. (838) animation (349) blender (207) colour (233) commercials (52) composition (152) cool (364) design (648) Featured (79) hardware (313) IOS (109) jokes (138) lighting (288) modeling (144) music (186) photogrammetry (190) photography (754) production (1291) python (93) quotes (496) reference (314) software (1350) trailers (307) ves (550) VR (221)
www.fxguide.com/fxfeatured/the-definitive-weta-digital-guide-to-ibl
Notes:
NOTE: The goal is to clean the initial individual brackets before or at merging time as much as possible.
This means:
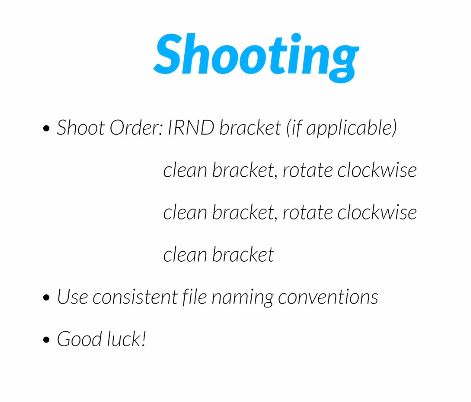
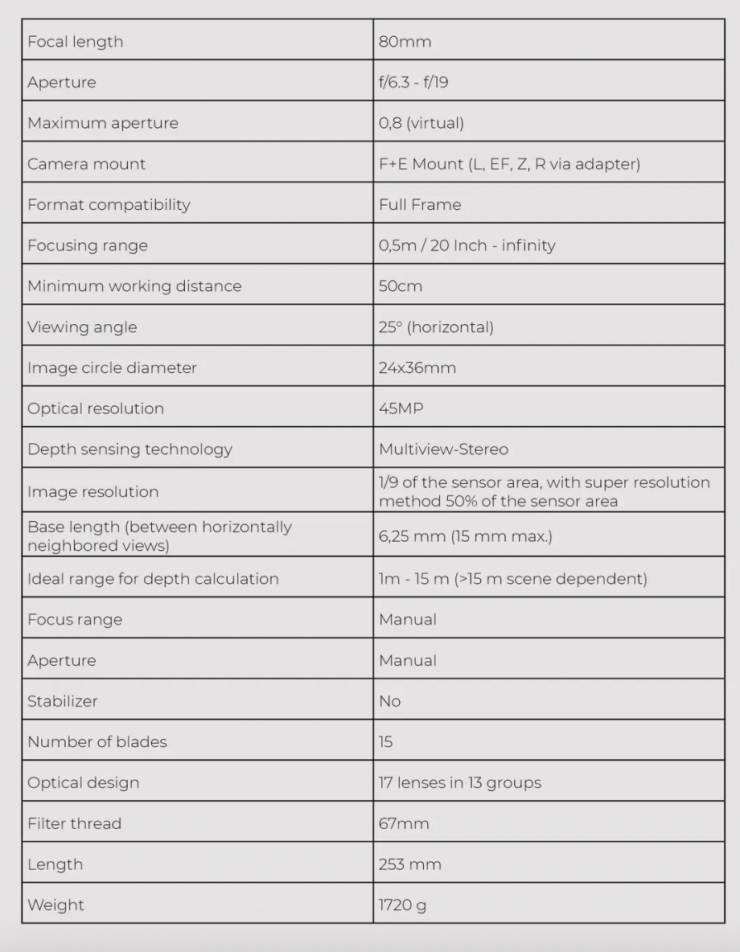
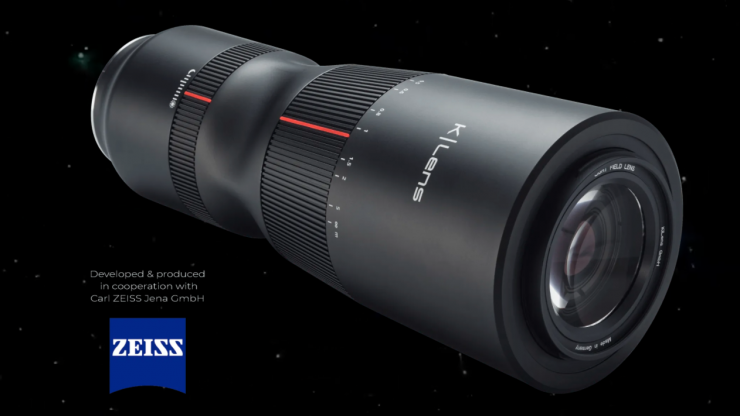
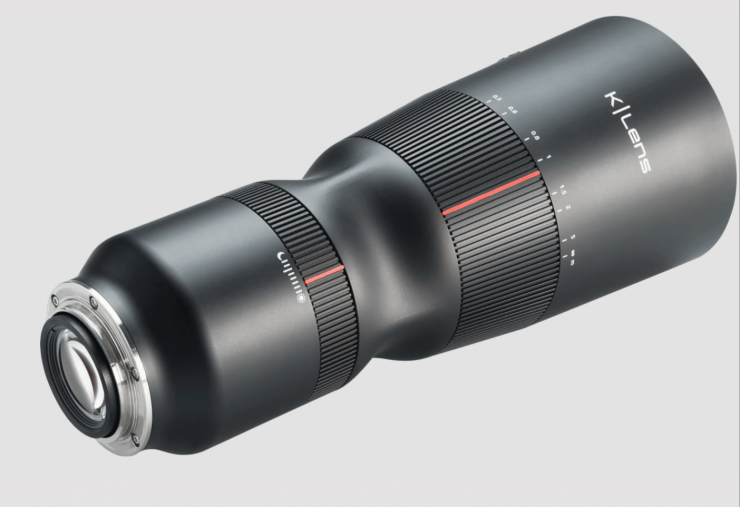
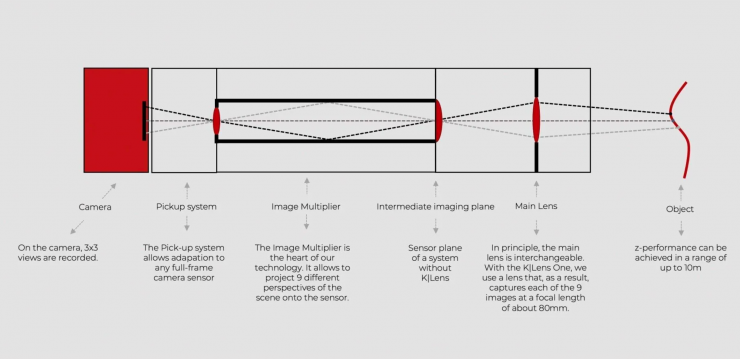
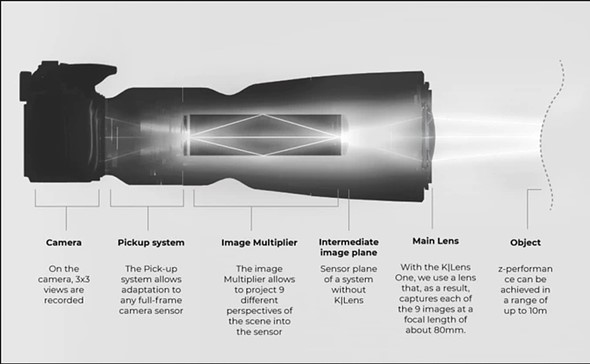
www.newsshooter.com/2021/10/31/klens-one-a-light-field-lens-that-captures-rgb-depth/

A mirror system (Image Multiplier) in the K|Lens splits the light rays into 9 separate images that are mapped on the camera sensor. All 9 of these images have slightly different perspectives. The best way to picture it is if you imagine using 9 separate cameras in a narrow array at the same time.
www.thisiscolossal.com/2021/04/reuben-wu-ex-stasis/

Wu programmed a stick of 200 LED lights to shift in color and shape above the calm landscapes. He captured the mesmerizing movements in-camera, and through a combination of stills, timelapse, and real-time footage, produced four audiovisual works that juxtapose the natural scenery with the artificially produced light and electronic sounds.


To measure the contrast ratio you will need a light meter. The process starts with you measuring the main source of light, or the key light.
Get a reading from the brightest area on the face of your subject. Then, measure the area lit by the secondary light, or fill light. To make sense of what you have just measured you have to understand that the information you have just gathered is in F-stops, a measure of light. With each additional F-stop, for example going one stop from f/1.4 to f/2.0, you create a doubling of light. The reverse is also true; moving one stop from f/8.0 to f/5.6 results in a halving of the light.
Let’s say you grabbed a measurement from your key light of f/8.0. Then, when you measured your fill light area, you get a reading of f/4.0. This will lead you to a contrast ratio of 4:1 because there are two stops between f/4.0 and f/8.0 and each stop doubles the amount of light. In other words, two stops x twice the light per stop = four times as much light at f/8.0 than at f/4.0.

theslantedlens.com/2017/lighting-ratios-photo-video/
Examples in the post
www.studiobinder.com/blog/academy-award-for-best-cinematography-winners
2019 – Roger Deakins, 1917
2018 – Alfonso Cuarón, Roma
2017 – Roger Deakins, Blade Runner 2049
2016 – Linus Sandgren, La La Land
2015 – Emmanuel Lubezki, The Revenant
2014 – Emmanuel Lubezki, Birdman or (The Unexpected Virtue of Ignorance)
2013 – Emmanuel Lubezki, Gravity
2012 – Claudio Miranda, Life of Pi
2011 – Robert Richardson, Hugo
2010 – Wally Pfister, Inception
2009 – Mauro Fiore, Avatar
2008 – Anthony Dod Mantle, Slumdog Millionaire
2007 – Robert Elswit, There Will Be Blood
2006 – Guillermo Navarro, Pan’s Labyrinth
2005 – Dion Beebe, Memoirs of a Geisha
2004 – Robert Richardson, The Aviator
2003 – Russell Boyd, Master and Commander: The Far Side of the World
2002 – Conrad L. Hall, Road to Perdition
2001 – Andrew Lesnie, The Lord of the Rings: The Fellowship of the Ring
2000 – Peter Pau, Crouching Tiger, Hidden Dragon
1999 – Conrad L. Hall, American Beauty
1998 – Janusz Kamiński, Saving Private Ryan
1997 – Russell Carpenter, Titanic
1996 – John Seale, The English Patient
1995 – John Toll, Braveheart
1994 – John Toll, Legends of the Fall
1993 – Janusz Kamiński, Schindler’s List
1992 – Phillipe Rousselot, A River Runs Through It
1991 – Robert Richardson, JFK
1990 – Dean Semler, Dances with Wolves
1989 – Freddie Francis, Glory
1988 – Peter Biziou, Mississippi Burning
1987 – Vittorio Storaro, The Last Emperor
1986 – Chris Menges, The Mission
1985 – David Watkin, Out of Africa
1984 – Chris Menges, The Killing Fields
1983 – Sven Nykvist, Fanny and Alexander
1982 – Billy Williams, Ronnie Taylor, Gandhi
1981 – Vittorio Storaro, Reds
1980 – Geoffrey Unsworth, Ghislain Cloquet, Tess
1979 – Vittorio Storaro, Apocalypse Now
1978 – Néstor Almendros, Days of Heaven
1977 – Vilmos Zsigmond, Close Encounters of the Third Kind
1976 – Haskell Wexler, Bound for Glory
1975 – John Alcott, Barry Lyndon
1974 – Fred J. Koenekamp, Joseph Biroc, The Towering Inferno
1973 – Sven Nykvist, Cries and Whispers
1972 – Geoffrey Unsworth, Cabaret
1971 – Oswald Morris, Fiddler on the Roof
1970 – Freddie Young, Ryan’s Daughter
1969 – Conrad Hall, Butch Cassidy and the Sundance Kid
1968 – Pasqualino De Santis, Romeo and Juliet
1967 – Burnett Guffey, Bonnie and Clyde
1966 – Ted Moore, (Color) A Man for All Seasons
Haskell Wexler, (B&W) Who’s Afraid of Virginia Woolf?
1965 – Freddie Young, (Color) Doctor Zhivago
(Ernest Laszlo), (B&W) Ship of Fools
1964 – Harry Stradling, (Color) My Fair Lady (
Walter Lassally, (B&W) Zorba the Greek
1963 – Leon Shamroy, (Color) Cleopatra
James Wong Howe, (B&W) Hud
1962 – Freddie Young, (Color) Lawrence of Arabia
Jean Bourgoin, Walter Wottitz, (B&W) The Longest Day
1961 – Daniel L. Fapp, (Color) West Side Story
Eugen Schüfftan, (B&W) The Hustler
1960 – Russell Metty, (Color) Spartacus
Freddie Francis, (B&W) Sons and Lovers
1959 – Robert Surtees, (Color) Ben-Hur
William C. Mellor, (B&W) The Diary of Anne Frank
1958 – Joseph Ruttenberg, (Color) Gigi
Sam Leavitt, (B&W) The Defiant Ones
1957 – Jack Hildyard, The Bridge on the River Kwai
1956 – Lionel Lindon, (Color) Around the World in 80 Days
Joseph Ruttenberg, (B&W) Somebody Up There Likes Me
1955 – Robert Burks, (Color) To Catch a Thief
James Wong Howe, (B&W) The Rose Tattoo
1954 – Milton Krasner, (Color) Three Coins in the Fountain
Boris Kaufman, (B&W) On the Waterfront
1953 – Loyal Griggs, (Color) Shane
Burnett Guffey, (B&W) From Here to Eternity
1952 – Winton C. Hoch, Archie Stout, (Color) The Quiet Man
Robert Surtees, (B&W) The Bad and the Beautiful
1951 – Alfred Gilks, John Alton, (Color) An American in Paris
William C. Mellor, (B&W) A Place in the Sun
1950 – Robert Surtees, (Color) King Solomon’s Mines
Robert Krasker, (B&W) The Third Man
1949 – Winton C. Hoch, (Color) She Wore a Yellow Ribbon
Paul C. Vogel, (B&W) Battleground
1948 – Joseph Valentine, William V. Skall, Winton C. Hoch, (Color) Joan of Arc
William Daniels, (B&W) The Naked City
1947 – Jack Cardiff, (Color) Black Narcissus
Guy Green, (B&W) Great Expectations
1946 – Charles Rosher, Leonard Smith, Arthur Arling, (Color) The Yearling
Arthur C. Miller, (B&W) Anna and the King of Siam
1945 – Leon Shamroy, (Color) Leave Her to Heaven
Harry Stradling, (B&W) The Picture of Dorian Gray
1944 – Leon Shamroy, (Color) Wilson
Joseph LaShelle, (B&W) Laura
1943 – Hal Mohr, W. Howard Greene, (Color) Phantom of the Opera
Arthur C. Miller, (B&W) The Song of Bernadette
1942 – Leon Shamroy, (Color) The Black Swan
Joseph Ruttenberg, (B&W) Mrs. Miniver
1941 – Ernest Haller, Ray Rennahan, (Color) Blood and Sand
Arthur C. Miller, (B&W) How Green Was My Valley
1940 – George Périnal, (Color) Thief of Bagdad
George Barnes, (B&W) Rebecca
1939 – Ernest Haller, Ray Rennahan, (Color) Gone with the Wind
Gregg Toland, (B&W) Wuthering Heights
1938 – Oliver T. Marsh, Allen Davey, (Color) Sweethearts
Joseph Ruttenberg, (B&W) The Great Waltz
1937 – W. Howard Greene, (Color) A Star is Born
Karl Freund, (B&W) The Good Earth
1936 – W. Howard Greene, Harold Rossen, (Color) The Garden of Allah
Tony Guadio, (B&W) Anthony Adverse
1935 – Hal Mohr, A Midsummer Night’s Dream
1934 – Victor Milner, Cleopatra
1933/32 – Charles Lang, A Farewell to Arms
1932/31 – Lee Garmes, Shanghai Express
1931/30 – Floyd Crosby, Tabu: A Story of the South Seas
1930/29 – Joseph T. Rucker, Willard Van der Veer, With Byrd at the South Pole
1929/28 – Clyde De Vinna, White Shadows in the South Seas
1928/27 – Charles Rosher, Karl Struss, Sunrise: A Song of Two Humans
5.10 of this tool includes excellent tools to clean up cr2 and cr3 used on set to support HDRI processing.
Converting raw to AcesCG 32 bit tiffs with metadata.


www.xuanprada.com/blog/2014/11/3/hdri-shooting
http://blog.gregzaal.com/2016/03/16/make-your-own-hdri/
http://blog.hdrihaven.com/how-to-create-high-quality-hdri/
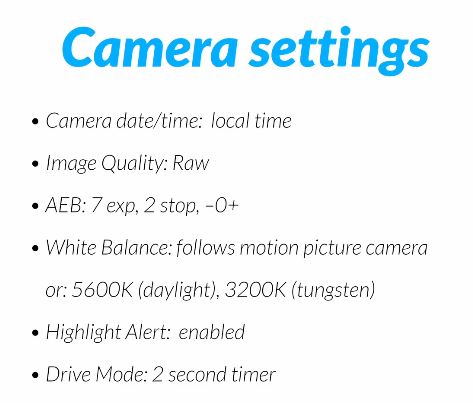
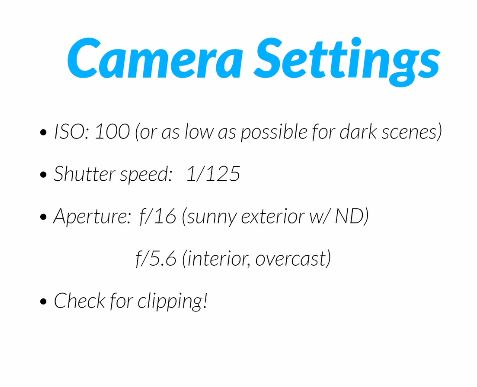
Shooting checklist
Methodology
Exposures starting point
NOTE: The goal is to clean the initial individual brackets before or at merging time as much as possible.
This means:

Here are the tips for using the chromatic ball in VFX projects, written in English:
https://www.linkedin.com/posts/bellrodrigo_here-are-the-tips-for-using-the-chromatic-activity-7200950595438940160-AGBp
Tips for Using the Chromatic Ball in VFX Projects**
The chromatic ball is an invaluable tool in VFX work, helping to capture lighting and reflection data crucial for integrating CGI elements seamlessly. Here are some tips to maximize its effectiveness:
1. **Positioning**:
– Place the chromatic ball in the same lighting conditions as the main subject. Ensure it is visible in the camera frame but not obstructing the main action.
– Ideally, place the ball where the CGI elements will be integrated to match the lighting and reflections accurately.
2. **Recording Reference Footage**:
– Capture reference footage of the chromatic ball at the beginning and end of each scene or lighting setup. This ensures you have consistent lighting data for the entire shoot.
3. **Consistent Angles**:
– Use consistent camera angles and heights when recording the chromatic ball. This helps in comparing and matching lighting setups across different shots.
4. **Combine with a Gray Ball**:
– Use a gray ball alongside the chromatic ball. The gray ball provides a neutral reference for exposure and color balance, complementing the chromatic ball’s reflection data.
5. **Marking Positions**:
– Mark the position of the chromatic ball on the set to ensure consistency when shooting multiple takes or different camera angles.
6. **Lighting Analysis**:
– Analyze the chromatic ball footage to understand the light sources, intensity, direction, and color temperature. This information is crucial for creating realistic CGI lighting and shadows.
7. **Reflection Analysis**:
– Use the chromatic ball to capture the environment’s reflections. This helps in accurately reflecting the CGI elements within the same scene, making them blend seamlessly.
8. **Use HDRI**:
– Capture High Dynamic Range Imagery (HDRI) of the chromatic ball. HDRI provides detailed lighting information and can be used to light CGI scenes with greater realism.
9. **Communication with VFX Team**:
– Ensure that the VFX team is aware of the chromatic ball’s data and how it was captured. Clear communication ensures that the data is used effectively in post-production.
10. **Post-Production Adjustments**:
– In post-production, use the chromatic ball data to adjust the CGI elements’ lighting and reflections. This ensures that the final output is visually cohesive and realistic.
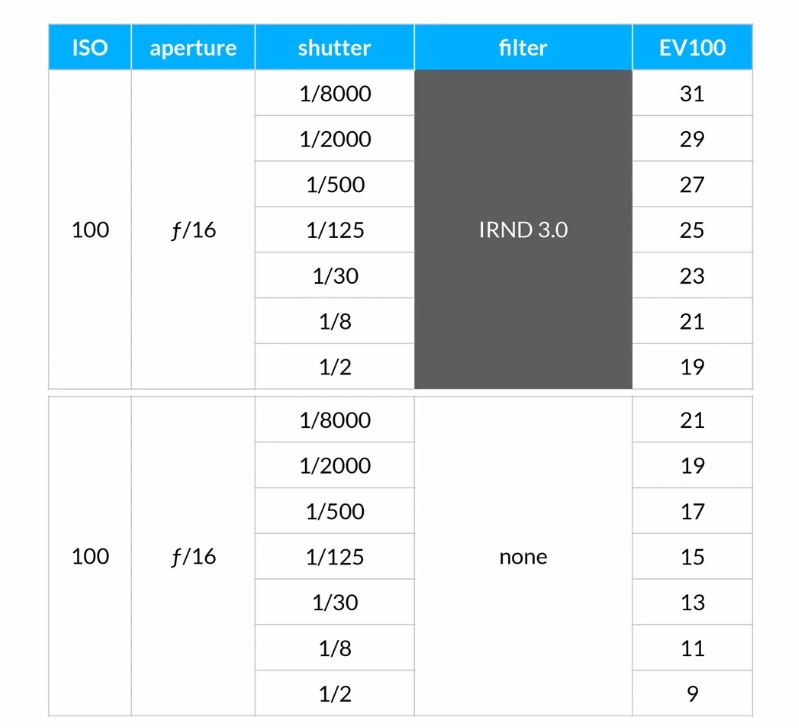
Also see: https://www.pixelsham.com/2015/05/16/how-aperture-shutter-speed-and-iso-affect-your-photos/
In photography, exposure value (EV) is a number that represents a combination of a camera’s shutter speed and f-number, such that all combinations that yield the same exposure have the same EV (for any fixed scene luminance).

The EV concept was developed in an attempt to simplify choosing among combinations of equivalent camera settings. Although all camera settings with the same EV nominally give the same exposure, they do not necessarily give the same picture. EV is also used to indicate an interval on the photographic exposure scale. 1 EV corresponding to a standard power-of-2 exposure step, commonly referred to as a stop
EV 0 corresponds to an exposure time of 1 sec and a relative aperture of f/1.0. If the EV is known, it can be used to select combinations of exposure time and f-number.
Note EV does not equal to photographic exposure. Photographic Exposure is defined as how much light hits the camera’s sensor. It depends on the camera settings mainly aperture and shutter speed. Exposure value (known as EV) is a number that represents the exposure setting of the camera.
Thus, strictly, EV is not a measure of luminance (indirect or reflected exposure) or illuminance (incidental exposure); rather, an EV corresponds to a luminance (or illuminance) for which a camera with a given ISO speed would use the indicated EV to obtain the nominally correct exposure. Nonetheless, it is common practice among photographic equipment manufacturers to express luminance in EV for ISO 100 speed, as when specifying metering range or autofocus sensitivity.
The exposure depends on two things: how much light gets through the lenses to the camera’s sensor and for how long the sensor is exposed. The former is a function of the aperture value while the latter is a function of the shutter speed. Exposure value is a number that represents this potential amount of light that could hit the sensor. It is important to understand that exposure value is a measure of how exposed the sensor is to light and not a measure of how much light actually hits the sensor. The exposure value is independent of how lit the scene is. For example a pair of aperture value and shutter speed represents the same exposure value both if the camera is used during a very bright day or during a dark night.
Each exposure value number represents all the possible shutter and aperture settings that result in the same exposure. Although the exposure value is the same for different combinations of aperture values and shutter speeds the resulting photo can be very different (the aperture controls the depth of field while shutter speed controls how much motion is captured).
EV 0.0 is defined as the exposure when setting the aperture to f-number 1.0 and the shutter speed to 1 second. All other exposure values are relative to that number. Exposure values are on a base two logarithmic scale. This means that every single step of EV – plus or minus 1 – represents the exposure (actual light that hits the sensor) being halved or doubled.
https://www.streetdirectory.com/travel_guide/141307/photography/exposure_value_ev_and_exposure_compensation.html
https://en.wikipedia.org/wiki/Exposure_value
https://www.scantips.com/lights/math.html
![]()
which means 2EV = N² / t
where
EV 0 corresponds to an exposure time of 1 sec and an aperture of f/1.0.
Example: If f/16 and 1/4 second, then this is:
(N² / t) = (16 × 16 ÷ 1/4) = (16 × 16 × 4) = 1024.
Log₂(1024) is EV 10. Meaning, 210 = 1024.
The exposure meter in the camera does not know whether the subject itself is bright or not. It simply measures the amount of light that comes in, and makes a guess based on that. The camera will aim for 18% gray, meaning if you take a photo of an entirely white surface, and an entirely black surface you should get two identical images which both are gray (at least in theory)
https://en.wikipedia.org/wiki/Light_meter
For reflected-light meters, camera settings are related to ISO speed and subject luminance by the reflected-light exposure equation:
![]()
where
For incident-light meters, camera settings are related to ISO speed and subject illuminance by the incident-light exposure equation:

where
Two values for K are in common use: 12.5 (Canon, Nikon, and Sekonic) and 14 (Minolta, Kenko, and Pentax); the difference between the two values is approximately 1/6 EV.
For C a value of 250 is commonly used.
Nonetheless, it is common practice among photographic equipment manufacturers to also express luminance in EV for ISO 100 speed. Using K = 12.5, the relationship between EV at ISO 100 and luminance L is then :
L = 2(EV-3)
The situation with incident-light meters is more complicated than that for reflected-light meters, because the calibration constant C depends on the sensor type. Illuminance is measured with a flat sensor; a typical value for C is 250 with illuminance in lux. Using C = 250, the relationship between EV at ISO 100 and illuminance E is then :
E = 2.5 * 2(EV)
https://nofilmschool.com/2018/03/want-easier-and-faster-way-calculate-exposure-formula
Three basic factors go into the exposure formula itself instead: aperture, shutter, and ISO. Plus a light meter calibration constant.
f-stop²/shutter (in seconds) = lux * ISO/C
If you at least know four of those variables, you’ll be able to calculate the missing value.
So, say you want to figure out how much light you’re going to need in order to shoot at a certain f-stop. Well, all you do is plug in your values (you should know the f-stop, ISO, and your light meter calibration constant) into the formula below:
lux = C (f-stop²/shutter (in seconds))/ISO
Exposure Value Calculator:
https://snapheadshots.com/resources/exposure-and-light-calculator
https://www.scantips.com/lights/exposurecalc.html
https://www.pointsinfocus.com/tools/exposure-settings-ev-calculator/#google_vignette
From that perspective, an exposure stop is a measurement of Exposure and provides a universal linear scale to measure the increase and decrease in light, exposed to the image sensor, due to changes in shutter speed, iso & f-stop.
+-1 stop is a doubling or halving of the amount of light let in when taking a photo.
1 EV is just another way to say one stop of exposure change.
One major use of EV (Exposure Value) is just to measure any change of exposure, where one EV implies a change of one stop of exposure. Like when we compensate our picture in the camera.
If the picture comes out too dark, our manual exposure could correct the next one by directly adjusting one of the three exposure controls (f/stop, shutter speed, or ISO). Or if using camera automation, the camera meter is controlling it, but we might apply +1 EV exposure compensation (or +1 EV flash compensation) to make the result goal brighter, as desired. This use of 1 EV is just another way to say one stop of exposure change.
On a perfect day the difference from sampling the sky vs the sun exposure with diffusing spot meters is about 3.2 exposure difference.
 ~15.4 EV for the sun
 ~12.2 EV for the sky
That is as a ballpark. All still influenced by surroundings, accuracy parameters, fov of the sensor…


EV calculator
https://www.scantips.com/lights/evchart.html#calc
http://www.fredparker.com/ultexp1.htm
Exposure value is basically used to indicate an interval on the photographic exposure scale, with a difference of 1 EV corresponding to a standard power-of-2 exposure step, also commonly referred to as a “stop”.
https://contrastly.com/a-guide-to-understanding-exposure-value-ev/
All you can hope to measure with your camera and some images is the relative reflected luminance. Even if you have the camera settings. https://en.wikipedia.org/wiki/Relative_luminance
If you REALLY want to know the amount of light in absolute radiometric units, you’re going to need to use some kind of absolute light meter or measured light source to calibrate your camera. For references on how to do this, see: Section 2.5 Obtaining Absolute Radiance from http://www.pauldebevec.com/Research/HDR/debevec-siggraph97.pdf
IF you are still trying to gauge relative brightness, the level of the sun in Nuke can vary, but it should be in the thousands. Ie: between 30,000 and 65,0000 rgb value depending on time of the day, season and atmospherics.
The values for a 12 o’clock sun, with the sun sampled at EV 15.5 (shutter 1/30, ISO 100, F22) is 32.000 RGB max values (or 32,000 pixel luminance).
The thing to keep an eye for is the level of contrast between sunny side/fill side. The terminator should be quite obvious, there can be up to 3 stops difference between fill/key in sunny lit objects.
Note: In Foundry’s Nuke, the software will map 18% gray to whatever your center f/stop is set to in the viewer settings (f/8 by default… change that to EV by following the instructions below).
You can experiment with this by attaching an Exposure node to a Constant set to 0.18, setting your viewer read-out to Spotmeter, and adjusting the stops in the node up and down. You will see that a full stop up or down will give you the respective next value on the aperture scale (f8, f11, f16 etc.).
One stop doubles or halves the amount or light that hits the filmback/ccd, so everything works in powers of 2.
So starting with 0.18 in your constant, you will see that raising it by a stop will give you .36 as a floating point number (in linear space), while your f/stop will be f/11 and so on.
If you set your center stop to 0 (see below) you will get a relative readout in EVs, where EV 0 again equals 18% constant gray.
Note: make sure to set your Nuke read node to ‘raw data’

In other words. Setting the center f-stop to 0 means that in a neutral plate, the middle gray in the macbeth chart will equal to exposure value 0. EV 0 corresponds to an exposure time of 1 sec and an aperture of f/1.0.
To switch Foundry’s Nuke’s SpotMeter to return the EV of an image, click on the main viewport, and then press s, this opens the viewer’s properties. Now set the center f-stop to 0 in there. And the SpotMeter in the viewport will change from aperture and fstops to EV.
If you are trying to gauge the EV from the pixel luminance in the image:
– Setting the center f-stop to 0 means that in a neutral plate, the middle 18% gray will equal to exposure value 0.
– So if EV 0 = 0.18 middle gray in nuke which equal to a pixel luminance of 0.18, doubling that value, doubles the EV.
.18 pixel luminance = 0EV
.36 pixel luminance = 1EV
.72 pixel luminance = 2EV
1.46 pixel luminance = 3EV
...
This is a Geometric Progression function: xn = ar(n-1)
The most basic example of this function is 1,2,4,8,16,32,… The sequence starts at 1 and doubles each time, so
And we get:
{a, ar, ar2, ar3, … }
= {1, 1×2, 1×22, 1×23, … }
= {1, 2, 4, 8, … }
In this example the function translates to: n = 2(n-1)
You can graph this curve through this expression: x = 2(y-1) :

You can go back and forth between the two values through a geometric progression function and a log function:
(Note: in a spreadsheet this is: = POWER(2; cell# -1) and =LOG(cell#, 2)+1) )
| 2(y-1) | log2(x)+1 |
| x | y |
| 1 | 1 |
| 2 | 2 |
| 4 | 3 |
| 8 | 4 |
| 16 | 5 |
| 32 | 6 |
| 64 | 7 |
| 128 | 8 |
| 256 | 9 |
| 512 | 10 |
| 1024 | 11 |
| 2048 | 12 |
| 4096 | 13 |
Translating this into a geometric progression between an image pixel luminance and EV:
noahwitchell.com
http://www.noahwitchell.com/freebies
locationtextures.com
https://locationtextures.com/panoramas/
maxroz.com
https://www.maxroz.com/hdri/list
HDRI Haven
https://hdrihaven.com/
Poly Haven
https://polyhaven.com/hdris
Domeble
https://www.domeble.com/
IHDRI
https://www.ihdri.com/
HDRMaps
https://hdrmaps.com/
NoEmotionHdrs.net
http://noemotionhdrs.net/hdrday.html
OpenFootage.net
https://www.openfootage.net/hdri-panorama/
HDRI-hub
https://www.hdri-hub.com/hdrishop/hdri
.zwischendrin
https://www.zwischendrin.com/en/browse/hdri
Longer list here:
https://cgtricks.com/list-sites-free-hdri/

COLLECTIONS
| Featured AI
| Design And Composition
| Explore posts
POPULAR SEARCHES
unreal | pipeline | virtual production | free | learn | photoshop | 360 | macro | google | nvidia | resolution | open source | hdri | real-time | photography basics | nuke
FEATURED POSTS
Social Links
DISCLAIMER – Links and images on this website may be protected by the respective owners’ copyright. All data submitted by users through this site shall be treated as freely available to share.