


BREAKING NEWS
LATEST POSTS
-
FXGuide – ACES 2.0 with ILM’s Alex Fry

https://draftdocs.acescentral.com/background/whats-new/
ACES 2.0 is the second major release of the components that make up the ACES system. The most significant change is a new suite of rendering transforms whose design was informed by collected feedback and requests from users of ACES 1. The changes aim to improve the appearance of perceived artifacts and to complete previously unfinished components of the system, resulting in a more complete, robust, and consistent product.
Highlights of the key changes in ACES 2.0 are as follows:
- New output transforms, including:
- A less aggressive tone scale
- More intuitive controls to create custom outputs to non-standard displays
- Robust gamut mapping to improve perceptual uniformity
- Improved performance of the inverse transforms
- Enhanced AMF specification
- An updated specification for ACES Transform IDs
- OpenEXR compression recommendations
- Enhanced tools for generating Input Transforms and recommended procedures for characterizing prosumer cameras
- Look Transform Library
- Expanded documentation
Rendering Transform
The most substantial change in ACES 2.0 is a complete redesign of the rendering transform.
ACES 2.0 was built as a unified system, rather than through piecemeal additions. Different deliverable outputs “match” better and making outputs to display setups other than the provided presets is intended to be user-driven. The rendering transforms are less likely to produce undesirable artifacts “out of the box”, which means less time can be spent fixing problematic images and more time making pictures look the way you want.
Key design goals
- Improve consistency of tone scale and provide an easy to use parameter to allow for outputs between preset dynamic ranges
- Minimize hue skews across exposure range in a region of same hue
- Unify for structural consistency across transform type
- Easy to use parameters to create outputs other than the presets
- Robust gamut mapping to improve harsh clipping artifacts
- Fill extents of output code value cube (where appropriate and expected)
- Invertible – not necessarily reversible, but Output > ACES > Output round-trip should be possible
- Accomplish all of the above while maintaining an acceptable “out-of-the box” rendering
- New output transforms, including:
-
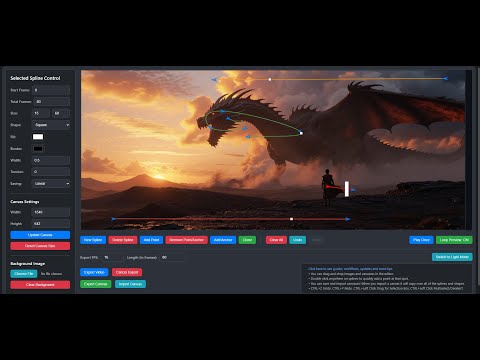
WhatDreamsCost Spline-Path-Control – Create motion controls for ComfyUI
https://github.com/WhatDreamsCost/Spline-Path-Control
https://whatdreamscost.github.io/Spline-Path-Control/
https://github.com/WhatDreamsCost/Spline-Path-Control/tree/main/example_workflows
Spline Path Control is a simple tool designed to make it easy to create motion controls. It allows you to create and animate shapes that follow splines, and then export the result as a
.webmvideo file.
This project was created to simplify the process of generating control videos for tools like VACE. Use it to control the motion of anything (camera movement, objects, humans etc) all without extra prompting.- Multi-Spline Editing: Create multiple, independent spline paths
- Easy To Use Controls: Quickly edit splines and points
- Full Control of Splines and Shapes:
- Start Frame: Set a delay before a spline’s animation begins.
- Duration: Control the speed of the shape along its path.
- Easing: Apply
Linear,Ease-in,Ease-out, andEase-in-outfunctions for smooth acceleration and deceleration. - Tension: Adjust the “curviness” of the spline path.
- Shape Customization: Change the shape (circle, square, triangle), size, fill color, and border.
- Reference Images: Drag and drop or upload a background image to trace paths over an existing image.
- WebM Export: Export your animation with a white background, perfect for use as a control video in VACE.

-
MiniMax-Remover – Taming Bad Noise Helps Video Object Removal Rotoscoping
https://github.com/zibojia/MiniMax-Remover
MiniMax-Remover is a fast and effective video object remover based on minimax optimization. It operates in two stages: the first stage trains a remover using a simplified DiT architecture, while the second stage distills a robust remover with CFG removal and fewer inference steps.


FEATURED POSTS


-
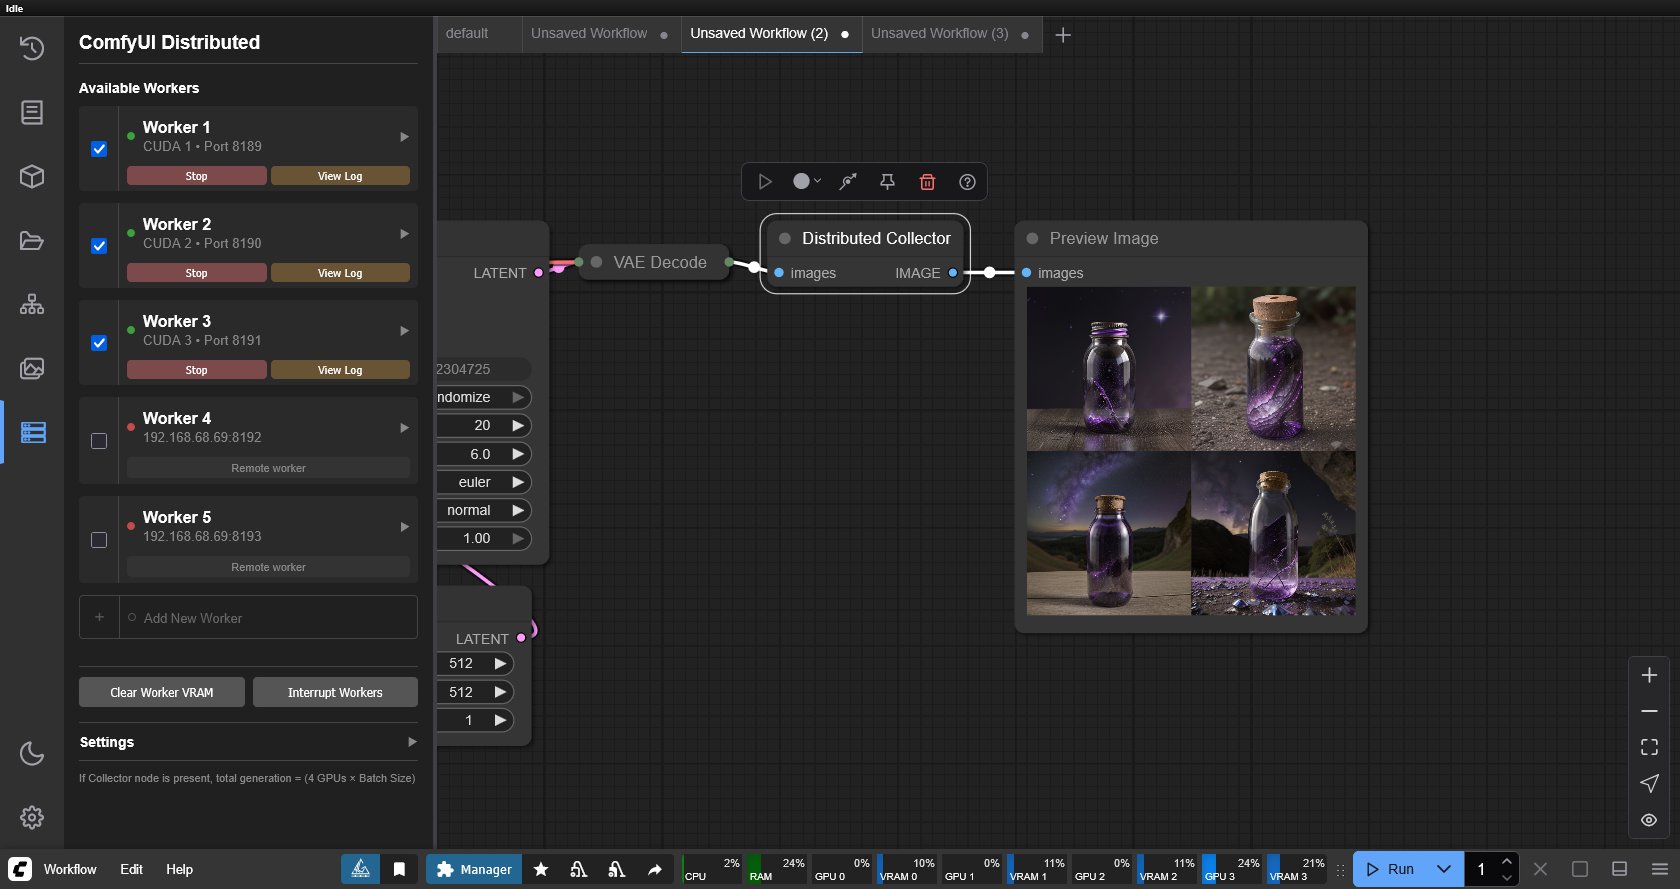
ComfyUI-Distributed – Parallel and distributed processing across multiple GPUs and machines
https://github.com/robertvoy/ComfyUI-Distributed
Key FeaturesParallel Workflow Processing
- Parallel Generation – Run the same workflow on multiple GPUs simultaneously with different seeds
- Automatic Load Balancing – Distribute workflow execution across available workers
- Batch Acceleration – Generate multiple variations faster by using all your GPUs
Distributed Upscaling- True Distributed Processing – Split large upscaling tasks into tiles processed across multiple GPUs
- Tile-based Upscaling – Intelligent work distribution for Ultimate SD Upscale
Management & Monitoring- Automatic Worker Management – Launch and monitor workers from the UI
- Network Support – Use GPUs across different machines on your network
- Real-time Monitoring – Track worker status and performance from the UI
- Easy Configuration – JSON-based configuration with UI controls
- Memory Management – Built-in VRAM clearing


-
Turn Yourself Into an Action Figure Using ChatGPT

ChatGPT Action Figure Prompts:
Create an action figure from the photo. It must be visualised in a realistic way. There should be accessories next to the figure like a UX designer have, Macbook Pro, a camera, drawing tablet, headset etc. Add a hole to the top of the box in the action figure. Also write the text “UX Mate” and below it “Keep Learning! Keep Designing
Use this image to create a picture of a action figure toy of a construction worker in a blister package from head to toe with accessories including a hammer, a staple gun and a ladder. The package should read “Kirk The Handy Man”
Create a realistic image of a toy action figure box. The box should be designed in a toy-equipment/action-figure style, with a cut-out window at the top like classic action figure packaging. The main color of the box and moleskine notebook should match the color of my jacket (referenced visually). Add colorful Mexican skull decorations across the box for a vibrant and artistic flair. Inside the box, include a “Your name” action figure, posed heroically. Next to the figure, arrange the following “equipment” in a stylized layout: • item 1 • item 2 … On the box, write: “Your name” (bold title font) Underneath: “Your role or anything else” The entire scene should look like a real product mockup, highly realistic, lit like a studio product photo. On the box, write: “Your name” (bold title font) Underneath: “Your role or description” The entire scene should look like a real product mockup, highly realistic, lit like a studio product photo. Prompt on Kling AI The figure steps out of its toy packaging and begins walking forward. As he continues to walk, the camera gradually zooms out in sync with his movement.
“Create image. Create a toy of the person in the photo. Let it be an action figure. Next to the figure, there should be the toy’s equipment, each in its individual blisters. 1) a book called “Tecnoforma”. 2) A 3-headed dog with a tag that says “Troika” and a bone at its feet with word “austerity” written on it. 3) a three-headed Hydra with with a tag called “Geringonça”. 4) a book titled “D. Sebastião”. Don’t repeat the equipment under any circumstance. The card holding the blister should be strong orange. Also, on top of the box, write ‘Pedro Passos Coelho’ and underneath it, ‘PSD action figure’. The figure and equipment must all be inside blisters. Visualize this in a realistic way.”

