


BREAKING NEWS
LATEST POSTS
-
FXGuide – ACES 2.0 with ILM’s Alex Fry

https://draftdocs.acescentral.com/background/whats-new/
ACES 2.0 is the second major release of the components that make up the ACES system. The most significant change is a new suite of rendering transforms whose design was informed by collected feedback and requests from users of ACES 1. The changes aim to improve the appearance of perceived artifacts and to complete previously unfinished components of the system, resulting in a more complete, robust, and consistent product.
Highlights of the key changes in ACES 2.0 are as follows:
- New output transforms, including:
- A less aggressive tone scale
- More intuitive controls to create custom outputs to non-standard displays
- Robust gamut mapping to improve perceptual uniformity
- Improved performance of the inverse transforms
- Enhanced AMF specification
- An updated specification for ACES Transform IDs
- OpenEXR compression recommendations
- Enhanced tools for generating Input Transforms and recommended procedures for characterizing prosumer cameras
- Look Transform Library
- Expanded documentation
Rendering Transform
The most substantial change in ACES 2.0 is a complete redesign of the rendering transform.
ACES 2.0 was built as a unified system, rather than through piecemeal additions. Different deliverable outputs “match” better and making outputs to display setups other than the provided presets is intended to be user-driven. The rendering transforms are less likely to produce undesirable artifacts “out of the box”, which means less time can be spent fixing problematic images and more time making pictures look the way you want.
Key design goals
- Improve consistency of tone scale and provide an easy to use parameter to allow for outputs between preset dynamic ranges
- Minimize hue skews across exposure range in a region of same hue
- Unify for structural consistency across transform type
- Easy to use parameters to create outputs other than the presets
- Robust gamut mapping to improve harsh clipping artifacts
- Fill extents of output code value cube (where appropriate and expected)
- Invertible – not necessarily reversible, but Output > ACES > Output round-trip should be possible
- Accomplish all of the above while maintaining an acceptable “out-of-the box” rendering
- New output transforms, including:
-
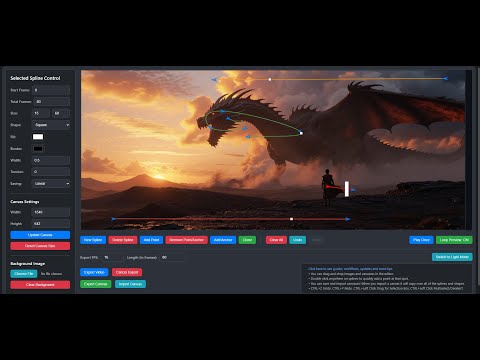
WhatDreamsCost Spline-Path-Control – Create motion controls for ComfyUI
https://github.com/WhatDreamsCost/Spline-Path-Control
https://whatdreamscost.github.io/Spline-Path-Control/
https://github.com/WhatDreamsCost/Spline-Path-Control/tree/main/example_workflows
Spline Path Control is a simple tool designed to make it easy to create motion controls. It allows you to create and animate shapes that follow splines, and then export the result as a
.webmvideo file.
This project was created to simplify the process of generating control videos for tools like VACE. Use it to control the motion of anything (camera movement, objects, humans etc) all without extra prompting.- Multi-Spline Editing: Create multiple, independent spline paths
- Easy To Use Controls: Quickly edit splines and points
- Full Control of Splines and Shapes:
- Start Frame: Set a delay before a spline’s animation begins.
- Duration: Control the speed of the shape along its path.
- Easing: Apply
Linear,Ease-in,Ease-out, andEase-in-outfunctions for smooth acceleration and deceleration. - Tension: Adjust the “curviness” of the spline path.
- Shape Customization: Change the shape (circle, square, triangle), size, fill color, and border.
- Reference Images: Drag and drop or upload a background image to trace paths over an existing image.
- WebM Export: Export your animation with a white background, perfect for use as a control video in VACE.

-
MiniMax-Remover – Taming Bad Noise Helps Video Object Removal Rotoscoping
https://github.com/zibojia/MiniMax-Remover
MiniMax-Remover is a fast and effective video object remover based on minimax optimization. It operates in two stages: the first stage trains a remover using a simplified DiT architecture, while the second stage distills a robust remover with CFG removal and fewer inference steps.


FEATURED POSTS
-
9 Best Hacks to Make a Cinematic Video with Any Camera
https://www.flexclip.com/learn/cinematic-video.html
- Frame Your Shots to Create Depth
- Create Shallow Depth of Field
- Avoid Shaky Footage and Use Flexible Camera Movements
- Properly Use Slow Motion
- Use Cinematic Lighting Techniques
- Apply Color Grading
- Use Cinematic Music and SFX
- Add Cinematic Fonts and Text Effects
- Create the Cinematic Bar at the Top and the Bottom

-
Elevenlabs AI Speech to Speech Converter
https://elevenlabs.io/voice-changer
Transform your voice into another character and control its emotion and delivery.

-
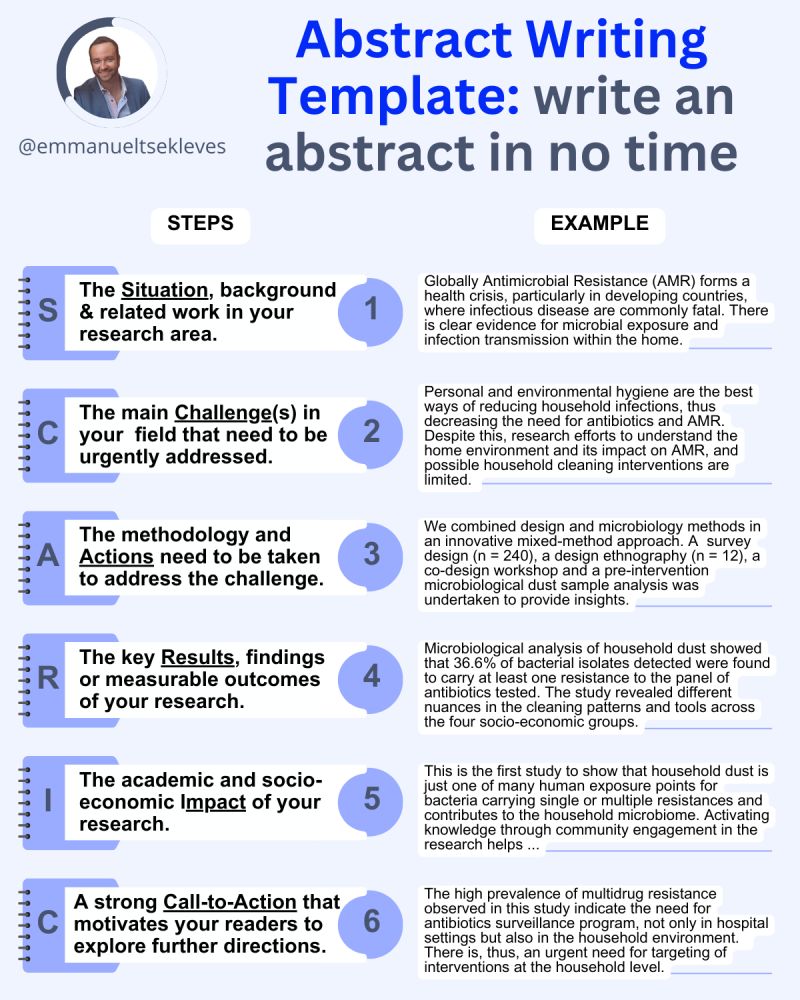
Emmanuel Tsekleves – Writing Research Papers
Here’s the journey of crafting a compelling paper:
1️. ABSTRACT
This is your elevator pitch.
Give a methodology overview.
Paint the problem you’re solving.
Highlight key findings and their impact.
2️. INTRODUCTION
Start with what we know.
Set the stage for our current understanding.
Hook your reader with the relevance of your work.
3️. LITERATURE REVIEW
Identify what’s unknown.
Spot the gaps in current knowledge.
Your job in the next sections is to fill this gap.
4️. METHODOLOGY
What did you do?
Outline how you’ll fill that gap.
Be transparent about your approach.
Make it reproducible so others can follow.
5️. RESULTS
Let the data speak for itself.
Present your findings clearly.
Keep it concise and focused.
6️. DISCUSSION
Now, connect the dots.
Discuss implications and significance.
How do your findings bridge the knowledge gap?
7️. CONCLUSION
Wrap it up with future directions.
What does this mean for us moving forward?
Leave the reader with a call to action or reflection.
8️. REFERENCES
Acknowledge the giants whose shoulders you stand on.
A robust reference list shows the depth of your research.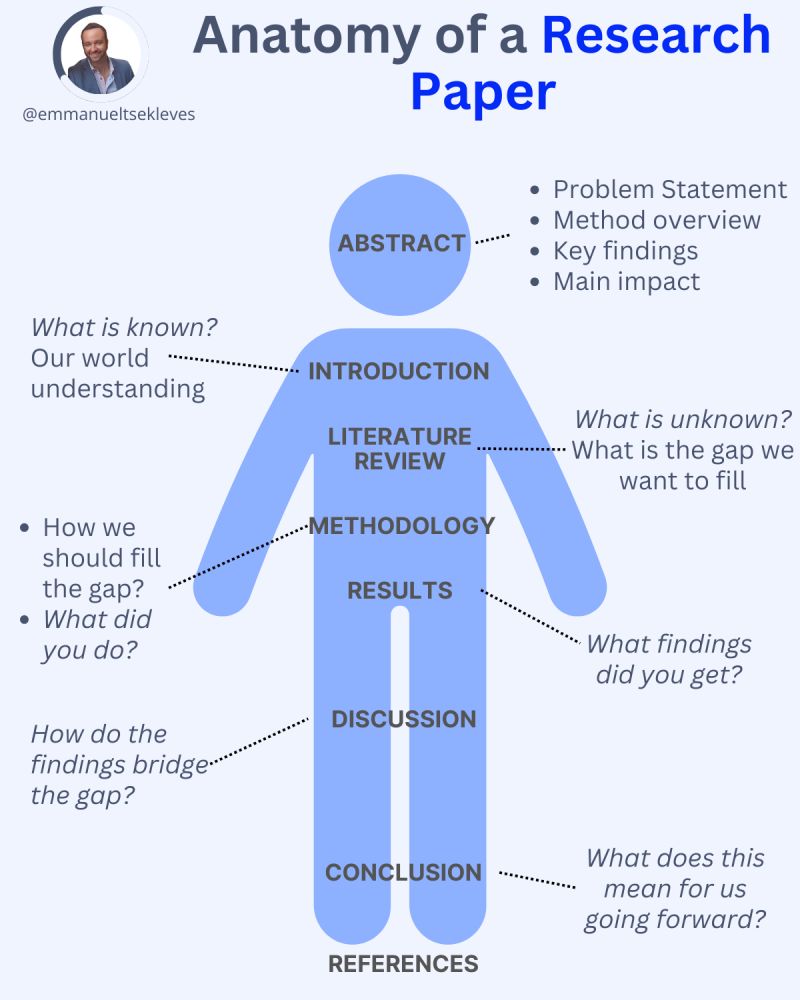

-
GretagMacbeth Color Checker Numeric Values and Middle Gray
The human eye perceives half scene brightness not as the linear 50% of the present energy (linear nature values) but as 18% of the overall brightness. We are biased to perceive more information in the dark and contrast areas. A Macbeth chart helps with calibrating back into a photographic capture into this “human perspective” of the world.
https://en.wikipedia.org/wiki/Middle_gray
In photography, painting, and other visual arts, middle gray or middle grey is a tone that is perceptually about halfway between black and white on a lightness scale in photography and printing, it is typically defined as 18% reflectance in visible light

Light meters, cameras, and pictures are often calibrated using an 18% gray card[4][5][6] or a color reference card such as a ColorChecker. On the assumption that 18% is similar to the average reflectance of a scene, a grey card can be used to estimate the required exposure of the film.
https://en.wikipedia.org/wiki/ColorChecker
(more…)

