


BREAKING NEWS
LATEST POSTS
-
-
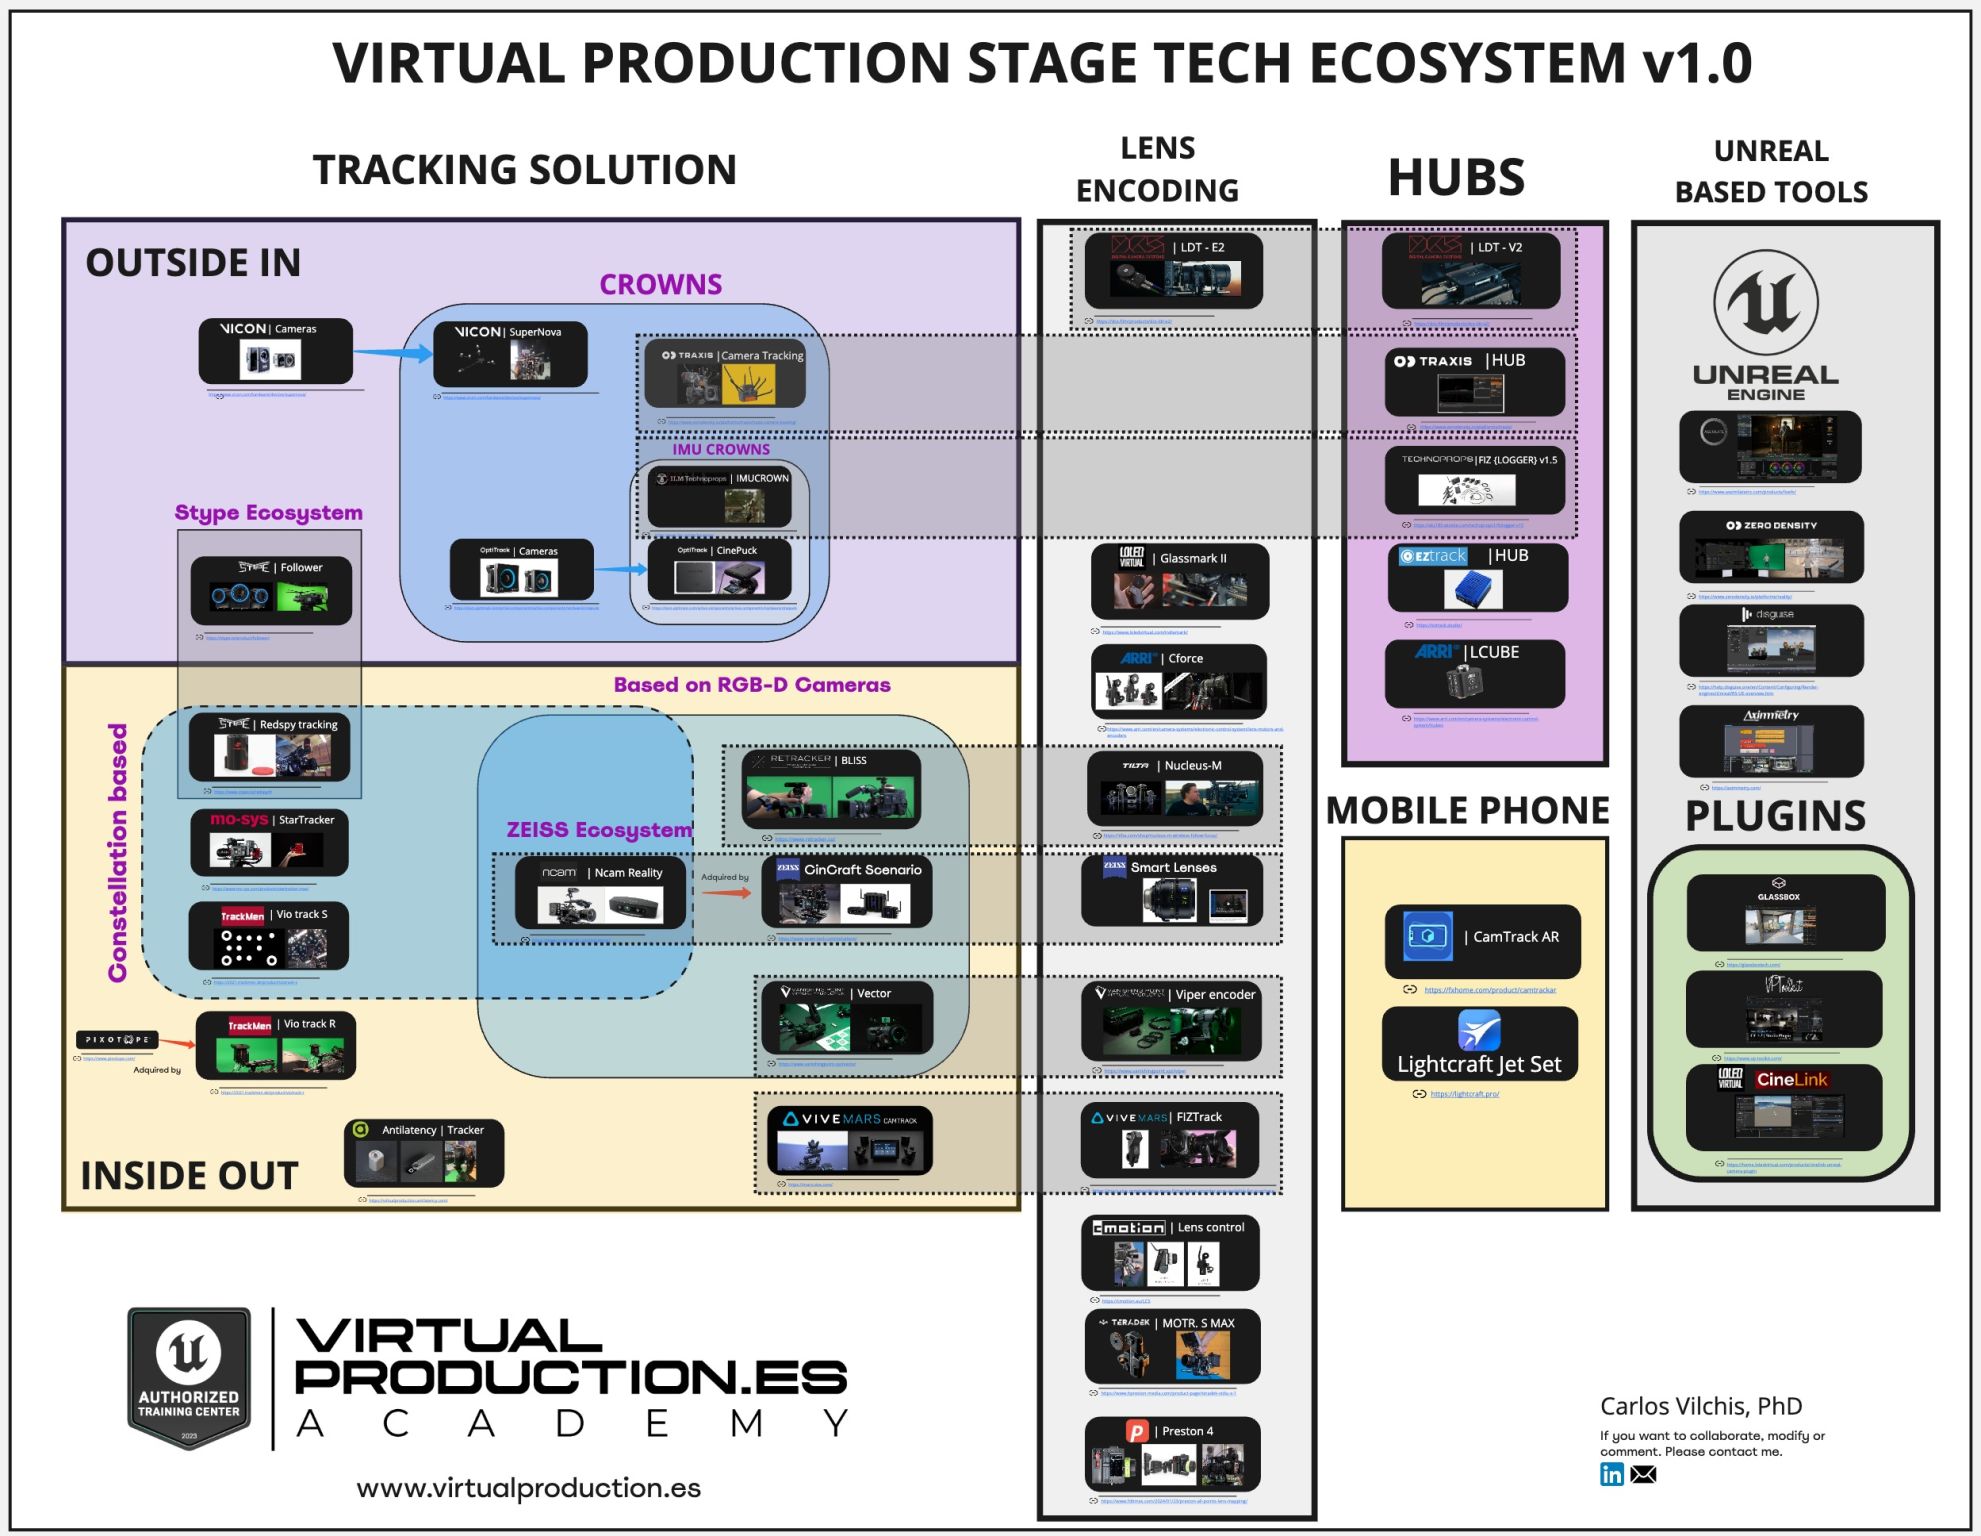
Carlos Vilchi – Virtual Production Stage Tech scheme v1.0
Carlos Vilchi has spent some time working on collecting all the technology related to Stage Tech including:
- -All the tracking technology existing today (inside out, outside in)
- -All lens encoding vendors, and their compatibility.
- -Tools, plugins, or Hubs.
- -The different small ecosystems between: Vicon, ZEISS Cinematography, ILM Technoprops, OptiTrack, stYpe, Antilatency, Ncam Technologies Ltd, Mo-Sys Engineering Ltd, EZtrack®, ARRI, DCS – Digital Camera Systems, Zero Density, Disguise, Aximmetry Technologies, HTC VIVE, Lightcraft Technology and more!
Local copy in the post
(more…) -
Ben McEwan – Deconstructing Despill Algorithms
Despilling is arguably the most important step to get right when pulling a key. A great despill can often hide imperfections in your alpha channel & prevents tedious painting to manually fix edges.
benmcewan.com/blog/2018/05/20/understanding-despill-algorithms/

-
Genex – Generative World Explorer
https://generative-world-explorer.github.io
Planning with partial observation is a central challenge in embodied AI. A majority of prior works have tackled this challenge by developing agents that physically explore their environment to update their beliefs about the world state. However, humans can imagine unseen parts of the world through a mental exploration and revise their beliefs with imagined observations. Such updated beliefs can allow them to make more informed decisions at the current step, without having to physically explore the world first. To achieve this human-like ability, we introduce the Generative World Explorer (Genex), a video generation model that allows an agent to mentally explore a large-scale 3D world (e.g., urban scenes) and acquire imagined observations to update its belief about the world .

-
KeenTools 2024.3 – FaceTracker for Blender Stable
FaceTracker for Blender is:
– Markerless facial mocap: capture facial performance and head motion with a matching geometry
– Custom face mesh generation: create digital doubles using snapshots of video frames (available with FaceBundle)
– 3D texture mapping: beauty work, (de)ageing, relighting
– 3D compositing: add digital make-up, dynamic VFX, hair and more
– (NEW) Animation retargeting: convert facial animation to ARKit blendshapes or Rigify rig in one clickhttps://keentools.io/products/facetracker-for-blender


FEATURED POSTS


-
Types of Film Lights and their efficiency – CRI, Color Temperature and Luminous Efficacy
nofilmschool.com/types-of-film-lights
“Not every light performs the same way. Lights and lighting are tricky to handle. You have to plan for every circumstance. But the good news is, lighting can be adjusted. Let’s look at different factors that affect lighting in every scene you shoot. “
Use CRI, Luminous Efficacy and color temperature controls to match your needs.
Color Temperature
Color temperature describes the “color” of white light by a light source radiated by a perfect black body at a given temperature measured in degrees Kelvinhttps://www.pixelsham.com/2019/10/18/color-temperature/
CRI
“The Color Rendering Index is a measurement of how faithfully a light source reveals the colors of whatever it illuminates, it describes the ability of a light source to reveal the color of an object, as compared to the color a natural light source would provide. The highest possible CRI is 100. A CRI of 100 generally refers to a perfect black body, like a tungsten light source or the sun. “https://www.studiobinder.com/blog/what-is-color-rendering-index
(more…)
-
Photography basics: Lumens vs Candelas (candle) vs Lux vs FootCandle vs Watts vs Irradiance vs Illuminance
https://www.translatorscafe.com/unit-converter/en-US/illumination/1-11/

The power output of a light source is measured using the unit of watts W. This is a direct measure to calculate how much power the light is going to drain from your socket and it is not relatable to the light brightness itself.
The amount of energy emitted from it per second. That energy comes out in a form of photons which we can crudely represent with rays of light coming out of the source. The higher the power the more rays emitted from the source in a unit of time.
Not all energy emitted is visible to the human eye, so we often rely on photometric measurements, which takes in account the sensitivity of human eye to different wavelenghts


Details in the post
(more…)
-
The Maya civilization and the color blue
Maya blue is a highly unusual pigment because it is a mix of organic indigo and an inorganic clay mineral called palygorskite.
Echoing the color of an azure sky, the indelible pigment was used to accentuate everything from ceramics to human sacrifices in the Late Preclassic period (300 B.C. to A.D. 300).
A team of researchers led by Dean Arnold, an adjunct curator of anthropology at the Field Museum in Chicago, determined that the key to Maya blue was actually a sacred incense called copal.
By heating the mixture of indigo, copal and palygorskite over a fire, the Maya produced the unique pigment, he reported at the time.

-
Photography basics: Why Use a (MacBeth) Color Chart?
Start here: https://www.pixelsham.com/2013/05/09/gretagmacbeth-color-checker-numeric-values/
https://www.studiobinder.com/blog/what-is-a-color-checker-tool/


In LightRoom

in Final Cut

in Nuke
Note: In Foundry’s Nuke, the software will map 18% gray to whatever your center f/stop is set to in the viewer settings (f/8 by default… change that to EV by following the instructions below).
You can experiment with this by attaching an Exposure node to a Constant set to 0.18, setting your viewer read-out to Spotmeter, and adjusting the stops in the node up and down. You will see that a full stop up or down will give you the respective next value on the aperture scale (f8, f11, f16 etc.).One stop doubles or halves the amount or light that hits the filmback/ccd, so everything works in powers of 2.
So starting with 0.18 in your constant, you will see that raising it by a stop will give you .36 as a floating point number (in linear space), while your f/stop will be f/11 and so on.If you set your center stop to 0 (see below) you will get a relative readout in EVs, where EV 0 again equals 18% constant gray.

In other words. Setting the center f-stop to 0 means that in a neutral plate, the middle gray in the macbeth chart will equal to exposure value 0. EV 0 corresponds to an exposure time of 1 sec and an aperture of f/1.0.
This will set the sun usually around EV12-17 and the sky EV1-4 , depending on cloud coverage.
To switch Foundry’s Nuke’s SpotMeter to return the EV of an image, click on the main viewport, and then press s, this opens the viewer’s properties. Now set the center f-stop to 0 in there. And the SpotMeter in the viewport will change from aperture and fstops to EV.