


BREAKING NEWS
LATEST POSTS
-
Finn Jager – From HEIC (High Efficiency Image Container) iPhone to a Multichannel EXR
Finn Jäger has spent some time in making a sleeker tool for all you VFX nerds out there, it takes a HEIC iPhone still and exports a Multichannel EXR – the cool thing is it also converts it to acesCG and it merges the SDR base image with the gain map according to apples math hdr_rgb = sdr_rgb * (1.0 + (headroom – 1.0) * gainmap)
https://github.com/finnschi/heic-shenanigans

-
Mars Lewis on the Brandolini’s Law
Brandolini’s law (or the bullshit asymmetry principle) is an internet adage coined in 2013 by Italian programmer Alberto Brandolini. It compares the considerable effort of debunking misinformation to the relative ease of creating it in the first place.
The law states: “The amount of energy needed to refute bullshit is an order of magnitude bigger than to produce it.”
https://en.wikipedia.org/wiki/Brandolini%27s_law
This is why every time you kill a lie, it feels like nothing changed. It’s why no matter how many facts you post, how many sources you cite, how many receipts you show—the swarm just keeps coming. Because while you’re out in the open doing surgery, the machine is behind the curtain spraying aerosol deceit into every vent.
The lie takes ten seconds. The truth takes ten paragraphs. And by the time you’ve written the tenth, the people you’re trying to reach have already scrolled past.
Every viral deception—the fake quote, the rigged video, the synthetic outrage—takes almost nothing to create. And once it’s out there, you’re not just correcting a fact—you’re prying it out of someone’s identity. Because people don’t adopt lies just for information. They adopt them for belonging. The lie becomes part of who they are, and your correction becomes an attack.
And still—you must correct it. Still, you must fight.
Because even if truth doesn’t spread as fast, it roots deeper. Even if it doesn’t go viral, it endures. And eventually, it makes people bulletproof to the next wave of narrative sewage.
You’re not here to win a one-day war. You’re here to outlast a never-ending invasion.
The lies are roaches. You kill one, and a hundred more scramble behind the drywall.The lies are Hydra heads. You cut one off, and two grow back. But you keep swinging anyway.
Because this isn’t about instant wins. It’s about making the cost of lying higher. It’s about being the resistance that doesn’t fold. You don’t fight because it’s easy. You fight because it’s right.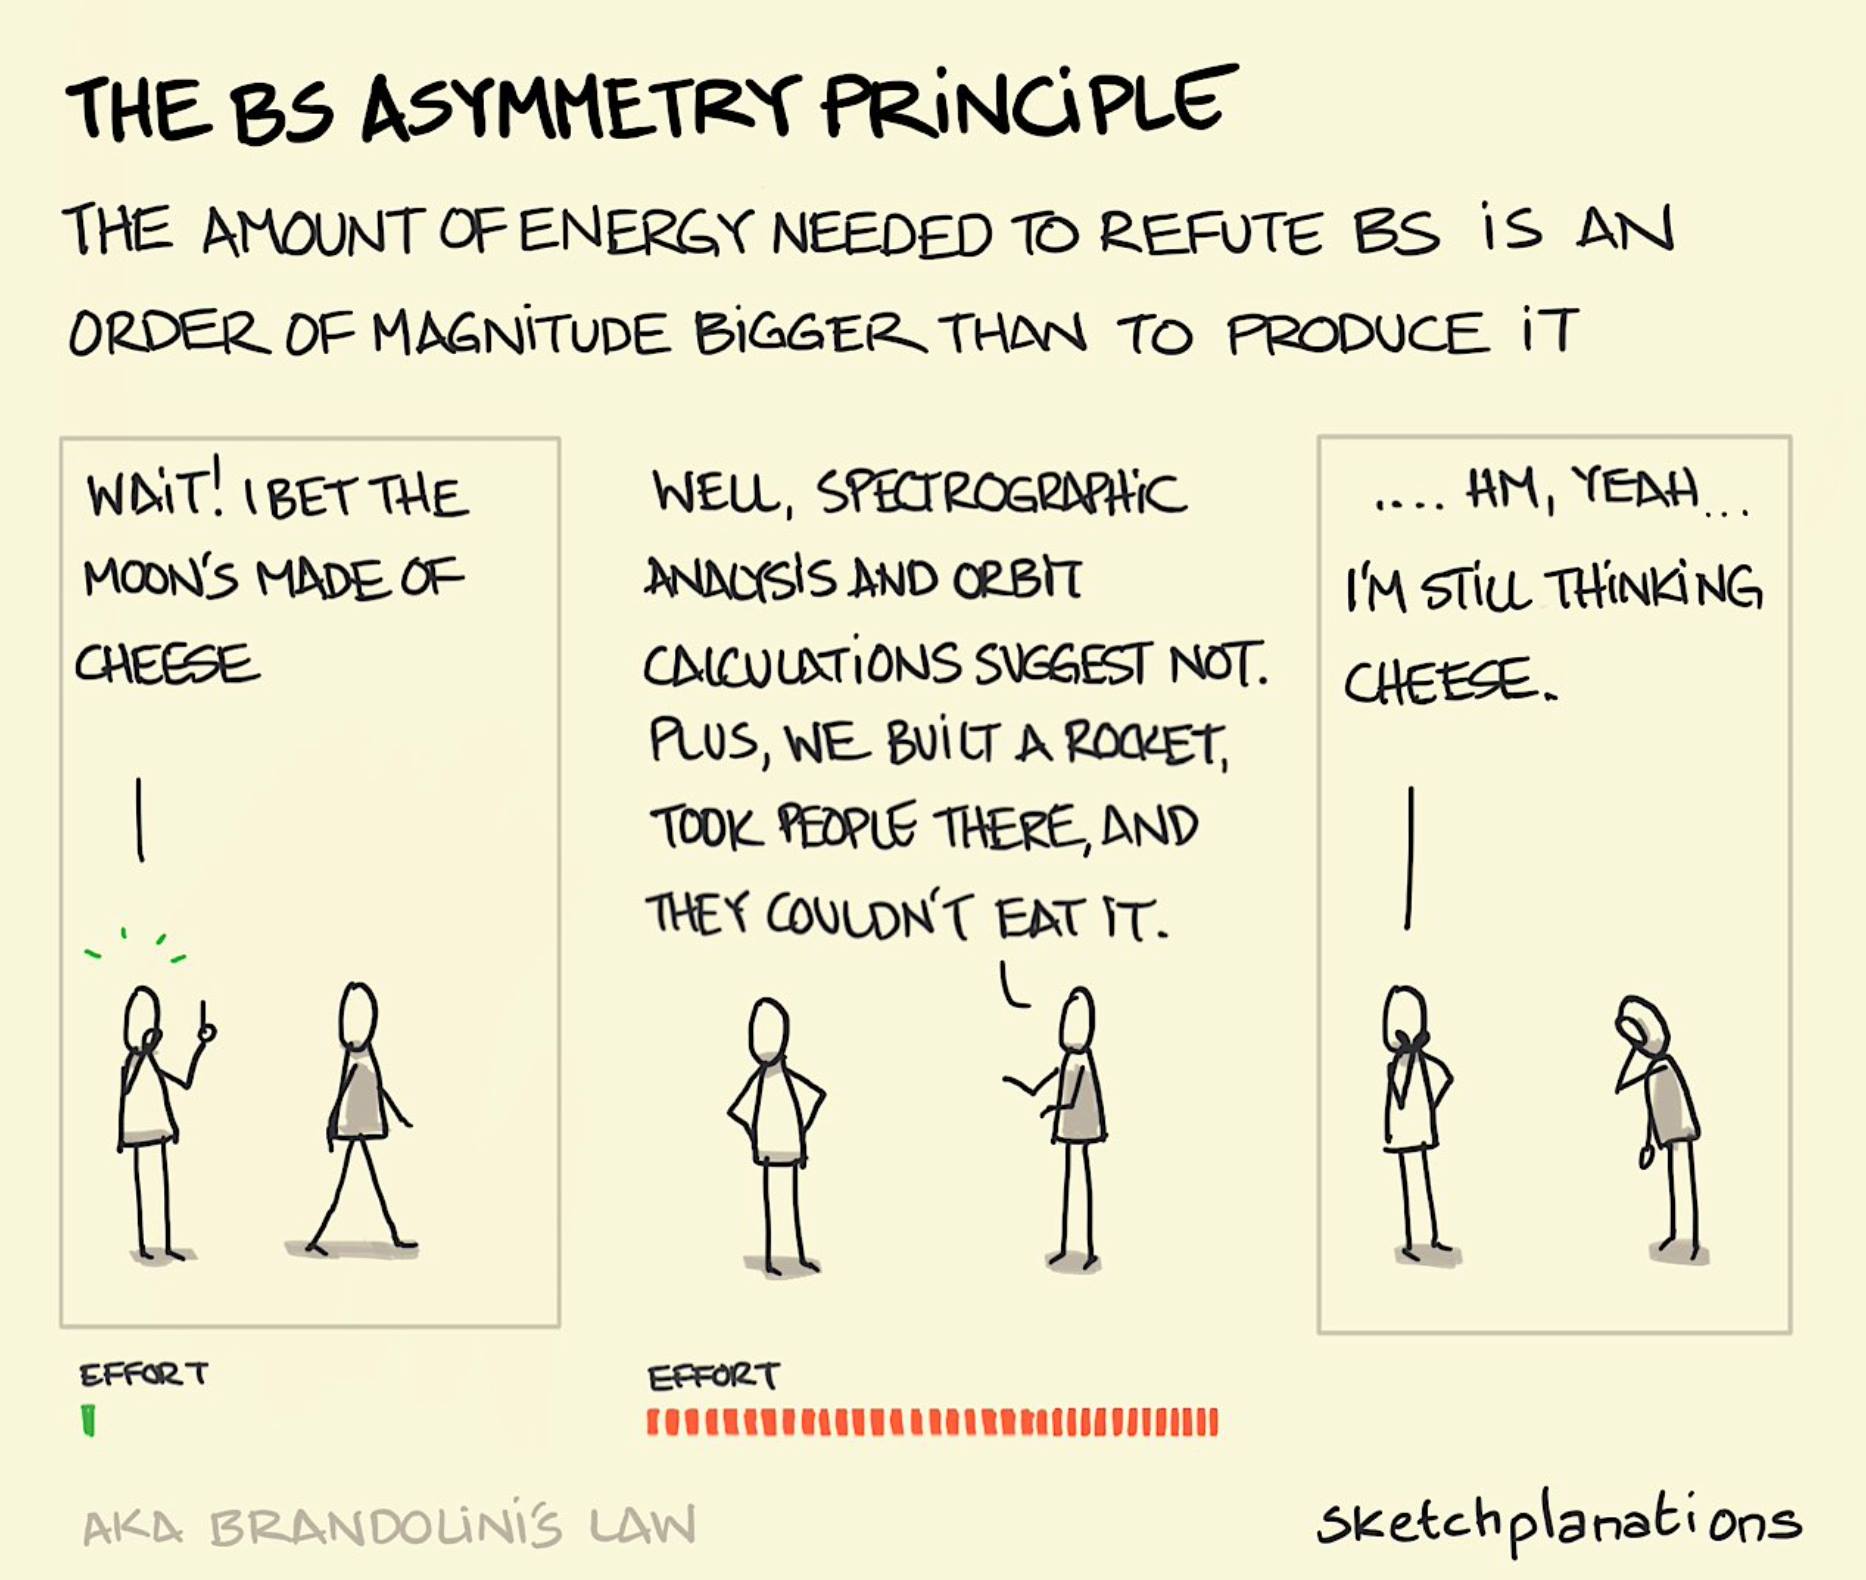
-
GenUE – Direct Prompt-to-Mesh Generation in Unreal Engine Integrated with ComfyUI
GenUE brings prompt-driven 3D asset creation directly into Unreal Engine using ComfyUI as a flexible backend. • Generate high-quality images from text prompts. • Choose from a catalog of batch-generated images – no style limitations. • Convert the selected image to a fully textured 3D mesh. • Automatically import and place the model into your Unreal Engine scene. This modular pipeline gives you full control over the image and 3D generation stages, with support for any ComfyUI workflow or model. Full generation (image + mesh + import) completes in under 2 minutes on a high-end consumer GPU.
-
Edward Ureña – Rig creator
https://edwardurena.gumroad.com/l/ramoo
What it offers:
• Base rigs for multiple character types
• Automatic weight application
• Built-in facial rigging system
• Bone generators with FK and IK options
• Streamlined constraint panel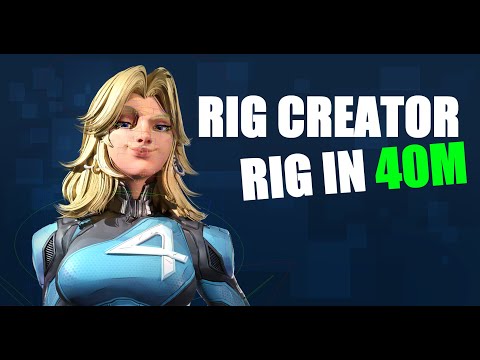
-
GPT-Image-1 API now available through ComfyUI with Dall-E integration
https://blog.comfy.org/p/comfyui-now-supports-gpt-image-1
https://docs.comfy.org/tutorials/api-nodes/openai/gpt-image-1
https://openai.com/index/image-generation-api
• Prompt GPT-Image-1 directly in ComfyUI using text or image inputs
• Set resolution and quality
• Supports image editing + transparent backgrounds
• Seamlessly mix with local workflows like WAN 2.1, FLUX Tools, and more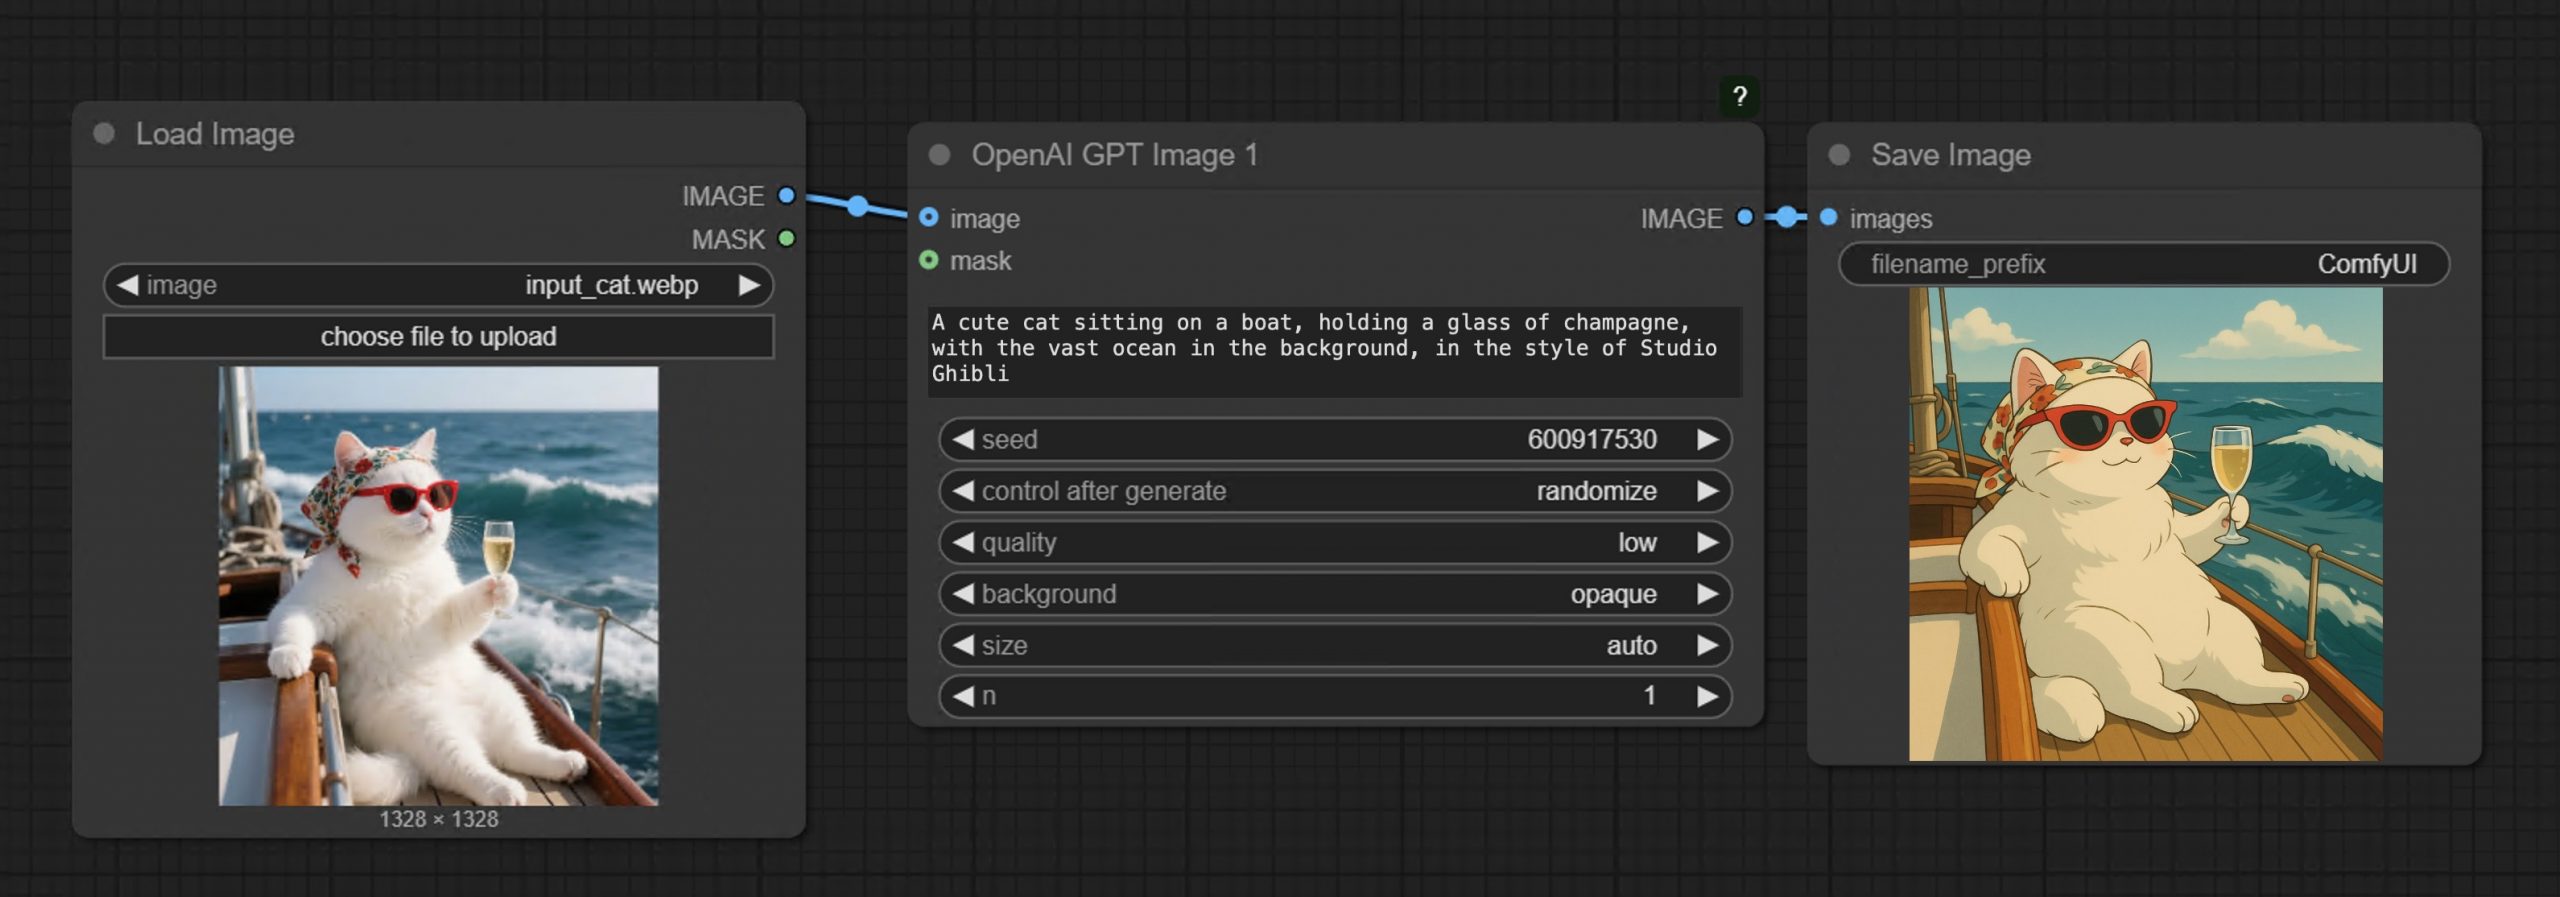
-
Tencent Hunyuan3D 2.5 – Transform images and text into 3D models with ultra-high-definition precision
What makes it special?
• Massive 10B parameter geometric model with 10x more mesh faces.
• High-quality textures with industry-first multi-view PBR generation.
• Optimized skeletal rigging for streamlined animation workflows.
• Flexible pipeline for text-to-3D and image-to-3D generation.
They’re making it accessible to everyone:
• Open-source code and pre-trained models.
• Easy-to-use API and intuitive web interface.
• Free daily quota doubled to 20 generations!
-
Alibaba 3DV-TON – A novel diffusion model for HQ and temporally consistent video
https://arxiv.org/pdf/2504.17414

Video try-on replaces clothing in videos with target garments. Existing methods struggle to generate high-quality and temporally consistent results when handling complex clothing patterns and diverse body poses. We present 3DV-TON, a novel diffusion-based framework for generating high-fidelity and temporally consistent video try-on results. Our approach employs generated animatable textured 3D meshes as explicit frame-level guidance, alleviating the issue of models over-focusing on appearance fidelity at the expanse of motion coherence. This is achieved by enabling direct reference to consistent garment texture movements throughout video sequences. The proposed method features an adaptive pipeline for generating dynamic 3D guidance: (1) selecting a keyframe for initial 2D image try-on, followed by (2) reconstructing and animating a textured 3D mesh synchronized with original video poses. We further introduce a robust rectangular masking strategy that successfully mitigates artifact propagation caused by leaking clothing information during dynamic human and garment movements. To advance video try-on research, we introduce HR-VVT, a high-resolution benchmark dataset containing 130 videos with diverse clothing types and scenarios. Quantitative and qualitative results demonstrate our superior performance over existing methods.
-
FramePack – Packing Input Frame Context in Next-Frame Prediction Models for Offline Video Generation With Low Resource Requirements
https://lllyasviel.github.io/frame_pack_gitpage/
- Diffuse thousands of frames at full fps-30 with 13B models using 6GB laptop GPU memory.
- Finetune 13B video model at batch size 64 on a single 8xA100/H100 node for personal/lab experiments.
- Personal RTX 4090 generates at speed 2.5 seconds/frame (unoptimized) or 1.5 seconds/frame (teacache).
- No timestep distillation.
- Video diffusion, but feels like image diffusion.

Image-to-5-Seconds (30fps, 150 frames)
-
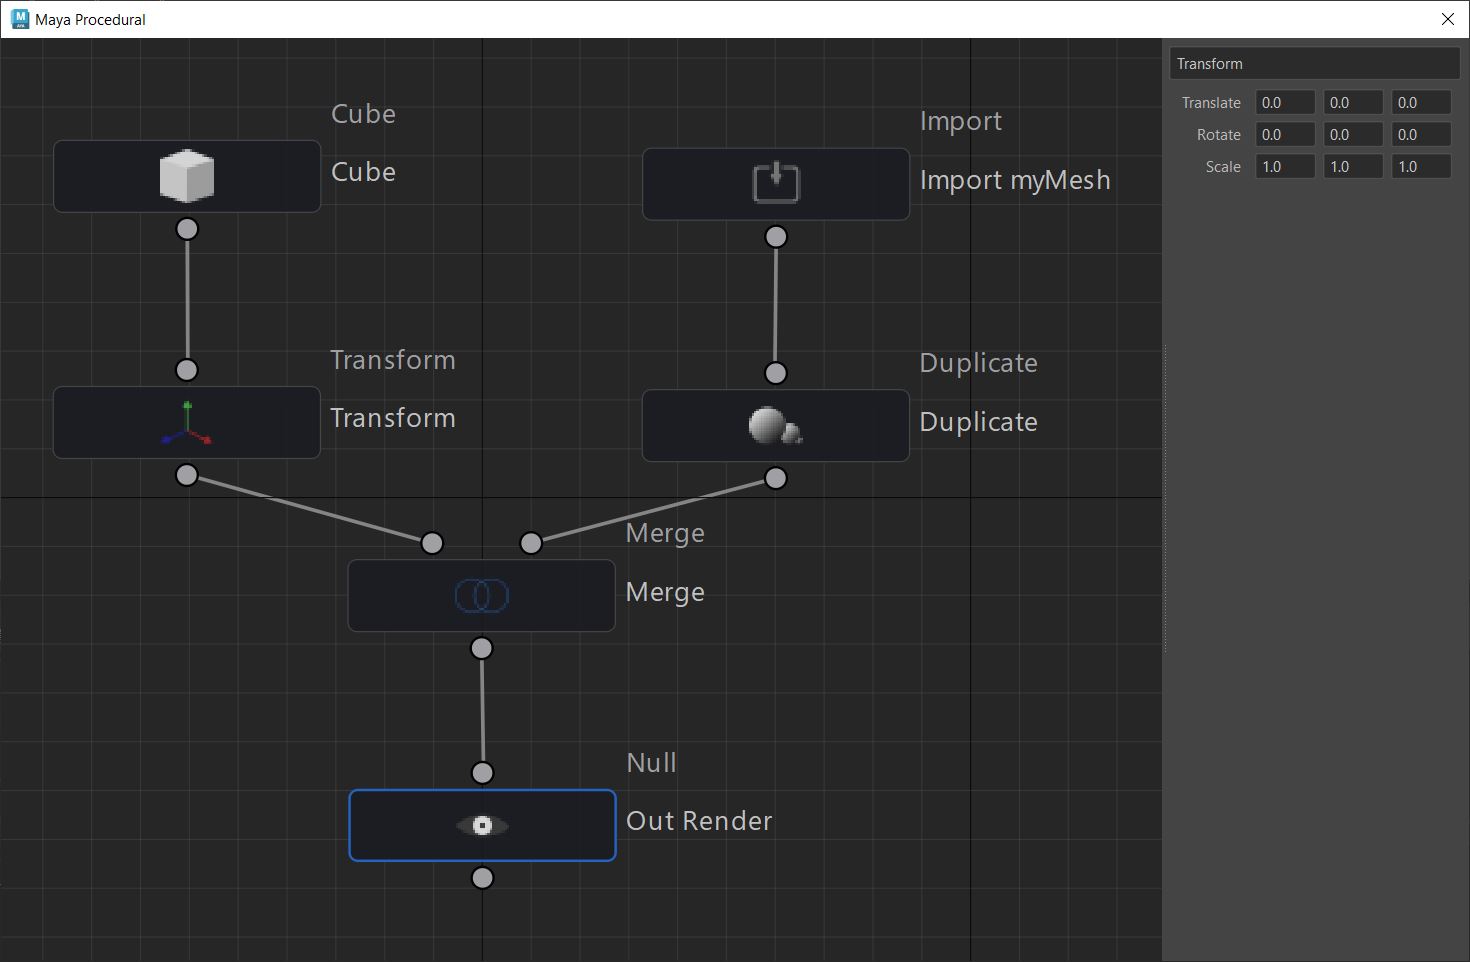
Anthony Sauzet – ProceduralMaya
A Maya script that introduces a node-based graph system for procedural modeling, like Houdini
https://github.com/AnthonySTZ/ProceduralMaya
-
11 Public Speaking Strategies

What do people report as their #1 greatest fear?
It’s not death….
It’s public speaking.
Glossophobia, the fear of public speaking, has been a daunting obstacle for me for years.
11 confidence-boosting tips
1/ The 5-5-5 Rule
→ Scan 5 faces; Hold each gaze for 5 seconds.
→ Repeat every 5 minutes.
→ Creates an authentic connection.
2/Power Pause
→ Dead silence for 3 seconds after key points.
→ Let your message land.
3/ The 3-Part Open
→ Hook with a question.
→ Share a story.
→ State your promise.
4/ Palm-Up Principle
→ Open palms when speaking = trustworthy.
→ Pointing fingers = confrontational.
5/ The 90-Second Reset
→ Feel nervous? Excuse yourself.
→ 90 seconds of deep breathing reset your nervous system.
6/ Rule of Three
→ Structure key points in threes.
→ Our brains love patterns.
7/ 2-Minute Story Rule
→ Keep stories under 2 minutes.
→ Any longer, you lose them.
8/ The Lighthouse Method
→ Plant “anchor points” around the room.
→ Rotate eye contact between them.
→ Looks natural, feels structured.
9/ The Power Position
→ Feet shoulder-width apart.
→ Hands relaxed at sides.
→ Projects confidence even when nervous.
10/ The Callback Technique
→ Reference earlier points later in your talk.
→ Creates a narrative thread.
→ Audiences love connections.
11/ The Rehearsal Truth
→ Practice the opening 3x more than the rest.
→ Nail the first 30 seconds; you’ll nail the talk.


FEATURED POSTS

-
Self Organizing Mapping – machine learning A.I.
A self-organizing map (SOM) or self-organizing feature map (SOFM) is a type of artificial neural network (ANN) that is trained using unsupervised learning to produce a low-dimensional (typically two-dimensional), discretized representation of the input space of the training samples, called a map.
http://www.mat.ucsb.edu/~g.legrady/academic/courses/06w259/projs/cs/MAT259-paper.pdf
http://en.wikipedia.org/wiki/Self-organizing_map
http://www.ai-junkie.com/ann/som/som1.html

-
What’s the Difference Between Ray Casting, Ray Tracing, Path Tracing and Rasterization? Physical light tracing…
RASTERIZATION
Rasterisation (or rasterization) is the task of taking the information described in a vector graphics format OR the vertices of triangles making 3D shapes and converting them into a raster image (a series of pixels, dots or lines, which, when displayed together, create the image which was represented via shapes), or in other words “rasterizing” vectors or 3D models onto a 2D plane for display on a computer screen.For each triangle of a 3D shape, you project the corners of the triangle on the virtual screen with some math (projective geometry). Then you have the position of the 3 corners of the triangle on the pixel screen. Those 3 points have texture coordinates, so you know where in the texture are the 3 corners. The cost is proportional to the number of triangles, and is only a little bit affected by the screen resolution.
In computer graphics, a raster graphics or bitmap image is a dot matrix data structure that represents a generally rectangular grid of pixels (points of color), viewable via a monitor, paper, or other display medium.
With rasterization, objects on the screen are created from a mesh of virtual triangles, or polygons, that create 3D models of objects. A lot of information is associated with each vertex, including its position in space, as well as information about color, texture and its “normal,” which is used to determine the way the surface of an object is facing.
Computers then convert the triangles of the 3D models into pixels, or dots, on a 2D screen. Each pixel can be assigned an initial color value from the data stored in the triangle vertices.
Further pixel processing or “shading,” including changing pixel color based on how lights in the scene hit the pixel, and applying one or more textures to the pixel, combine to generate the final color applied to a pixel.
The main advantage of rasterization is its speed. However, rasterization is simply the process of computing the mapping from scene geometry to pixels and does not prescribe a particular way to compute the color of those pixels. So it cannot take shading, especially the physical light, into account and it cannot promise to get a photorealistic output. That’s a big limitation of rasterization.
There are also multiple problems:
If you have two triangles one is behind the other, you will draw twice all the pixels. you only keep the pixel from the triangle that is closer to you (Z-buffer), but you still do the work twice.
The borders of your triangles are jagged as it is hard to know if a pixel is in the triangle or out. You can do some smoothing on those, that is anti-aliasing.
You have to handle every triangles (including the ones behind you) and then see that they do not touch the screen at all. (we have techniques to mitigate this where we only look at triangles that are in the field of view)
Transparency is hard to handle (you can’t just do an average of the color of overlapping transparent triangles, you have to do it in the right order)


RAY CASTING
It is almost the exact reverse of rasterization: you start from the virtual screen instead of the vector or 3D shapes, and you project a ray, starting from each pixel of the screen, until it intersect with a triangle.The cost is directly correlated to the number of pixels in the screen and you need a really cheap way of finding the first triangle that intersect a ray. In the end, it is more expensive than rasterization but it will, by design, ignore the triangles that are out of the field of view.
You can use it to continue after the first triangle it hit, to take a little bit of the color of the next one, etc… This is useful to handle the border of the triangle cleanly (less jagged) and to handle transparency correctly.
RAYTRACING


Same idea as ray casting except once you hit a triangle you reflect on it and go into a different direction. The number of reflection you allow is the “depth” of your ray tracing. The color of the pixel can be calculated, based off the light source and all the polygons it had to reflect off of to get to that screen pixel.The easiest way to think of ray tracing is to look around you, right now. The objects you’re seeing are illuminated by beams of light. Now turn that around and follow the path of those beams backwards from your eye to the objects that light interacts with. That’s ray tracing.
Ray tracing is eye-oriented process that needs walking through each pixel looking for what object should be shown there, which is also can be described as a technique that follows a beam of light (in pixels) from a set point and simulates how it reacts when it encounters objects.
Compared with rasterization, ray tracing is hard to be implemented in real time, since even one ray can be traced and processed without much trouble, but after one ray bounces off an object, it can turn into 10 rays, and those 10 can turn into 100, 1000…The increase is exponential, and the the calculation for all these rays will be time consuming.
Historically, computer hardware hasn’t been fast enough to use these techniques in real time, such as in video games. Moviemakers can take as long as they like to render a single frame, so they do it offline in render farms. Video games have only a fraction of a second. As a result, most real-time graphics rely on the another technique called rasterization.

PATH TRACING
Path tracing can be used to solve more complex lighting situations.
Path tracing is a type of ray tracing. When using path tracing for rendering, the rays only produce a single ray per bounce. The rays do not follow a defined line per bounce (to a light, for example), but rather shoot off in a random direction. The path tracing algorithm then takes a random sampling of all of the rays to create the final image. This results in sampling a variety of different types of lighting.When a ray hits a surface it doesn’t trace a path to every light source, instead it bounces the ray off the surface and keeps bouncing it until it hits a light source or exhausts some bounce limit.
It then calculates the amount of light transferred all the way to the pixel, including any color information gathered from surfaces along the way.
It then averages out the values calculated from all the paths that were traced into the scene to get the final pixel color value.It requires a ton of computing power and if you don’t send out enough rays per pixel or don’t trace the paths far enough into the scene then you end up with a very spotty image as many pixels fail to find any light sources from their rays. So when you increase the the samples per pixel, you can see the image quality becomes better and better.
Ray tracing tends to be more efficient than path tracing. Basically, the render time of a ray tracer depends on the number of polygons in the scene. The more polygons you have, the longer it will take.
Meanwhile, the rendering time of a path tracer can be indifferent to the number of polygons, but it is related to light situation: If you add a light, transparency, translucence, or other shader effects, the path tracer will slow down considerably.
blogs.nvidia.com/blog/2018/03/19/whats-difference-between-ray-tracing-rasterization/
https://en.wikipedia.org/wiki/Rasterisation
https://www.quora.com/Whats-the-difference-between-ray-tracing-and-path-tracing
-
Python and TCL: Tips and Tricks for Foundry Nuke
www.andreageremia.it/tutorial_python_tcl.html
https://www.gatimedia.co.uk/list-of-knobs-2
https://learn.foundry.com/nuke/developers/63/ndkdevguide/knobs-and-handles/knobtypes.html
http://www.andreageremia.it/tutorial_python_tcl.html
http://thoughtvfx.blogspot.com/2012/12/nuke-tcl-tips.html
Check final image quality
https://www.compositingpro.com/tech-check-compositing-shot-in-nuke/Local copy:
http://pixelsham.com/wp-content/uploads/2023/03/compositing_pro_tech_check_nuke_script.nkNuke tcl procedures
https://www.gatimedia.co.uk/nuke-tcl-proceduresKnobs
https://learn.foundry.com/nuke/developers/63/ndkdevguide/knobs-and-handles/knobtypes.html
(more…)


