


BREAKING NEWS
LATEST POSTS
-
Best 3D Printers of 2023! A Guide for Beginners, Budgets, & More!

~Low Budget~
- Elegoo Neptune 3 – $189 – https://www.elegoo.com/en-ca/collections/3d-printers/products/elegoo-neptune-3-pro-fdm-3d-printer-225x225x280mm
- Elegoo Neptune 4 -$239 – https://www.elegoo.com/collections/3d-printers/products/elegoo-neptune-4-fdm-3d-printer
- Bambu Lab A1 Mini – $299 – https://ca.store.bambulab.com/products/a1-mini
- Bambu Lab A1 Combo – $459 – https://ca.store.bambulab.com/products/a1?_pos=2&_sid=e97d0d489
- Creality K1 – $479 – https://store.creality.com/products/k1-3d-printer
~Medium Budget~
- Bambu Lab P1P – $539 – https://ca.store.bambulab.com/products/p1p?sscid=c1k7_l2ppk
- Bambu Lab P1S – $599 – https://ca.store.bambulab.com/products/p1s?variant=41211805696136
- Flashforge 5M Pro – $599 – https://www.flashforgeshop.com/product/adventurer-5m-pro-3d-printer
- Elegoo Neptune 3 PLUS – $279 – https://www.elegoo.com/collections/3d-printers/products/elegoo-neptune-3-plus-fdm-3d-printer-with-larger-build-volume-of-320x320x400mm
- Elegoo Neptune 4 PLUS – $350 – https://www.elegoo.com/collections/3d-printers/products/neptune-4-plus-fdm-3d-printer
~High Budget~
- Creality K1 MAX – $719 – https://store.creality.com/products/k1-max-3d-printer
- Prusa Mk4 (Kit) – $799 – https://www.prusa3d.com/product/original-prusa-mk4-kit-2/
- Prusa Mk4 (Built) – $1099 – https://www.prusa3d.com/product/original-prusa-mk4-2/
- FLsun V400 – $649 – https://store.flsun3d.com/products/flsun-v400
- Bambu Lab X1C – $1049 – https://ca.store.bambulab.com/products/x1-carbon-3d-printer
- Bambu Lab X1C AMS – $1299 – https://ca.store.bambulab.com/products/x1-carbon-combo
~Experienced User~
- Bambu Lab X1C – $1049 – https://ca.store.bambulab.com/products/x1-carbon-3d-printer
- Bambu Lab X1C AMS – $1299 – https://ca.store.bambulab.com/products/x1-carbon-combo
- Bambu Lab P1P – $539 – https://ca.store.bambulab.com/products/p1p
- Bambu Lab P1S – $599 – https://ca.store.bambulab.com/products/p1s
- Creality K1 MAX – $719 – https://store.creality.com/products/k1-max-3d-printer
- Prusa Mk4 (Kit) – $799 – https://www.prusa3d.com/product/original-prusa-mk4-kit-2/
- Prusa Mk4 (Built) – $1099 – https://www.prusa3d.com/product/original-prusa-mk4-2
- Elegoo Neptune 3 MAX – $380 – https://www.elegoo.com/collections/3d-printers/products/elegoo-neptune-3-max-fdm-3d-printer-massive-printing-size-of-420x420x500mm
- Prusa XL – $1999 – https://www.prusa3d.com/product/original-prusa-xl-2/
-
Render in a Flash with Updates to Autodesk Arnold 7.2.5
Arnold 7.2.5 adds support for NVIDIA and Intel GPU denoising on Windows in the Intel Denoiser. Denoising with a GPU using the Intel Denoiser should be now between 10x and 20x faster.
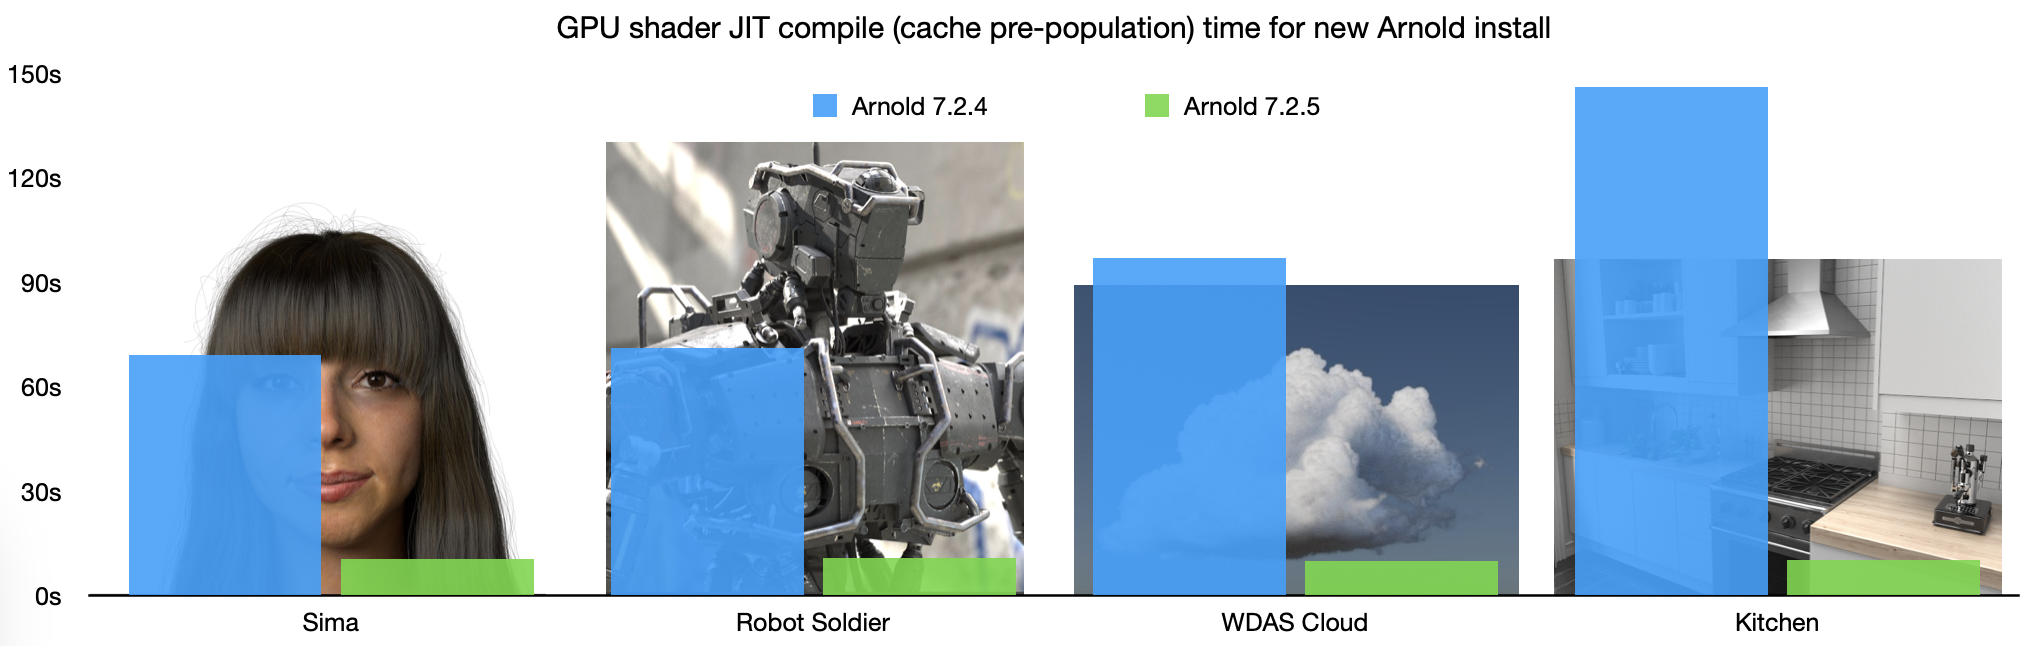
https://help.autodesk.com/view/ARNOL/ENU/?guid=arnold_core_7250_html


FEATURED POSTS
-
AI and the Law: Anthropic to Pay $1.5 Billion to Settle Book Piracy Class Action Lawsuit
https://variety.com/2025/digital/news/anthropic-class-action-settlement-billion-1236509571
The settlement amounts to about $3,000 per book and is believed to be the largest ever recovery in a U.S. copyright case, according to the plaintiffs’ attorneys.


-
Photography basics: Why Use a (MacBeth) Color Chart?
Start here: https://www.pixelsham.com/2013/05/09/gretagmacbeth-color-checker-numeric-values/
https://www.studiobinder.com/blog/what-is-a-color-checker-tool/


In LightRoom

in Final Cut

in Nuke
Note: In Foundry’s Nuke, the software will map 18% gray to whatever your center f/stop is set to in the viewer settings (f/8 by default… change that to EV by following the instructions below).
You can experiment with this by attaching an Exposure node to a Constant set to 0.18, setting your viewer read-out to Spotmeter, and adjusting the stops in the node up and down. You will see that a full stop up or down will give you the respective next value on the aperture scale (f8, f11, f16 etc.).One stop doubles or halves the amount or light that hits the filmback/ccd, so everything works in powers of 2.
So starting with 0.18 in your constant, you will see that raising it by a stop will give you .36 as a floating point number (in linear space), while your f/stop will be f/11 and so on.If you set your center stop to 0 (see below) you will get a relative readout in EVs, where EV 0 again equals 18% constant gray.

In other words. Setting the center f-stop to 0 means that in a neutral plate, the middle gray in the macbeth chart will equal to exposure value 0. EV 0 corresponds to an exposure time of 1 sec and an aperture of f/1.0.
This will set the sun usually around EV12-17 and the sky EV1-4 , depending on cloud coverage.
To switch Foundry’s Nuke’s SpotMeter to return the EV of an image, click on the main viewport, and then press s, this opens the viewer’s properties. Now set the center f-stop to 0 in there. And the SpotMeter in the viewport will change from aperture and fstops to EV.


-
Is a MacBeth Colour Rendition Chart the Safest Way to Calibrate a Camera?
www.colour-science.org/posts/the-colorchecker-considered-mostly-harmless/
“Unless you have all the relevant spectral measurements, a colour rendition chart should not be used to perform colour-correction of camera imagery but only for white balancing and relative exposure adjustments.”
“Using a colour rendition chart for colour-correction might dramatically increase error if the scene light source spectrum is different from the illuminant used to compute the colour rendition chart’s reference values.”
“other factors make using a colour rendition chart unsuitable for camera calibration:
– Uncontrolled geometry of the colour rendition chart with the incident illumination and the camera.
– Unknown sample reflectances and ageing as the colour of the samples vary with time.
– Low samples count.
– Camera noise and flare.
– Etc…“Those issues are well understood in the VFX industry, and when receiving plates, we almost exclusively use colour rendition charts to white balance and perform relative exposure adjustments, i.e. plate neutralisation.”