BREAKING NEWS
LATEST POSTS
-
Narcis Calin’s Galaxy Engine – A free, open source simulation software
This 2025 I decided to start learning how to code, so I installed Visual Studio and I started looking into C++. After days of watching tutorials and guides about the basics of C++ and programming, I decided to make something physics-related. I started with a dot that fell to the ground and then I wanted to simulate gravitational attraction, so I made 2 circles attracting each other. I thought it was really cool to see something I made with code actually work, so I kept building on top of that small, basic program. And here we are after roughly 8 months of learning programming. This is Galaxy Engine, and it is a simulation software I have been making ever since I started my learning journey. It currently can simulate gravity, dark matter, galaxies, the Big Bang, temperature, fluid dynamics, breakable solids, planetary interactions, etc. The program can run many tens of thousands of particles in real time on the CPU thanks to the Barnes-Hut algorithm, mixed with Morton curves. It also includes its own PBR 2D path tracer with BVH optimizations. The path tracer can simulate a bunch of stuff like diffuse lighting, specular reflections, refraction, internal reflection, fresnel, emission, dispersion, roughness, IOR, nested IOR and more! I tried to make the path tracer closer to traditional 3D render engines like V-Ray. I honestly never imagined I would go this far with programming, and it has been an amazing learning experience so far. I think that mixing this knowledge with my 3D knowledge can unlock countless new possibilities. In case you are curious about Galaxy Engine, I made it completely free and Open-Source so that anyone can build and compile it locally! You can find the source code in GitHub
https://github.com/NarcisCalin/Galaxy-Engine
-
Introduction to BytesIO
When you’re working with binary data in Python—whether that’s image bytes, network payloads, or any in-memory binary stream—you often need a file-like interface without touching the disk. That’s where
BytesIOfrom the built-iniomodule comes in handy. It lets you treat a bytes buffer as if it were a file.What Is
BytesIO?- Module:
io - Class:
BytesIO - Purpose:
- Provides an in-memory binary stream.
- Acts like a file opened in binary mode (
'rb'/'wb'), but data lives in RAM rather than on disk.
from io import BytesIO
Why Use
BytesIO?- Speed
- No disk I/O—reads and writes happen in memory.
- Convenience
- Emulates file methods (
read(),write(),seek(), etc.). - Ideal for testing code that expects a file-like object.
- Emulates file methods (
- Safety
- No temporary files cluttering up your filesystem.
- Integration
- Libraries that accept file-like objects (e.g., PIL,
requests) will work withBytesIO.
- Libraries that accept file-like objects (e.g., PIL,
Basic Examples
1. Writing Bytes to a Buffer
(more…)from io import BytesIO # Create a BytesIO buffer buffer = BytesIO() # Write some binary data buffer.write(b'Hello, \xF0\x9F\x98\x8A') # includes a smiley emoji in UTF-8 # Retrieve the entire contents data = buffer.getvalue() print(data) # b'Hello, \xf0\x9f\x98\x8a' print(data.decode('utf-8')) # Hello, 😊 # Always close when done buffer.close() - Module:
-
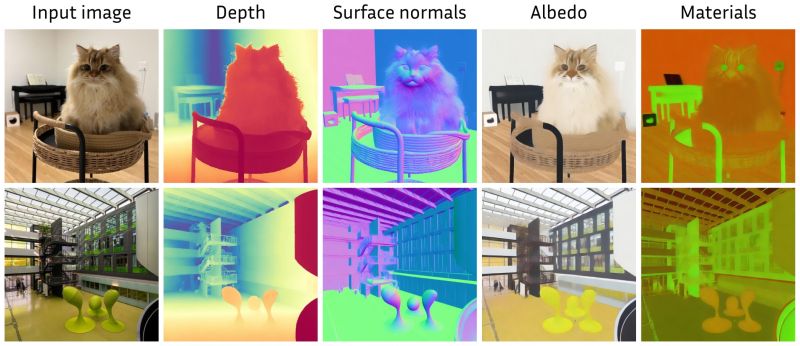
Marigold – repurposing diffusion-based image generators for dense predictions
Marigold repurposes Stable Diffusion for dense prediction tasks such as monocular depth estimation and surface normal prediction, delivering a level of detail often missing even in top discriminative models.
Key aspects that make it great:
– Reuses the original VAE and only lightly fine-tunes the denoising UNet
– Trained on just tens of thousands of synthetic image–modality pairs
– Runs on a single consumer GPU (e.g., RTX 4090)
– Zero-shot generalization to real-world, in-the-wild imageshttps://mlhonk.substack.com/p/31-marigold
https://arxiv.org/pdf/2505.09358
https://marigoldmonodepth.github.io/
-
Runway Aleph
https://runwayml.com/research/introducing-runway-aleph
Generate New Camera Angles
Generate the Next Shot
Use Any Style to Transfer to a Video
Change Environments, Locations, Seasons and Time of Day
Add Things to a Scene
Remove Things from a Scene
Change Objects in a Scene
Apply the Motion of a Video to an Image
Alter a Character’s Appearance
Recolor Elements of a Scene
Relight Shots
Green Screen Any Object, Person or Situation
-
Mike Wong – AtoMeow – A Blue noise image stippling in Processing

https://github.com/mwkm/atoMeow
https://www.shadertoy.com/view/7s3XzX
This demo is created for coders who are familiar with this awesome creative coding platform. You may quickly modify the code to work for video or to stipple your own Procssing drawings by turning them into
PImageand run the simulation. This demo code also serves as a reference implementation of my article Blue noise sampling using an N-body simulation-based method. If you are interested in 2.5D, you may mod the code to achieve what I discussed in this artist friendly article.Convert your video to a dotted noise.
-
Aitor Echeveste – Free CG and Comp Projection Shot, Download the Assets & Follow the Workflow
What’s Included:
- Cleaned and extended base plates
- Full Maya and Nuke 3D projection layouts
- Bullet and environment CG renders with AOVs (RGB, normals, position, ID, etc.)
- Explosion FX in slow motion
- 3D scene geometry for projection
- Camera + lensing setup
- Light groups and passes for look development


FEATURED POSTS

-
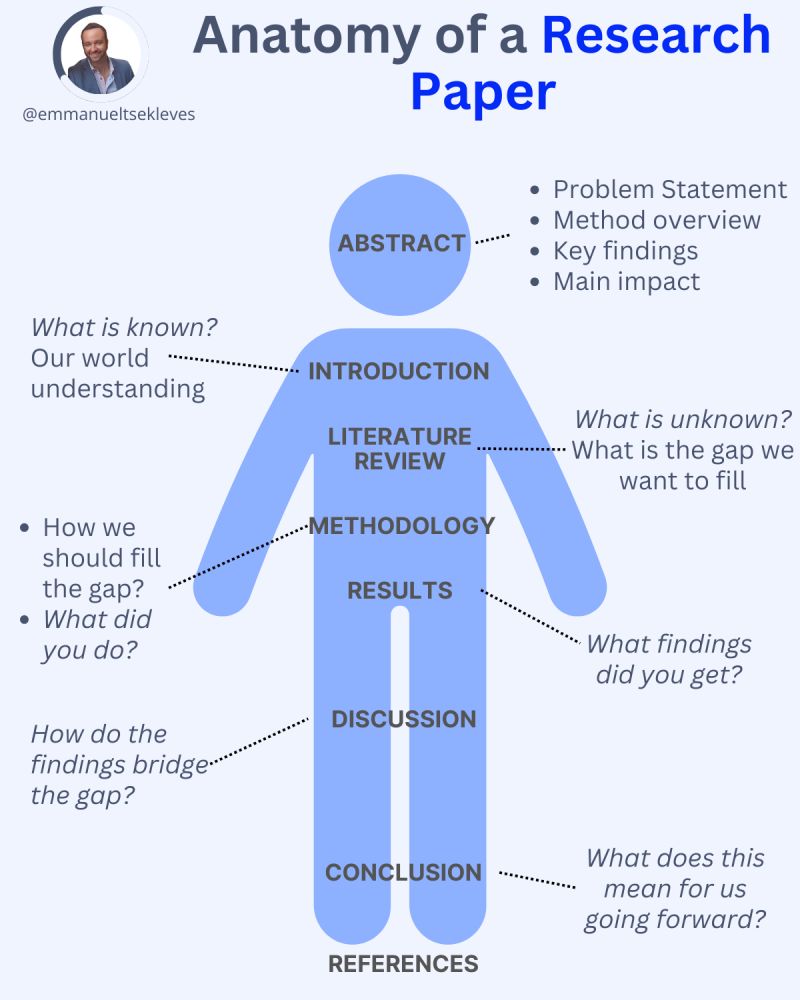
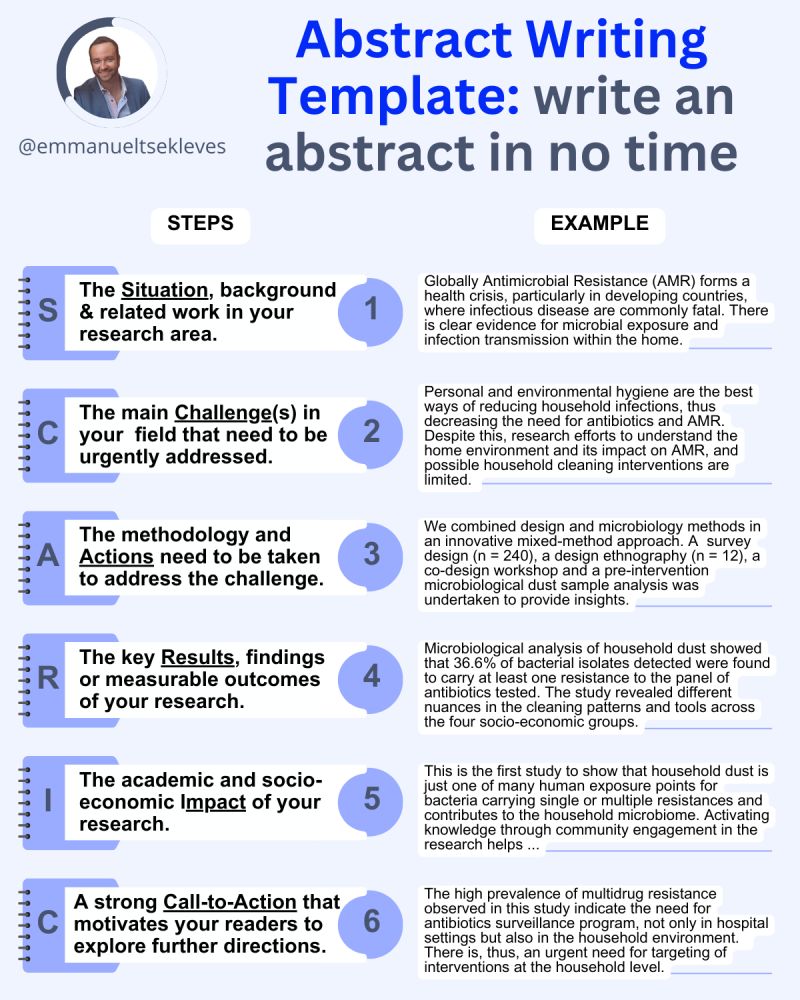
Emmanuel Tsekleves – Writing Research Papers
Here’s the journey of crafting a compelling paper:
1️. ABSTRACT
This is your elevator pitch.
Give a methodology overview.
Paint the problem you’re solving.
Highlight key findings and their impact.
2️. INTRODUCTION
Start with what we know.
Set the stage for our current understanding.
Hook your reader with the relevance of your work.
3️. LITERATURE REVIEW
Identify what’s unknown.
Spot the gaps in current knowledge.
Your job in the next sections is to fill this gap.
4️. METHODOLOGY
What did you do?
Outline how you’ll fill that gap.
Be transparent about your approach.
Make it reproducible so others can follow.
5️. RESULTS
Let the data speak for itself.
Present your findings clearly.
Keep it concise and focused.
6️. DISCUSSION
Now, connect the dots.
Discuss implications and significance.
How do your findings bridge the knowledge gap?
7️. CONCLUSION
Wrap it up with future directions.
What does this mean for us moving forward?
Leave the reader with a call to action or reflection.
8️. REFERENCES
Acknowledge the giants whose shoulders you stand on.
A robust reference list shows the depth of your research.