BREAKING NEWS
LATEST POSTS
-
Embedding frame ranges into Quicktime movies with FFmpeg
QuickTime (.mov) files are fundamentally time-based, not frame-based, and so don’t have a built-in, uniform “first frame/last frame” field you can set as numeric frame IDs. Instead, tools like Shotgun Create rely on the timecode track and the movie’s duration to infer frame numbers. If you want Shotgun to pick up a non-default frame range (e.g. start at 1001, end at 1064), you must bake in an SMPTE timecode that corresponds to your desired start frame, and ensure the movie’s duration matches your clip length.
How Shotgun Reads Frame Ranges
- Default start frame is 1. If no timecode metadata is present, Shotgun assumes the movie begins at frame 1.
- Timecode ⇒ frame number. Shotgun Create “honors the timecodes of media sources,” mapping the embedded TC to frame IDs. For example, a 24 fps QuickTime tagged with a start timecode of 00:00:41:17 will be interpreted as beginning on frame 1001 (1001 ÷ 24 fps ≈ 41.71 s).
Embedding a Start Timecode
QuickTime uses a
tmcd(timecode) track. You can bake in an SMPTE track via FFmpeg’s-timecodeflag or via Compressor/encoder settings:- Compute your start TC.
- Desired start frame = 1001
- Frame 1001 at 24 fps ⇒ 1001 ÷ 24 ≈ 41.708 s ⇒ TC 00:00:41:17
- FFmpeg example:
ffmpeg -i input.mov \
  -c copy \
  -timecode 00:00:41:17 \
  output.mov
This adds a timecode track beginning at 00:00:41:17, which Shotgun maps to frame 1001.
Ensuring the Correct End Frame
Shotgun infers the last frame from the movie’s duration. To end on frame 1064:
- Frame count = 1064 – 1001 + 1 = 64 frames
- Duration = 64 ÷ 24 fps ≈ 2.667 s
FFmpeg trim example:
ffmpeg -i input.mov \
  -c copy \
  -timecode 00:00:41:17 \
  -t 00:00:02.667 \
  output_trimmed.mov
This results in a 64-frame clip (1001→1064) at 24 fps.

-
Aider.chat – A free, open-source AI pair-programming CLI tool
Aider enables developers to interactively generate, modify, and test code by leveraging both cloud-hosted and local LLMs directly from the terminal or within an IDE. Key capabilities include comprehensive codebase mapping, support for over 100 programming languages, automated git commit messages, voice-to-code interactions, and built-in linting and testing workflows. Installation is straightforward via pip or uv, and while the tool itself has no licensing cost, actual usage costs stem from the underlying LLM APIs, which are billed separately by providers like OpenAI or Anthropic.
Key Features
- Cloud & Local LLM Support
Connect to most major LLM providers out of the box, or run models locally for privacy and cost control aider.chat. - Codebase Mapping
Automatically indexes all project files so that even large repositories can be edited contextually aider.chat. - 100+ Language Support
Works with Python, JavaScript, Rust, Ruby, Go, C++, PHP, HTML, CSS, and dozens more aider.chat. - Git Integration
Generates sensible commit messages and automates diffs/undo operations through familiar git tooling aider.chat. - Voice-to-Code
Speak commands to Aider to request features, tests, or fixes without typing aider.chat. - Images & Web Pages
Attach screenshots, diagrams, or documentation URLs to provide visual context for edits aider.chat. - Linting & Testing
Runs lint and test suites automatically after each change, and can fix issues it detects
- Cloud & Local LLM Support
-
SourceTree vs Github Desktop – Which one to use
Sourcetree and GitHub Desktop are both free, GUI-based Git clients aimed at simplifying version control for developers. While they share the same core purpose—making Git more accessible—they differ in features, UI design, integration options, and target audiences.
Installation & Setup
- Sourcetree
- Download: https://www.sourcetreeapp.com/
- Supported OS: Windows 10+, macOS 10.13+
- Prerequisites: Comes bundled with its own Git, or can be pointed to a system Git install.
- Initial Setup: Wizard guides SSH key generation, authentication with Bitbucket/GitHub/GitLab.
- GitHub Desktop
- Download: https://desktop.github.com/
- Supported OS: Windows 10+, macOS 10.15+
- Prerequisites: Bundled Git; seamless login with GitHub.com or GitHub Enterprise.
- Initial Setup: One-click sign-in with GitHub; auto-syncs repositories from your GitHub account.
Feature Comparison
(more…)Feature Sourcetree GitHub Desktop Branch Visualization Detailed graph view with drag-and-drop for rebasing/merging Linear graph, simpler but less configurable Staging & Commit File-by-file staging, inline diff view All-or-nothing staging, side-by-side diff Interactive Rebase Full support via UI Basic support via command line only Conflict Resolution Built-in merge tool integration (DiffMerge, Beyond Compare) Contextual conflict editor with choice panels Submodule Management Native submodule support Limited; requires CLI Custom Actions / Hooks Define custom actions (e.g., launch scripts) No UI for custom Git hooks Git Flow / Hg Flow Built-in support None Performance Can lag on very large repos Generally snappier on medium-sized repos Memory Footprint Higher RAM usage Lightweight Platform Integration Atlassian Bitbucket, Jira Deep GitHub.com / Enterprise integration Learning Curve Steeper for beginners Beginner-friendly - Sourcetree
-
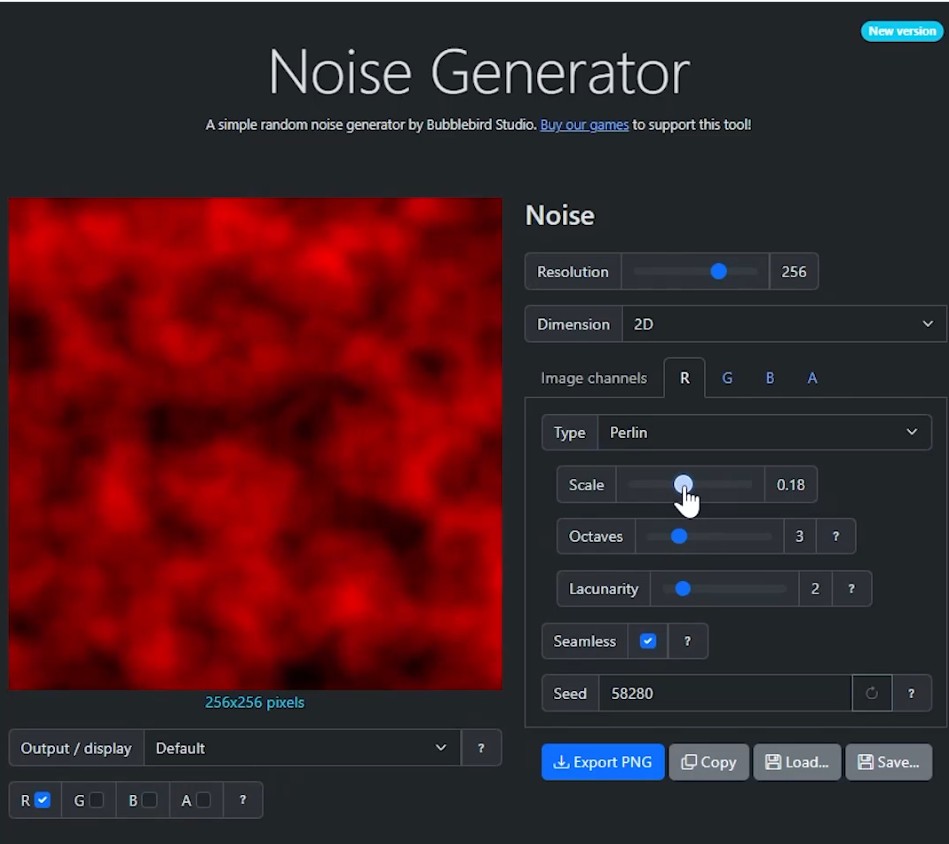
Bubblebird-Studio – Free NoiseGenerator
https://github.com/Bubblebird-Studio/NoiseGenerator
It currently support the following noise models:
Support for Blue Noise is planned.
You can freely use it here: https://noisegen.bubblebirdstudio.com/
-
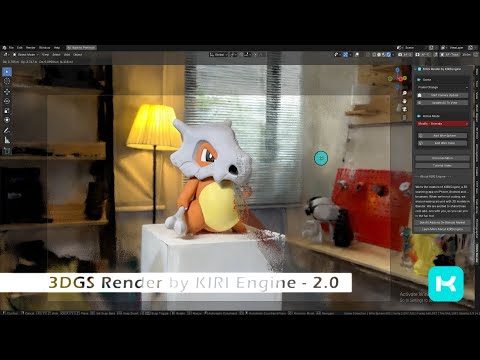
Free 3DGS Render Addon for Blender 2.0
https://superhivemarket.com/products/3dgs-render-by-kiri-engine
https://github.com/Kiri-Innovation/3dgs-render-blender-addon
https://www.kiriengine.app/blender-addon/3dgs-render
The addon is a full 3DGS editing and rendering suite for Blender.3DGS scans can be created from .OBJ files, or 3DGS .PLY files can be imported as mesh objects, offering two distinct workflows. The created objects can be manipulated, animated and rendered inside Blender. Or Blender can be used as an intermediate editing and painting software – with the results being exportable to other 3DGS software and viewers.


FEATURED POSTS


-
AnimationXpress.com interviews Daniele Tosti for TheCgCareer.com channel

You’ve been in the VFX Industry for over a decade. Tell us about your journey.
It all started with my older brother giving me a Commodore64 personal computer as a gift back in the late 80′. I realised then I could create something directly from my imagination using this new digital media format. And, eventually, make a living in the process.
That led me to start my professional career in 1990. From live TV to games to animation. All the way to live action VFX in the recent years.I really never stopped to crave to create art since those early days. And I have been incredibly fortunate to work with really great talent along the way, which made my journey so much more effective.
What inspired you to pursue VFX as a career?
An incredible combination of opportunities, really. The opportunity to express myself as an artist and earn money in the process. The opportunity to learn about how the world around us works and how best solve problems. The opportunity to share my time with other talented people with similar passions. The opportunity to grow and adapt to new challenges. The opportunity to develop something that was never done before. A perfect storm of creativity that fed my continuous curiosity about life and genuinely drove my inspiration.
Tell us about the projects you’ve particularly enjoyed working on in your career
(more…)
-
Google – Artificial Intelligence free courses
1. Introduction to Large Language Models: Learn about the use cases and how to enhance the performance of large language models.
https://www.cloudskillsboost.google/course_templates/5392. Introduction to Generative AI: Discover the differences between Generative AI and traditional machine learning methods.
https://www.cloudskillsboost.google/course_templates/5363. Generative AI Fundamentals: Earn a skill badge by demonstrating your understanding of foundational concepts in Generative AI.
https://www.cloudskillsboost.google/paths4. Introduction to Responsible AI: Learn about the importance of Responsible AI and how Google implements it in its products.
https://www.cloudskillsboost.google/course_templates/5545. Encoder-Decoder Architecture: Learn about the encoder-decoder architecture, a critical component of machine learning for sequence-to-sequence tasks.
https://www.cloudskillsboost.google/course_templates/5436. Introduction to Image Generation: Discover diffusion models, a promising family of machine learning models in the image generation space.
https://www.cloudskillsboost.google/course_templates/5417. Transformer Models and BERT Model: Get a comprehensive introduction to the Transformer architecture and the Bidirectional Encoder Representations from the Transformers (BERT) model.
https://www.cloudskillsboost.google/course_templates/5388. Attention Mechanism: Learn about the attention mechanism, which allows neural networks to focus on specific parts of an input sequence.
https://www.cloudskillsboost.google/course_templates/537