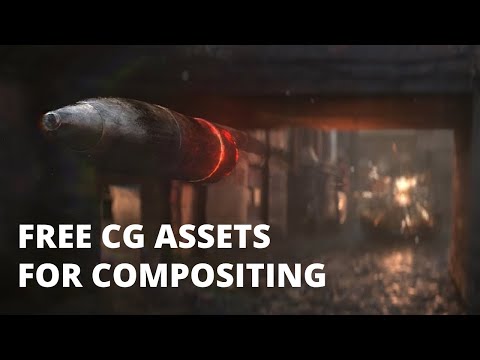
This demo is created for coders who are familiar with this awesome creative coding platform. You may quickly modify the code to work for video or to stipple your own Procssing drawings by turning them into PImage and run the simulation. This demo code also serves as a reference implementation of my article Blue noise sampling using an N-body simulation-based method. If you are interested in 2.5D, you may mod the code to achieve what I discussed in this artist friendly article.
🔹 Code Readability & Simplicity – Use meaningful names, write short functions, follow SRP, flatten logic, and remove dead code. → Clarity is a feature.
🔹 Function & Class Design – Limit parameters, favor pure functions, small classes, and composition over inheritance. → Structure drives scalability.
🔹 Testing & Maintainability – Write readable unit tests, avoid over-mocking, test edge cases, and refactor with confidence. → Test what matters.
🔹 Code Structure & Architecture – Organize by features, minimize global state, avoid god objects, and abstract smartly. → Architecture isn’t just backend.
🔹 Refactoring & Iteration – Apply the Boy Scout Rule, DRY, KISS, and YAGNI principles regularly. → Refactor like it’s part of development.
I ran Steamboat Willie (now public domain) through Flux Kontext to reimagine it as a 3D-style animated piece. Instead of going the polished route with something like W.A.N. 2.1 for full image-to-video generation, I leaned into the raw, handmade vibe that comes from converting each frame individually. It gave it a kind of stop-motion texture, imperfect, a bit wobbly, but full of character.
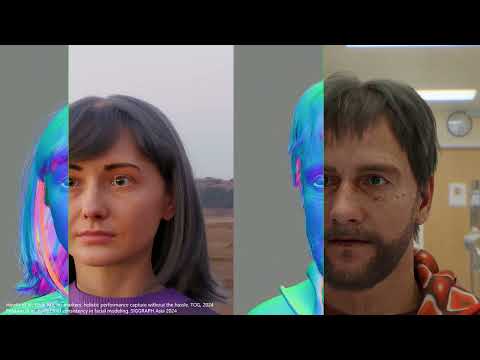
Our human-centric dense prediction model delivers high-quality, detailed (depth) results while achieving remarkable efficiency, running orders of magnitude faster than competing methods, with inference speeds as low as 21 milliseconds per frame (the large multi-task model on an NVIDIA A100). It reliably captures a wide range of human characteristics under diverse lighting conditions, preserving fine-grained details such as hair strands and subtle facial features. This demonstrates the model’s robustness and accuracy in complex, real-world scenarios.
The state of the art in human-centric computer vision achieves high accuracy and robustness across a diverse range of tasks. The most effective models in this domain have billions of parameters, thus requiring extremely large datasets, expensive training regimes, and compute-intensive inference. In this paper, we demonstrate that it is possible to train models on much smaller but high-fidelity synthetic datasets, with no loss in accuracy and higher efficiency. Using synthetic training data provides us with excellent levels of detail and perfect labels, while providing strong guarantees for data provenance, usage rights, and user consent. Procedural data synthesis also provides us with explicit control on data diversity, that we can use to address unfairness in the models we train. Extensive quantitative assessment on real input images demonstrates accuracy of our models on three dense prediction tasks: depth estimation, surface normal estimation, and soft foreground segmentation. Our models require only a fraction of the cost of training and inference when compared with foundational models of similar accuracy.
QuickTime (.mov) files are fundamentally time-based, not frame-based, and so don’t have a built-in, uniform “first frame/last frame” field you can set as numeric frame IDs. Instead, tools like Shotgun Create rely on the timecode track and the movie’s duration to infer frame numbers. If you want Shotgun to pick up a non-default frame range (e.g. start at 1001, end at 1064), you must bake in an SMPTE timecode that corresponds to your desired start frame, and ensure the movie’s duration matches your clip length.
How Shotgun Reads Frame Ranges
Default start frame is 1. If no timecode metadata is present, Shotgun assumes the movie begins at frame 1.
Timecode ⇒ frame number. Shotgun Create “honors the timecodes of media sources,” mapping the embedded TC to frame IDs. For example, a 24 fps QuickTime tagged with a start timecode of 00:00:41:17 will be interpreted as beginning on frame 1001 (1001 ÷ 24 fps ≈ 41.71 s).
Embedding a Start Timecode
QuickTime uses a tmcd (timecode) track. You can bake in an SMPTE track via FFmpeg’s -timecode flag or via Compressor/encoder settings:
Compute your start TC.
Desired start frame = 1001
Frame 1001 at 24 fps ⇒ 1001 ÷ 24 ≈ 41.708 s ⇒ TC 00:00:41:17
Aider enables developers to interactively generate, modify, and test code by leveraging both cloud-hosted and local LLMs directly from the terminal or within an IDE. Key capabilities include comprehensive codebase mapping, support for over 100 programming languages, automated git commit messages, voice-to-code interactions, and built-in linting and testing workflows. Installation is straightforward via pip or uv, and while the tool itself has no licensing cost, actual usage costs stem from the underlying LLM APIs, which are billed separately by providers like OpenAI or Anthropic.
Key Features
Cloud & Local LLM Support Connect to most major LLM providers out of the box, or run models locally for privacy and cost control aider.chat.
Codebase Mapping Automatically indexes all project files so that even large repositories can be edited contextually aider.chat.
100+ Language Support Works with Python, JavaScript, Rust, Ruby, Go, C++, PHP, HTML, CSS, and dozens more aider.chat.
Git Integration Generates sensible commit messages and automates diffs/undo operations through familiar git tooling aider.chat.
Voice-to-Code Speak commands to Aider to request features, tests, or fixes without typing aider.chat.
Images & Web Pages Attach screenshots, diagrams, or documentation URLs to provide visual context for edits aider.chat.
Linting & Testing Runs lint and test suites automatically after each change, and can fix issues it detects
Sourcetree and GitHub Desktop are both free, GUI-based Git clients aimed at simplifying version control for developers. While they share the same core purpose—making Git more accessible—they differ in features, UI design, integration options, and target audiences.
“Not every light performs the same way. Lights and lighting are tricky to handle. You have to plan for every circumstance. But the good news is, lighting can be adjusted. Let’s look at different factors that affect lighting in every scene you shoot. “
Use CRI, Luminous Efficacy and color temperature controls to match your needs.
Color Temperature Color temperature describes the “color” of white light by a light source radiated by a perfect black body at a given temperature measured in degrees Kelvin
CRI “The Color Rendering Index is a measurement of how faithfully a light source reveals the colors of whatever it illuminates, it describes the ability of a light source to reveal the color of an object, as compared to the color a natural light source would provide. The highest possible CRI is 100. A CRI of 100 generally refers to a perfect black body, like a tungsten light source or the sun. “
Candela is the basic unit of measure of the entire volume of light intensity from any point in a single direction from a light source. Note the detail: it measures the total volume of light within a certain beam angle and direction.
While the luminance of starlight is around 0.001 cd/m2, that of a sunlit scene is around 100,000 cd/m2, which is a hundred millions times higher. The luminance of the sun itself is approximately 1,000,000,000 cd/m2.
The candela per square metre (symbol: cd/m2) is the unit of luminance in the International System of Units (SI). The unit is based on the candela, the SI unit of luminous intensity, and the square metre, the SI unit of area. The nit (symbol: nt) is a non-SI name also used for this unit (1 nt = 1 cd/m2).[1] The term nit is believed to come from the Latin word nitēre, “to shine”. As a measure of light emitted per unit area, this unit is frequently used to specify the brightness of a display device.
NIT and cd/m2 (candela power) represent the same thing and can be used interchangeably. One nit is equivalent to one candela per square meter, where the candela is the amount of light which has been emitted by a common tallow candle, but NIT is not part of the International System of Units (abbreviated SI, from Systeme International, in French).
It’s easiest to think of a TV as emitting light directly, in much the same way as the Sun does. Nits are simply the measurement of the level of light (luminance) in a given area which the emitting source sends to your eyes or a camera sensor.
The Nit can be considered a unit of visible-light intensity which is often used to specify the brightness level of an LCD.
1 Nit is approximately equal to 3.426 Lumens. To work out a comparable number of Nits to Lumens, you need to multiply the number of Nits by 3.426. If you know the number of Lumens, and wish to know the Nits, simply divide the number of Lumens by 3.426.
Most consumer desktop LCDs have Nits of 200 to 300, the average TV most likely has an output capability of between 100 and 200 Nits, and an HDR TV ranges from 400 to 1,500 Nits.
Virtual Production sets currently sport around 6000 NIT ceiling and 1000 NIT wall panels.
The ambient brightness of a sunny day with clear blue skies is between 7000-10,000 nits (between 3000-7000 nits for overcast skies and indirect sunlight).
A bright sunny day can have specular highlights that reach over 100,000 nits. Direct sunlight is around 1,600,000,000 nits.
10,000 nits is also the typical brightness of a fluorescent tube – bright, but not painful to look at.
Tests showed that a “black level” of 0.005 nits (cd/m²) satisfied the vast majority of viewers. While 0.005 nits is very close to true black, Griffis says Dolby can go down to a black of 0.0001 nits, even though there is no need or ability for displays to get that dark today.
How bright is white? Dolby says the range of 0.005 nits – 10,000 nits satisfied 84% of the viewers in their viewing tests.
The brightest consumer HDR displays today are about 1,500 nits. Professional displays where HDR content is color-graded can achieve up to 4,000 nits peak brightness.
High brightness that would be in danger of damaging the eye would be in the neighborhood of 250,000 nits.
Lumens
Lumen is a measure of how much light is emitted (luminance, luminous flux) by an object. It indicates the total potential amount of light from a light source that is visible to the human eye.
Lumen is commonly used in the context of light bulbs or video-projectors as a metric for their brightness power.
Lumen is used to describe light output, and about video projectors, it is commonly referred to as ANSI Lumens. Simply put, lumens is how to find out how bright a LED display is. The higher the lumens, the brighter to display!
Technically speaking, a Lumen is the SI unit of luminous flux, which is equal to the amount of light which is emitted per second in a unit solid angle of one steradian from a uniform source of one-candela intensity radiating in all directions.
LUX
Lux(lx) or often Illuminance, is a photometric unit along a given area, which takes in account the sensitivity of human eye to different wavelenghts. It is the measure of light at a specific distance within a specific area at that distance. Often used to measure the incidental sun’s intensity.