


BREAKING NEWS
LATEST POSTS
-
SourceTree vs Github Desktop – Which one to use
Sourcetree and GitHub Desktop are both free, GUI-based Git clients aimed at simplifying version control for developers. While they share the same core purpose—making Git more accessible—they differ in features, UI design, integration options, and target audiences.
Installation & Setup
- Sourcetree
- Download: https://www.sourcetreeapp.com/
- Supported OS: Windows 10+, macOS 10.13+
- Prerequisites: Comes bundled with its own Git, or can be pointed to a system Git install.
- Initial Setup: Wizard guides SSH key generation, authentication with Bitbucket/GitHub/GitLab.
- GitHub Desktop
- Download: https://desktop.github.com/
- Supported OS: Windows 10+, macOS 10.15+
- Prerequisites: Bundled Git; seamless login with GitHub.com or GitHub Enterprise.
- Initial Setup: One-click sign-in with GitHub; auto-syncs repositories from your GitHub account.
Feature Comparison
(more…)Feature Sourcetree GitHub Desktop Branch Visualization Detailed graph view with drag-and-drop for rebasing/merging Linear graph, simpler but less configurable Staging & Commit File-by-file staging, inline diff view All-or-nothing staging, side-by-side diff Interactive Rebase Full support via UI Basic support via command line only Conflict Resolution Built-in merge tool integration (DiffMerge, Beyond Compare) Contextual conflict editor with choice panels Submodule Management Native submodule support Limited; requires CLI Custom Actions / Hooks Define custom actions (e.g., launch scripts) No UI for custom Git hooks Git Flow / Hg Flow Built-in support None Performance Can lag on very large repos Generally snappier on medium-sized repos Memory Footprint Higher RAM usage Lightweight Platform Integration Atlassian Bitbucket, Jira Deep GitHub.com / Enterprise integration Learning Curve Steeper for beginners Beginner-friendly - Sourcetree
-
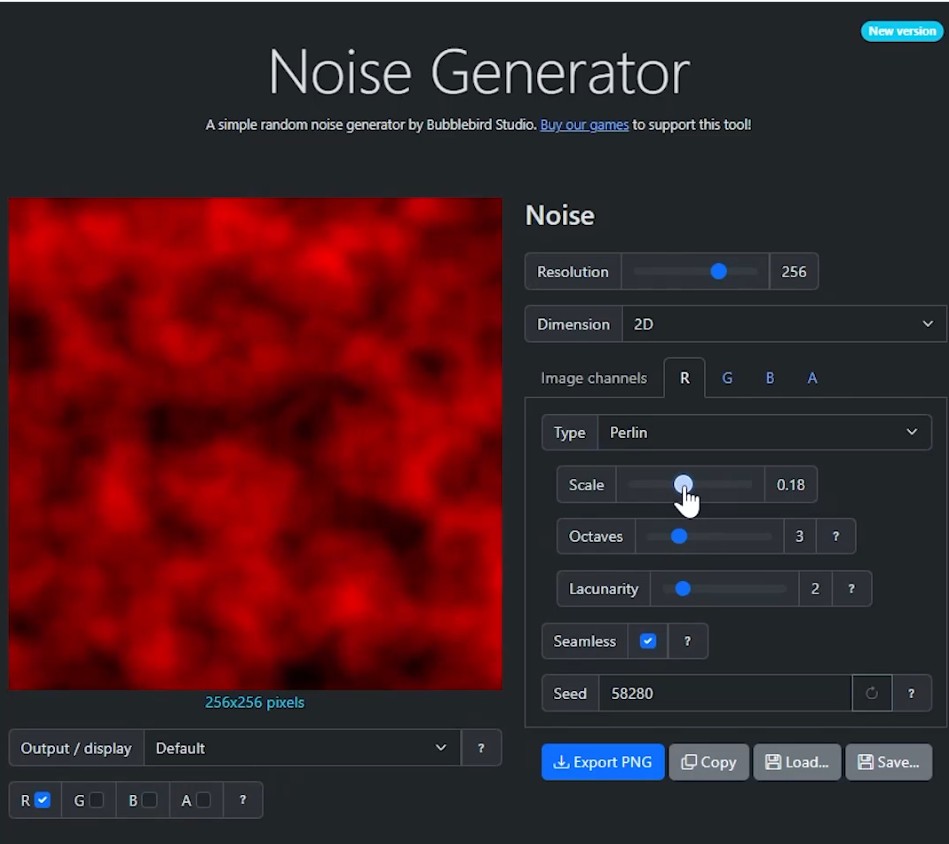
Bubblebird-Studio – Free NoiseGenerator
https://github.com/Bubblebird-Studio/NoiseGenerator
It currently support the following noise models:
Support for Blue Noise is planned.
You can freely use it here: https://noisegen.bubblebirdstudio.com/
-
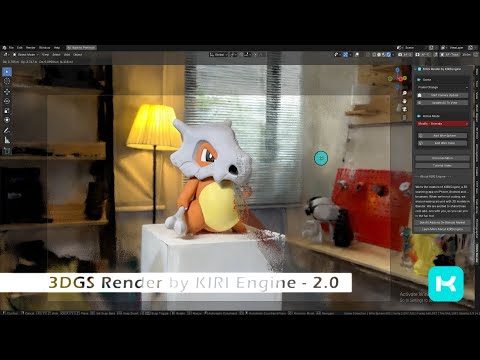
Free 3DGS Render Addon for Blender 2.0
https://superhivemarket.com/products/3dgs-render-by-kiri-engine
https://github.com/Kiri-Innovation/3dgs-render-blender-addon
https://www.kiriengine.app/blender-addon/3dgs-render
The addon is a full 3DGS editing and rendering suite for Blender.3DGS scans can be created from .OBJ files, or 3DGS .PLY files can be imported as mesh objects, offering two distinct workflows. The created objects can be manipulated, animated and rendered inside Blender. Or Blender can be used as an intermediate editing and painting software – with the results being exportable to other 3DGS software and viewers.
-
Unwrella Connect – A Free UV-Packer-IO Bridge for Blender
Homepage: https://www.uv-packer.com/
Download: https://www.uv-packer.com/blender/
Documentation: https://docs.3d-plugin.com/https://docs.3d-plugin.com/unwrellaconnect-blender
UnwrellaConnect for Blender is an extension that seamlessly connects Blender to our standalone UV editing applications, allowing you to run their powerful functionality directly from within the Blender interface – no need to leave your workflow.


FEATURED POSTS


-
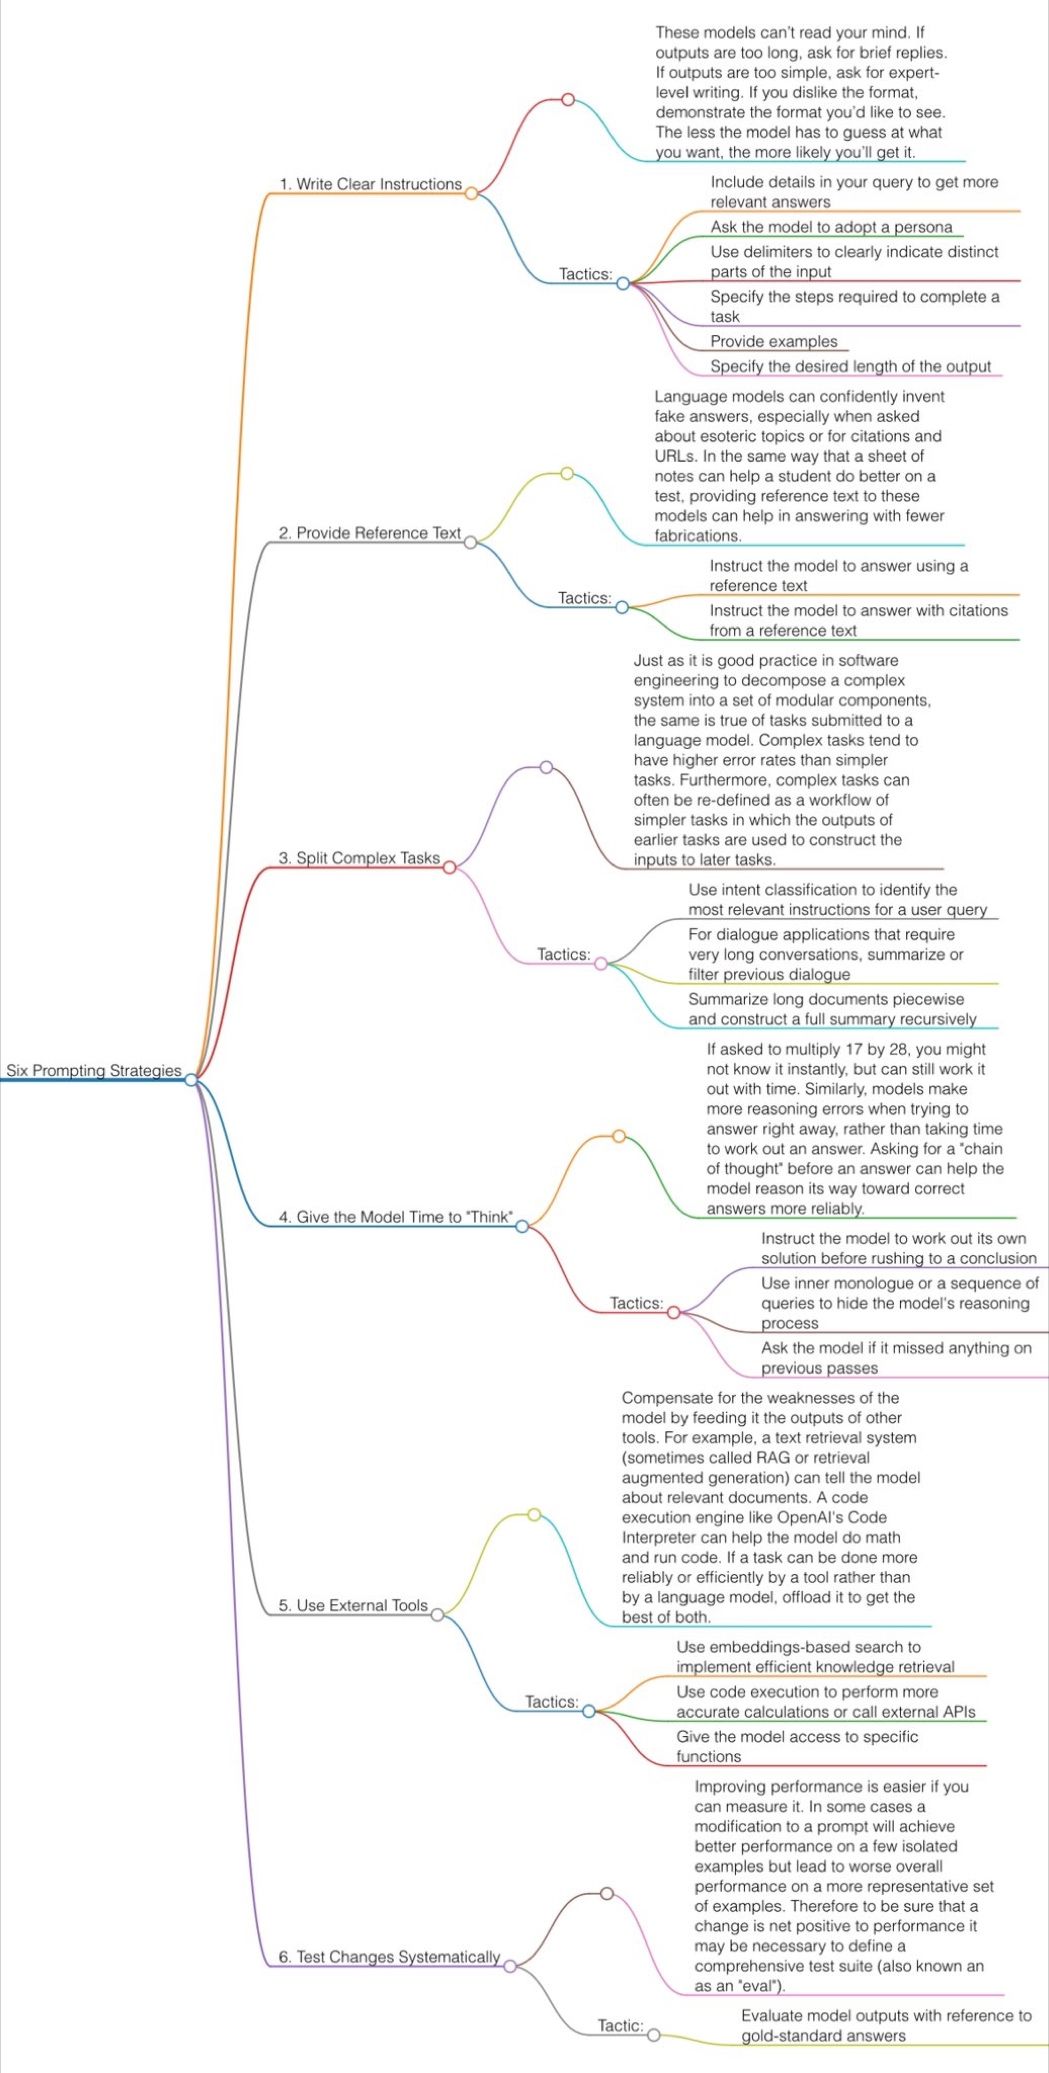
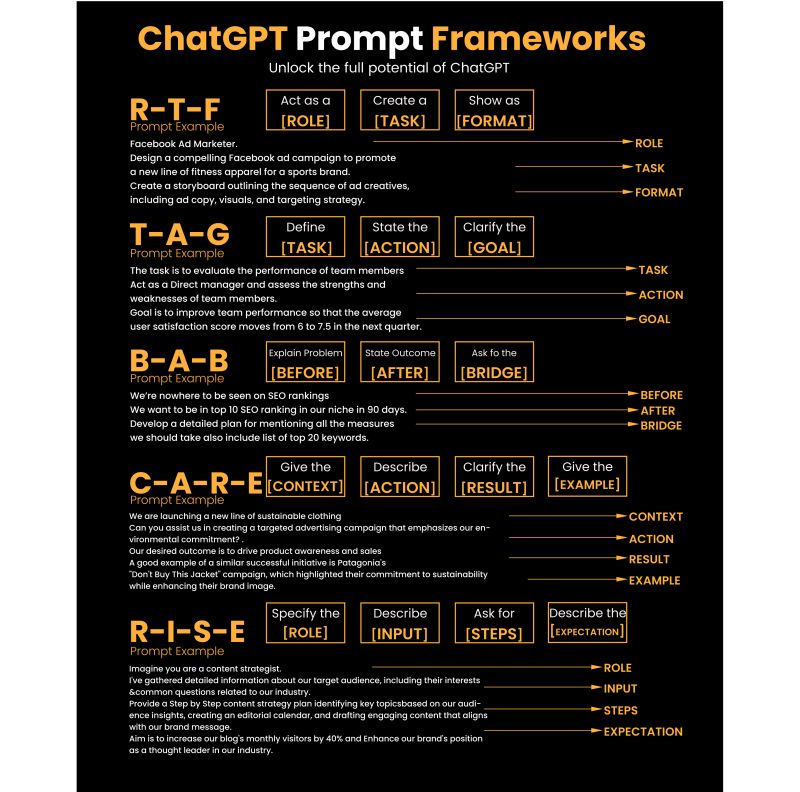
Guide to Prompt Engineering
The 10 most powerful techniques:
1. Communicate the Why
2. Explain the context (strategy, data)
3. Clearly state your objectives
4. Specify the key results (desired outcomes)
5. Provide an example or template
6. Define roles and use the thinking hats
7. Set constraints and limitations
8. Provide step-by-step instructions (CoT)
9. Ask to reverse-engineer the result to get a prompt
10. Use markdown or XML to clearly separate sections (e.g., examples)
Top 10 high-ROI use cases for PMs:
1. Get new product ideas
2. Identify hidden assumptions
3. Plan the right experiments
4. Summarize a customer interview
5. Summarize a meeting
6. Social listening (sentiment analysis)
7. Write user stories
8. Generate SQL queries for data analysis
9. Get help with PRD and other templates
10. Analyze your competitors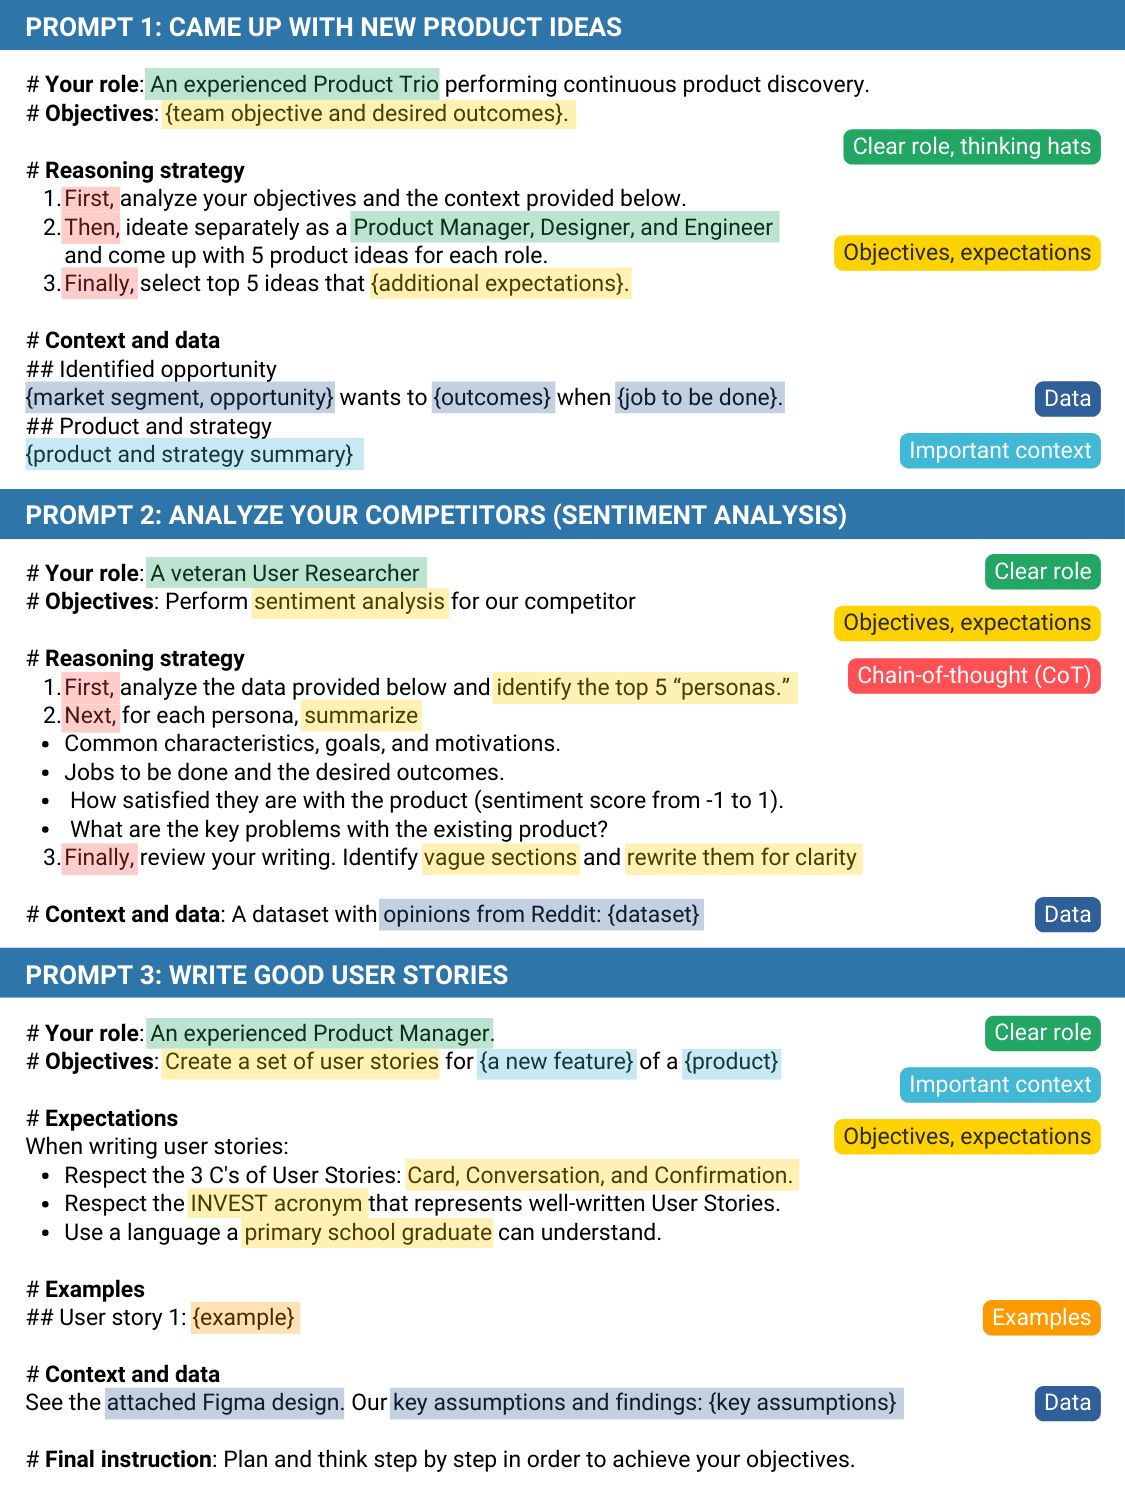
Quick prompting scheme:
1- pass an image to JoyCaption
https://www.pixelsham.com/2024/12/23/joy-caption-alpha-two-free-automatic-caption-of-images/
2- tune the caption with ChatGPT as suggested by Pixaroma:
Craft detailed prompts for Al (image/video) generation, avoiding quotation marks. When I provide a description or image, translate it into a prompt that captures a cinematic, movie-like quality, focusing on elements like scene, style, mood, lighting, and specific visual details. Ensure that the prompt evokes a rich, immersive atmosphere, emphasizing textures, depth, and realism. Always incorporate (static/slow) camera or cinematic movement to enhance the feeling of fluidity and visual storytelling. Keep the wording precise yet descriptive, directly usable, and designed to achieve a high-quality, film-inspired result.
https://www.reddit.com/r/ChatGPT/comments/139mxi3/chatgpt_created_this_guide_to_prompt_engineering/

1. Use the 80/20 principle to learn faster
Prompt: “I want to learn about [insert topic]. Identify and share the most important 20% of learnings from this topic that will help me understand 80% of it.”
2. Learn and develop any new skill
Prompt: “I want to learn/get better at [insert desired skill]. I am a complete beginner. Create a 30-day learning plan that will help a beginner like me learn and improve this skill.”
3. Summarize long documents and articles
Prompt: “Summarize the text below and give me a list of bullet points with key insights and the most important facts.” [Insert text]
4. Train ChatGPT to generate prompts for you
Prompt: “You are an AI designed to help [insert profession]. Generate a list of the 10 best prompts for yourself. The prompts should be about [insert topic].”
5. Master any new skill
Prompt: “I have 3 free days a week and 2 months. Design a crash study plan to master [insert desired skill].”
6. Simplify complex information
Prompt: “Break down [insert topic] into smaller, easier-to-understand parts. Use analogies and real-life examples to simplify the concept and make it more relatable.”
More suggestions under the post…
(more…)
-
sRGB vs REC709 – An introduction and FFmpeg implementations

1. Basic Comparison
- What they are
- sRGB: A standard “web”/computer-display RGB color space defined by IEC 61966-2-1. It’s used for most monitors, cameras, printers, and the vast majority of images on the Internet.
- Rec. 709: An HD-video color space defined by ITU-R BT.709. It’s the go-to standard for HDTV broadcasts, Blu-ray discs, and professional video pipelines.
- Why they exist
- sRGB: Ensures consistent colors across different consumer devices (PCs, phones, webcams).
- Rec. 709: Ensures consistent colors across video production and playback chains (cameras → editing → broadcast → TV).
- What you’ll see
- On your desktop or phone, images tagged sRGB will look “right” without extra tweaking.
- On an HDTV or video-editing timeline, footage tagged Rec. 709 will display accurate contrast and hue on broadcast-grade monitors.
2. Digging Deeper
Feature sRGB Rec. 709 White point D65 (6504 K), same for both D65 (6504 K) Primaries (x,y) R: (0.640, 0.330) G: (0.300, 0.600) B: (0.150, 0.060) R: (0.640, 0.330) G: (0.300, 0.600) B: (0.150, 0.060) Gamut size Identical triangle on CIE 1931 chart Identical to sRGB Gamma / transfer Piecewise curve: approximate 2.2 with linear toe Pure power-law γ≈2.4 (often approximated as 2.2 in practice) Matrix coefficients N/A (pure RGB usage) Y = 0.2126 R + 0.7152 G + 0.0722 B (Rec. 709 matrix) Typical bit-depth 8-bit/channel (with 16-bit variants) 8-bit/channel (10-bit for professional video) Usage metadata Tagged as “sRGB” in image files (PNG, JPEG, etc.) Tagged as “bt709” in video containers (MP4, MOV) Color range Full-range RGB (0–255) Studio-range Y′CbCr (Y′ [16–235], Cb/Cr [16–240])
Why the Small Differences Matter
(more…) - What they are
