


BREAKING NEWS
LATEST POSTS
-
Runway Aleph
https://runwayml.com/research/introducing-runway-aleph
Generate New Camera Angles
Generate the Next Shot
Use Any Style to Transfer to a Video
Change Environments, Locations, Seasons and Time of Day
Add Things to a Scene
Remove Things from a Scene
Change Objects in a Scene
Apply the Motion of a Video to an Image
Alter a Character’s Appearance
Recolor Elements of a Scene
Relight Shots
Green Screen Any Object, Person or Situation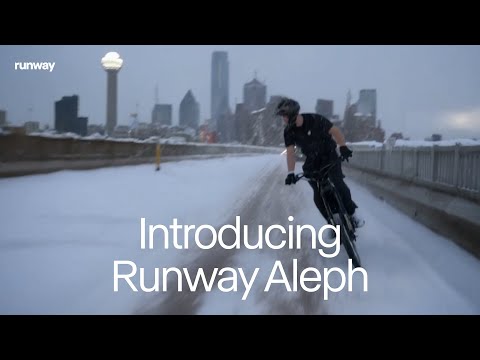
-
Mike Wong – AtoMeow – A Blue noise image stippling in Processing

https://github.com/mwkm/atoMeow
https://www.shadertoy.com/view/7s3XzX
This demo is created for coders who are familiar with this awesome creative coding platform. You may quickly modify the code to work for video or to stipple your own Procssing drawings by turning them into
PImageand run the simulation. This demo code also serves as a reference implementation of my article Blue noise sampling using an N-body simulation-based method. If you are interested in 2.5D, you may mod the code to achieve what I discussed in this artist friendly article.Convert your video to a dotted noise.
-
Aitor Echeveste – Free CG and Comp Projection Shot, Download the Assets & Follow the Workflow

What’s Included:
- Cleaned and extended base plates
- Full Maya and Nuke 3D projection layouts
- Bullet and environment CG renders with AOVs (RGB, normals, position, ID, etc.)
- Explosion FX in slow motion
- 3D scene geometry for projection
- Camera + lensing setup
- Light groups and passes for look development
-
Tauseef Fayyaz About readable code – Clean Code Practices
𝗛𝗲𝗿𝗲’𝘀 𝘄𝗵𝗮𝘁 𝘁𝗼 𝗺𝗮𝘀𝘁𝗲𝗿 𝗶𝗻 𝗖𝗹𝗲𝗮𝗻 𝗖𝗼𝗱𝗲 𝗣𝗿𝗮𝗰𝘁𝗶𝗰𝗲𝘀:
🔹 Code Readability & Simplicity – Use meaningful names, write short functions, follow SRP, flatten logic, and remove dead code.
→ Clarity is a feature.
🔹 Function & Class Design – Limit parameters, favor pure functions, small classes, and composition over inheritance.
→ Structure drives scalability.
🔹 Testing & Maintainability – Write readable unit tests, avoid over-mocking, test edge cases, and refactor with confidence.
→ Test what matters.
🔹 Code Structure & Architecture – Organize by features, minimize global state, avoid god objects, and abstract smartly.
→ Architecture isn’t just backend.
🔹 Refactoring & Iteration – Apply the Boy Scout Rule, DRY, KISS, and YAGNI principles regularly.
→ Refactor like it’s part of development.
🔹 Robustness & Safety – Validate early, handle errors gracefully, avoid magic numbers, and favor immutability.
→ Safe code is future-proof.
🔹 Documentation & Comments – Let your code explain itself. Comment why, not what, and document at the source.
→ Good docs reduce team friction.
🔹 Tooling & Automation – Use linters, formatters, static analysis, and CI reviews to automate code quality.
→ Let tools guard your gates.
🔹 Final Review Practices – Review, refactor nearby code, and avoid cleverness in the name of brevity.
→ Readable code is better than smart code. -
Mark Theriault “Steamboat Willie” – AI Re-Imagining of a 1928 Classic in 4k
I ran Steamboat Willie (now public domain) through Flux Kontext to reimagine it as a 3D-style animated piece. Instead of going the polished route with something like W.A.N. 2.1 for full image-to-video generation, I leaned into the raw, handmade vibe that comes from converting each frame individually. It gave it a kind of stop-motion texture, imperfect, a bit wobbly, but full of character.

-
Microsoft DAViD – Data-efficient and Accurate Vision Models from Synthetic Data
Our human-centric dense prediction model delivers high-quality, detailed (depth) results while achieving remarkable efficiency, running orders of magnitude faster than competing methods, with inference speeds as low as 21 milliseconds per frame (the large multi-task model on an NVIDIA A100). It reliably captures a wide range of human characteristics under diverse lighting conditions, preserving fine-grained details such as hair strands and subtle facial features. This demonstrates the model’s robustness and accuracy in complex, real-world scenarios.
https://microsoft.github.io/DAViD
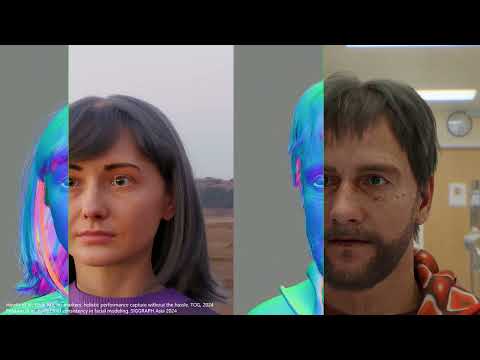
The state of the art in human-centric computer vision achieves high accuracy and robustness across a diverse range of tasks. The most effective models in this domain have billions of parameters, thus requiring extremely large datasets, expensive training regimes, and compute-intensive inference. In this paper, we demonstrate that it is possible to train models on much smaller but high-fidelity synthetic datasets, with no loss in accuracy and higher efficiency. Using synthetic training data provides us with excellent levels of detail and perfect labels, while providing strong guarantees for data provenance, usage rights, and user consent. Procedural data synthesis also provides us with explicit control on data diversity, that we can use to address unfairness in the models we train. Extensive quantitative assessment on real input images demonstrates accuracy of our models on three dense prediction tasks: depth estimation, surface normal estimation, and soft foreground segmentation. Our models require only a fraction of the cost of training and inference when compared with foundational models of similar accuracy.
-
-
Embedding frame ranges into Quicktime movies with FFmpeg
QuickTime (.mov) files are fundamentally time-based, not frame-based, and so don’t have a built-in, uniform “first frame/last frame” field you can set as numeric frame IDs. Instead, tools like Shotgun Create rely on the timecode track and the movie’s duration to infer frame numbers. If you want Shotgun to pick up a non-default frame range (e.g. start at 1001, end at 1064), you must bake in an SMPTE timecode that corresponds to your desired start frame, and ensure the movie’s duration matches your clip length.
How Shotgun Reads Frame Ranges
- Default start frame is 1. If no timecode metadata is present, Shotgun assumes the movie begins at frame 1.
- Timecode ⇒ frame number. Shotgun Create “honors the timecodes of media sources,” mapping the embedded TC to frame IDs. For example, a 24 fps QuickTime tagged with a start timecode of 00:00:41:17 will be interpreted as beginning on frame 1001 (1001 ÷ 24 fps ≈ 41.71 s).
Embedding a Start Timecode
QuickTime uses a
tmcd(timecode) track. You can bake in an SMPTE track via FFmpeg’s-timecodeflag or via Compressor/encoder settings:- Compute your start TC.
- Desired start frame = 1001
- Frame 1001 at 24 fps ⇒ 1001 ÷ 24 ≈ 41.708 s ⇒ TC 00:00:41:17
- FFmpeg example:
ffmpeg -i input.mov \
  -c copy \
  -timecode 00:00:41:17 \
  output.mov
This adds a timecode track beginning at 00:00:41:17, which Shotgun maps to frame 1001.
Ensuring the Correct End Frame
Shotgun infers the last frame from the movie’s duration. To end on frame 1064:
- Frame count = 1064 – 1001 + 1 = 64 frames
- Duration = 64 ÷ 24 fps ≈ 2.667 s
FFmpeg trim example:
ffmpeg -i input.mov \
  -c copy \
  -timecode 00:00:41:17 \
  -t 00:00:02.667 \
  output_trimmed.mov
This results in a 64-frame clip (1001→1064) at 24 fps.

-
Aider.chat – A free, open-source AI pair-programming CLI tool
Aider enables developers to interactively generate, modify, and test code by leveraging both cloud-hosted and local LLMs directly from the terminal or within an IDE. Key capabilities include comprehensive codebase mapping, support for over 100 programming languages, automated git commit messages, voice-to-code interactions, and built-in linting and testing workflows. Installation is straightforward via pip or uv, and while the tool itself has no licensing cost, actual usage costs stem from the underlying LLM APIs, which are billed separately by providers like OpenAI or Anthropic.
Key Features
- Cloud & Local LLM Support
Connect to most major LLM providers out of the box, or run models locally for privacy and cost control aider.chat. - Codebase Mapping
Automatically indexes all project files so that even large repositories can be edited contextually aider.chat. - 100+ Language Support
Works with Python, JavaScript, Rust, Ruby, Go, C++, PHP, HTML, CSS, and dozens more aider.chat. - Git Integration
Generates sensible commit messages and automates diffs/undo operations through familiar git tooling aider.chat. - Voice-to-Code
Speak commands to Aider to request features, tests, or fixes without typing aider.chat. - Images & Web Pages
Attach screenshots, diagrams, or documentation URLs to provide visual context for edits aider.chat. - Linting & Testing
Runs lint and test suites automatically after each change, and can fix issues it detects
- Cloud & Local LLM Support


FEATURED POSTS
-
SlowMoVideo – How to make a slow motion shot with the open source program
http://slowmovideo.granjow.net/
slowmoVideo is an OpenSource program that creates slow-motion videos from your footage.
Slow motion cinematography is the result of playing back frames for a longer duration than they were exposed. For example, if you expose 240 frames of film in one second, then play them back at 24 fps, the resulting movie is 10 times longer (slower) than the original filmed event….
Film cameras are relatively simple mechanical devices that allow you to crank up the speed to whatever rate the shutter and pull-down mechanism allow. Some film cameras can operate at 2,500 fps or higher (although film shot in these cameras often needs some readjustment in postproduction). Video, on the other hand, is always captured, recorded, and played back at a fixed rate, with a current limit around 60fps. This makes extreme slow motion effects harder to achieve (and less elegant) on video, because slowing down the video results in each frame held still on the screen for a long time, whereas with high-frame-rate film there are plenty of frames to fill the longer durations of time. On video, the slow motion effect is more like a slide show than smooth, continuous motion.
One obvious solution is to shoot film at high speed, then transfer it to video (a case where film still has a clear advantage, sorry George). Another possibility is to cross dissolve or blur from one frame to the next. This adds a smooth transition from one still frame to the next. The blur reduces the sharpness of the image, and compared to slowing down images shot at a high frame rate, this is somewhat of a cheat. However, there isn’t much you can do about it until video can be recorded at much higher rates. Of course, many film cameras can’t shoot at high frame rates either, so the whole super-slow-motion endeavor is somewhat specialized no matter what medium you are using. (There are some high speed digital cameras available now that allow you to capture lots of digital frames directly to your computer, so technology is starting to catch up with film. However, this feature isn’t going to appear in consumer camcorders any time soon.)

-
Photography basics: Exposure Value vs Photographic Exposure vs Il/Luminance vs Pixel luminance measurements
Also see: https://www.pixelsham.com/2015/05/16/how-aperture-shutter-speed-and-iso-affect-your-photos/
In photography, exposure value (EV) is a number that represents a combination of a camera’s shutter speed and f-number, such that all combinations that yield the same exposure have the same EV (for any fixed scene luminance).
The EV concept was developed in an attempt to simplify choosing among combinations of equivalent camera settings. Although all camera settings with the same EV nominally give the same exposure, they do not necessarily give the same picture. EV is also used to indicate an interval on the photographic exposure scale. 1 EV corresponding to a standard power-of-2 exposure step, commonly referred to as a stop
EV 0 corresponds to an exposure time of 1 sec and a relative aperture of f/1.0. If the EV is known, it can be used to select combinations of exposure time and f-number.Note EV does not equal to photographic exposure. Photographic Exposure is defined as how much light hits the camera’s sensor. It depends on the camera settings mainly aperture and shutter speed. Exposure value (known as EV) is a number that represents the exposure setting of the camera.
Thus, strictly, EV is not a measure of luminance (indirect or reflected exposure) or illuminance (incidentl exposure); rather, an EV corresponds to a luminance (or illuminance) for which a camera with a given ISO speed would use the indicated EV to obtain the nominally correct exposure. Nonetheless, it is common practice among photographic equipment manufacturers to express luminance in EV for ISO 100 speed, as when specifying metering range or autofocus sensitivity.
The exposure depends on two things: how much light gets through the lenses to the camera’s sensor and for how long the sensor is exposed. The former is a function of the aperture value while the latter is a function of the shutter speed. Exposure value is a number that represents this potential amount of light that could hit the sensor. It is important to understand that exposure value is a measure of how exposed the sensor is to light and not a measure of how much light actually hits the sensor. The exposure value is independent of how lit the scene is. For example a pair of aperture value and shutter speed represents the same exposure value both if the camera is used during a very bright day or during a dark night.
Each exposure value number represents all the possible shutter and aperture settings that result in the same exposure. Although the exposure value is the same for different combinations of aperture values and shutter speeds the resulting photo can be very different (the aperture controls the depth of field while shutter speed controls how much motion is captured).
EV 0.0 is defined as the exposure when setting the aperture to f-number 1.0 and the shutter speed to 1 second. All other exposure values are relative to that number. Exposure values are on a base two logarithmic scale. This means that every single step of EV – plus or minus 1 – represents the exposure (actual light that hits the sensor) being halved or doubled.Formulas
(more…)


