UnwrellaConnect for Blender is an extension that seamlessly connects Blender to our standalone UV editing applications, allowing you to run their powerful functionality directly from within the Blender interface – no need to leave your workflow.
Hand drawn sketch | Models made in CC4 with ZBrush | Textures in Substance Painter | Paint over in Photoshop | Renders, Animation, VFX with AI. Each 5-8 hours spread over a couple days.
As I continue to explore the use of AI tools to enhance my 3D character creation process, I discover they can be incredibly useful during the previsualization phase to see what a character might ultimately look like in production. I selectively use AI to enhance and accelerate my creative process, not to replace it or use it as an end to end solution.
This module provides a straightforward, idiomatic interface for authenticating to Vault, managing secrets engines, performing cryptographic operations, and administering a Vault cluster (e.g., initialization, seal/unseal)
My new AI-assisted short film is here. Kira explores human cloning and the search for identity in today’s world. It took nearly 600 prompts, 12 days (during my free time), and a $500 budget to bring this project to life. The entire film was created by one person using a range of AI tools, all listed at the end. Enjoy. ~ Hashem
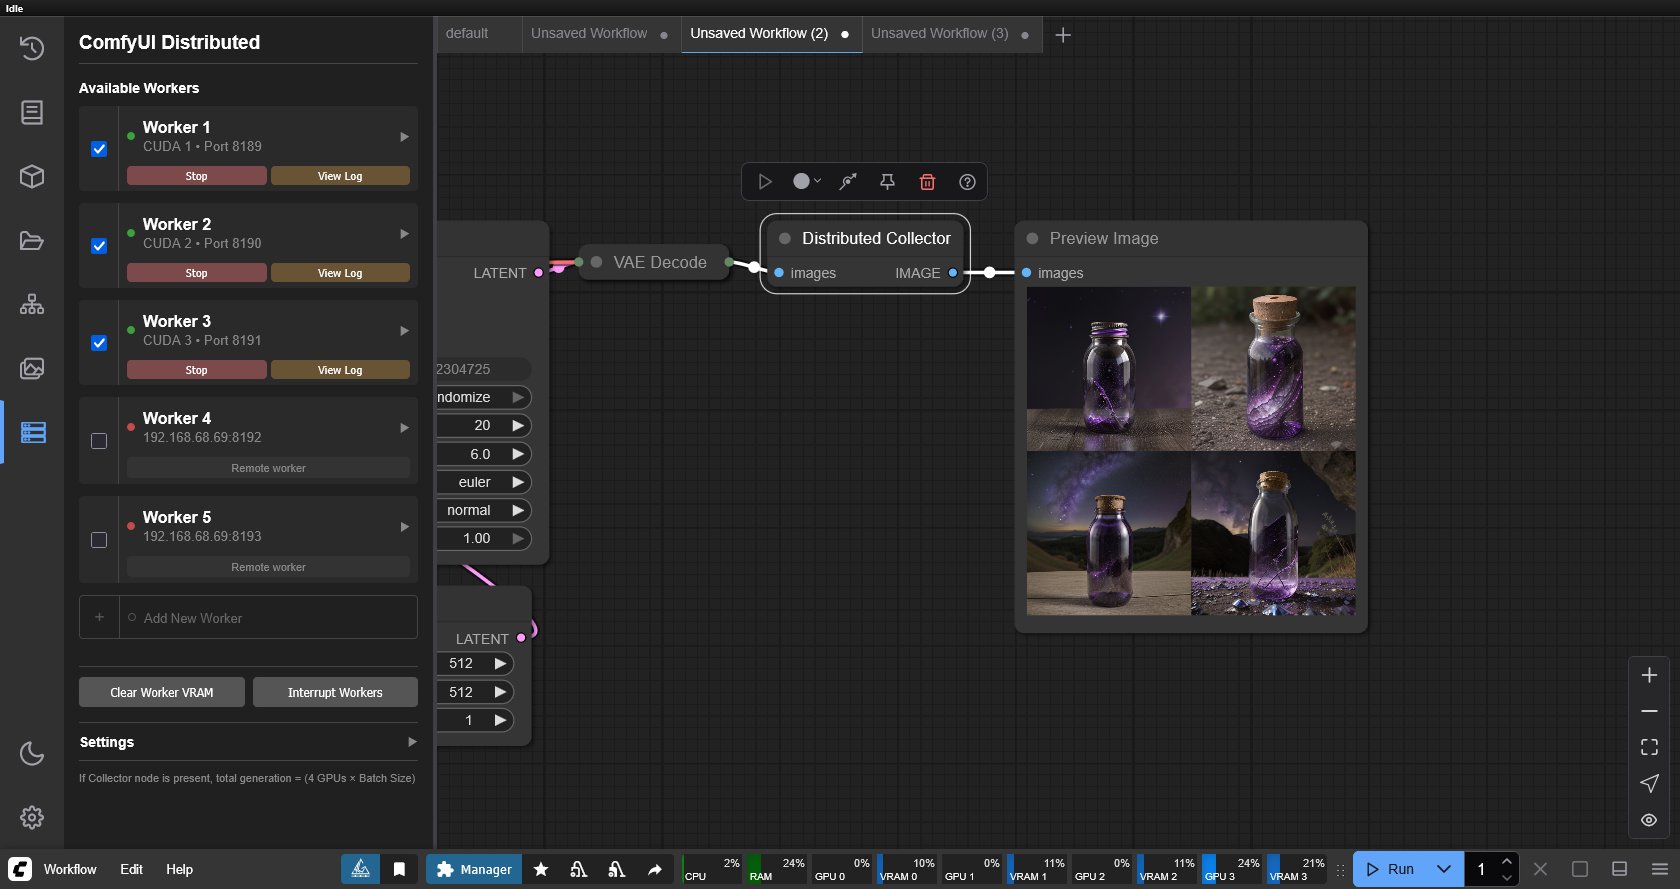
comfy-cli is a command line tool that helps users easily install and manage ComfyUI, a powerful open-source machine learning framework. With comfy-cli, you can quickly set up ComfyUI, install packages, and manage custom nodes, all from the convenience of your terminal.
C:\<PATH_TO>\python.exe -m venv C:\comfyUI_cli_install
cd C:\comfyUI_env
C:\comfyUI_env\Scripts\activate.bat
C:\<PATH_TO>\python.exe -m pip install comfy-cli
comfy --workspace=C:\comfyUI_env\ComfyUI install

# then
comfy launch
# or
comfy launch -- --cpu --listen 0.0.0.0
If you are trying to clone a different install, pip freeze it first. Then run those requirements.
# from the original env
python.exe -m pip freeze > M:\requirements.txt

# under the new venv env
pip install -r M:\requirements.txt
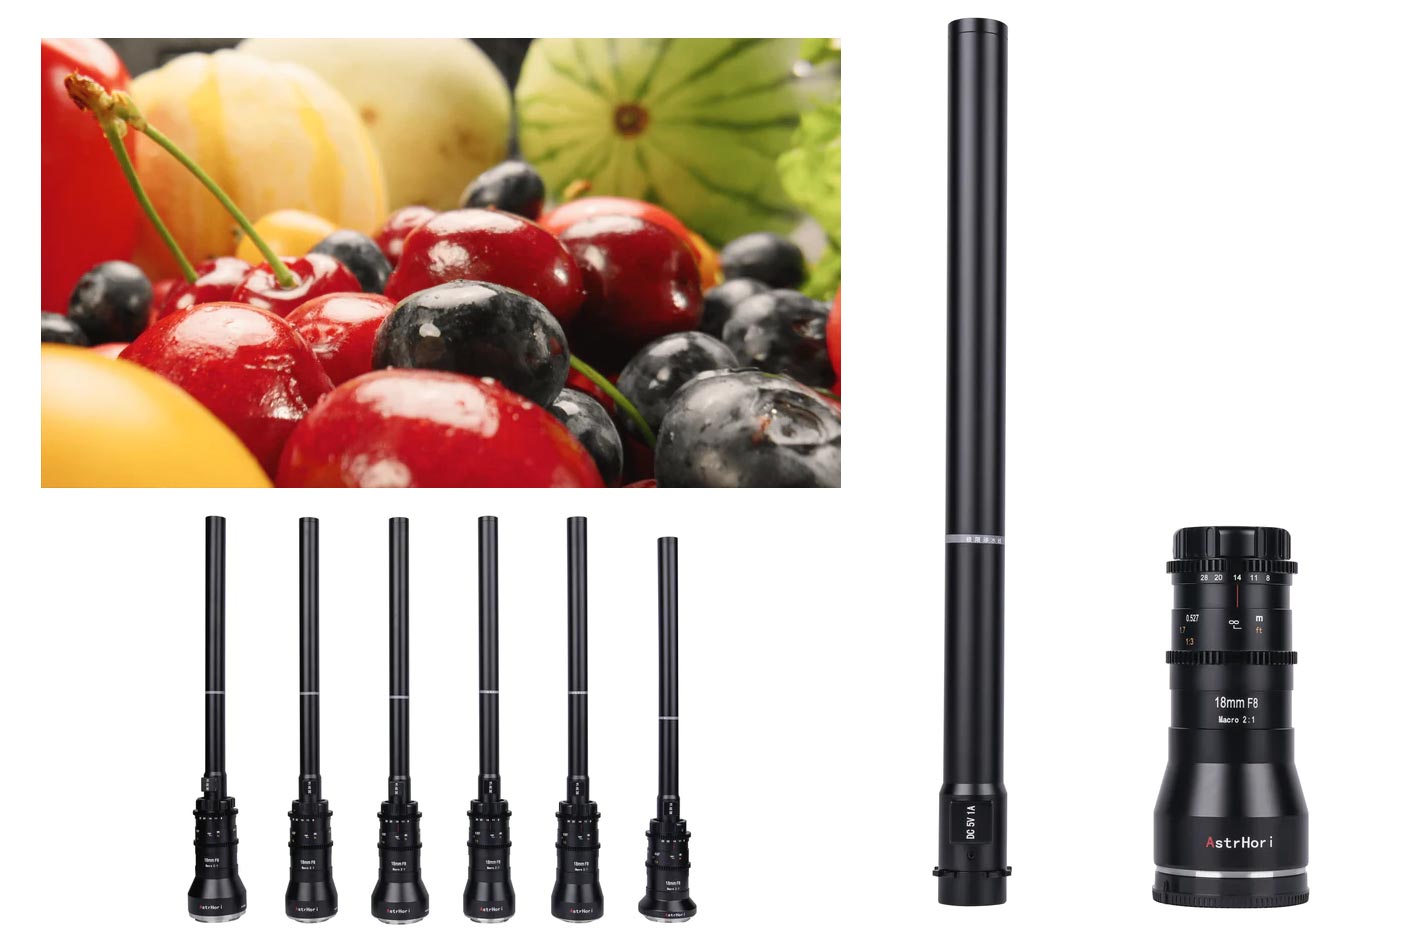
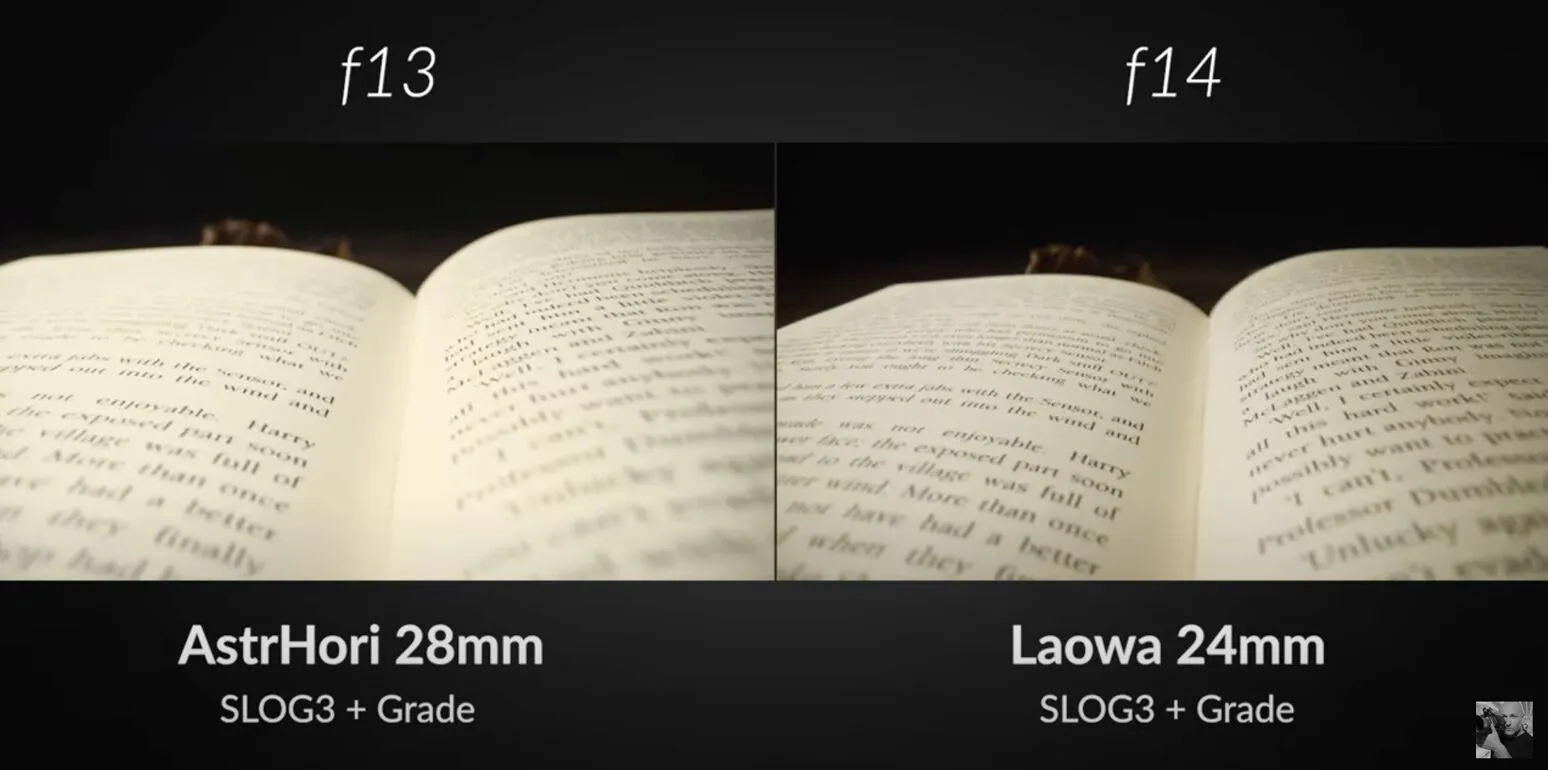
Overall, the Laowa did perform better than the AstrHori across all of our tests. The AstrHori lost contrast and suffered from flare when the subject was backlit. It also struggled to achieve perfect neutrality in terms of colour balance.
However, as mentioned above, the cost difference between these two lenses is significant. Considering that it costs less than half as much as the Laowa, the AstrHori is an impressive macro probe lens for the price.
In photography, exposure value (EV) is a number that represents a combination of a camera’s shutter speed and f-number, such that all combinations that yield the same exposure have the same EV (for any fixed scene luminance).
The EV concept was developed in an attempt to simplify choosing among combinations of equivalent camera settings. Although all camera settings with the same EV nominally give the same exposure, they do not necessarily give the same picture. EV is also used to indicate an interval on the photographic exposure scale. 1 EV corresponding to a standard power-of-2 exposure step, commonly referred to as a stop
EV 0 corresponds to an exposure time of 1 sec and a relative aperture of f/1.0. If the EV is known, it can be used to select combinations of exposure time and f-number.
Note EV does not equal to photographic exposure. Photographic Exposureis defined as how much light hits the camera’s sensor. It depends on the camera settings mainly aperture and shutter speed. Exposure value (known as EV) is a number that represents theexposure setting of the camera.
Thus, strictly, EV is not a measure of luminance (indirect or reflected exposure) or illuminance (incidentl exposure); rather, an EV corresponds to a luminance (or illuminance) for which a camera with a given ISO speed would use the indicated EV to obtain the nominally correct exposure. Nonetheless, it is common practice among photographic equipment manufacturers to express luminance in EV for ISO 100 speed, as when specifying metering range or autofocus sensitivity.
The exposure depends on two things: how much light gets through the lenses to the camera’s sensor and for how long the sensor is exposed. The former is a function of the aperture value while the latter is a function of the shutter speed. Exposure value is a number that represents this potential amount of light that could hit the sensor. It is important to understand that exposure value is a measure of how exposed the sensor is to light and not a measure of how much light actually hits the sensor. The exposure value is independent of how lit the scene is. For example a pair of aperture value and shutter speed represents the same exposure value both if the camera is used during a very bright day or during a dark night.
Each exposure value number represents all the possible shutter and aperture settings that result in the same exposure. Although the exposure value is the same for different combinations of aperture values and shutter speeds the resulting photo can be very different (the aperture controls the depth of field while shutter speed controls how much motion is captured).
EV 0.0 is defined as the exposure when setting the aperture to f-number 1.0 and the shutter speed to 1 second. All other exposure values are relative to that number. Exposure values are on a base two logarithmic scale. This means that every single step of EV – plus or minus 1 – represents the exposure (actual light that hits the sensor) being halved or doubled.
Shutter is the device that controls the amount of light through a lens. Basically in general it controls the amount of time a film is exposed.
Shutter speed is how long this device is open for, which also defines motion blur… the longer it stays open the blurrier the image captured.
The number refers to the amount of light actually allowed through.
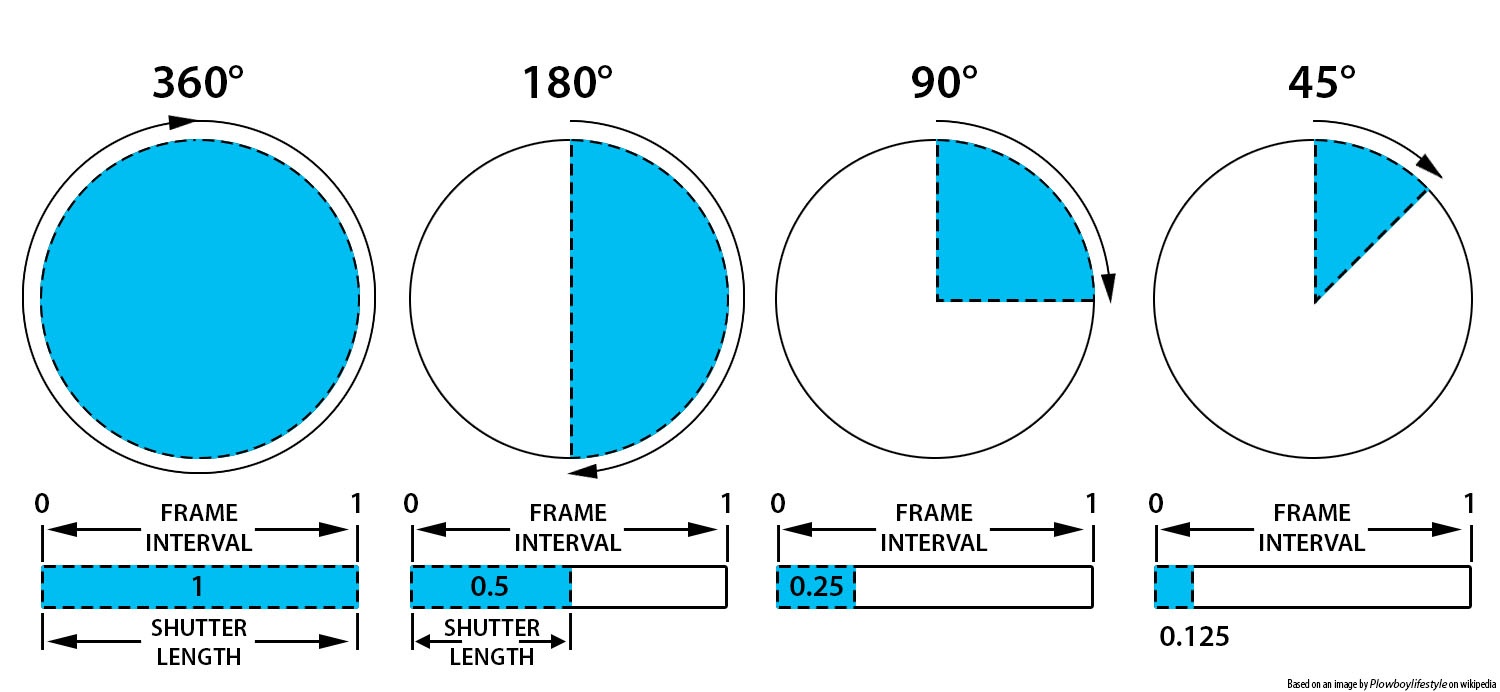
As a reference, shooting at 24fps, at 180 shutter angle or 1/48th of shutter speed (0.0208 exposure time) will produce motion blur which is similar to what we perceive at naked eye
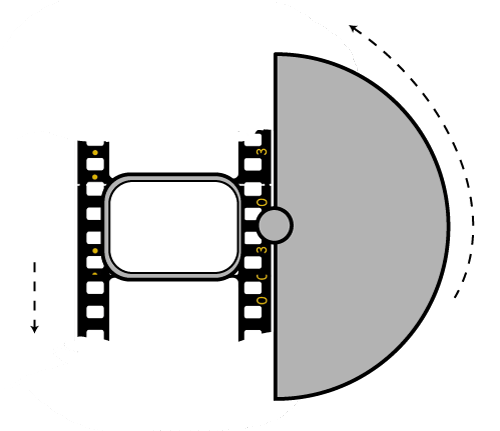
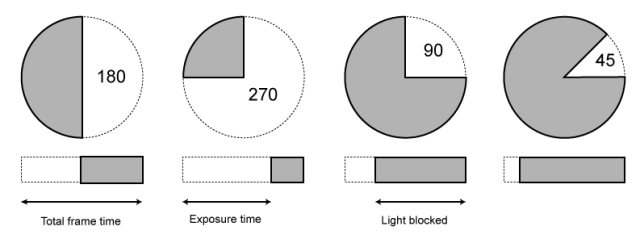
Talked of as in (shutter) angles, for historical reasons, as the original exposure mechanism was controlled through a pie shaped mirror in front of the lens.
A shutter of 180 degrees is blocking/allowing light for half circle. (half blocked, half open). 270 degrees is one quarter pie shaped, which would allow for a higher exposure time (3 quarter pie open, vs one quarter closed) 90 degrees is three quarter pie shaped, which would allow for a lower exposure (one quarter open, three quarters closed)
For example here is a chart from shutter angle to shutter speed at 24 fps: 270 = 1/32
180 = 1/48
172.8 = 1/50
144 = 1/60
90 = 1/96
72 = 1/120
45 = 1/198
22.5 = 1/348
11 = 1/696
8.6 = 1/1000
The above is basically the relation between the way a video camera calculates shutter (fractions of a second) and the way a film camera calculates shutter (in degrees).
Smaller shutter angles show strobing artifacts. As the camera only ever sees at least half of the time (for a typical 180 degree shutter). Due to being obscured by the shutter during that period, it doesn’t capture the scene continuously.
This means that fast moving objects, and especially objects moving across the frame, will exhibit jerky movement. This is called strobing. The defect is also very noticeable during pans. Smaller shutter angles (shorter exposure) exhibit more pronounced strobing effects.
Larger shutter angles show more motion blur. As the longer exposure captures more motion.
Note that in 3D you want to first sum the total of the shutter open and shutter close values, than compare that to the shutter angle aperture, ie:
shutter open -0.0625
shutter close 0.0625
Total shutter = 0.0625+0.0625 = 0.125
Shutter angle = 360*0.125 = 45
shutter open -0.125
shutter close 0.125
Total shutter = 0.125+0.125 = 0.25
Shutter angle = 360*0.25 = 90
shutter open -0.25
shutter close 0.25
Total shutter = 0.25+0.25 = 0.5
Shutter angle = 360*0.5 = 180
shutter open -0.375
shutter close 0.375
Total shutter = 0.375+0.375 = 0.75
Shutter angle = 360*0.75 = 270