


BREAKING NEWS
LATEST POSTS
-
AI and the Law – 𝗬𝗼𝘂𝗿 (𝗽𝗿𝗶𝘃𝗮𝘁𝗲𝗹𝘆) 𝘀𝗵𝗮𝗿𝗲𝗱 𝗖𝗵𝗮𝘁𝗚𝗣𝗧 𝗰𝗵𝗮𝘁𝘀 𝗺𝗶𝗴𝗵𝘁 𝗯𝗲 𝘀𝗵𝗼𝘄𝗶𝗻𝗴 𝘂𝗽 𝗼𝗻 𝗚𝗼𝗼𝗴𝗹𝗲
Many users assume shared conversations are only seen by friends or colleagues — but when you use OpenAI’s share feature, those chats get now indexed by search engines like Google.
Meaning: your “private” AI prompts could end up very public. This is called Google dorking — and it’s shockingly effective.
Over 70,000 chats are now publicly viewable. Some are harmless.
Others? They might expose sensitive strategies, internal docs, product plans, even company secrets.
OpenAI currently does not block indexing. So if you’ve ever shared something thinking it’s “just a link” — it might now be searchable by anyone. You can even build a bot to crawl and analyze these.
Welcome to the new visibility layer of AI. I can’t say I am surprised…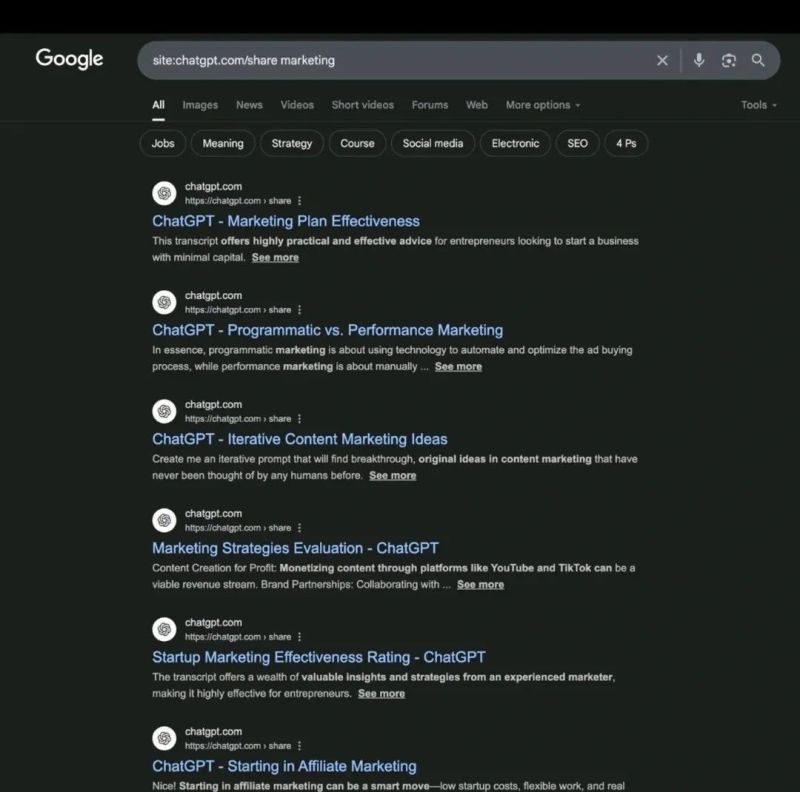
-
Stefan Ringelschwandtner – LUT Inspector tool
It lets you load any .cube LUT right in your browser, see the RGB curves, and use a split view on the Granger Test Image to compare the original vs. LUT-applied version in real time — perfect for spotting hue shifts, saturation changes, and contrast tweaks.
https://mononodes.com/lut-inspector/


-
Python Automation – Beginner to Advance Guid
WhatApp Message Automation
Automating Instagram
Telegrame Bot Creation
Email Automation with Python
PDF and Document Automation -
Kelly Boesch – Static and Toward The Light
https://www.kellyboeschdesign.com
I was working an album cover last night and got these really cool images in midjourney so made a video out of it. Animated using Pika. Song made using Suno Full version on my bandcamp. It’s called Static.
https://www.linkedin.com/posts/kellyboesch_midjourney-keyframes-ai-activity-7359244714853736450-Wvcr(more…) -
sRGB vs REC709 – An introduction and FFmpeg implementations

1. Basic Comparison
- What they are
- sRGB: A standard “web”/computer-display RGB color space defined by IEC 61966-2-1. It’s used for most monitors, cameras, printers, and the vast majority of images on the Internet.
- Rec. 709: An HD-video color space defined by ITU-R BT.709. It’s the go-to standard for HDTV broadcasts, Blu-ray discs, and professional video pipelines.
- Why they exist
- sRGB: Ensures consistent colors across different consumer devices (PCs, phones, webcams).
- Rec. 709: Ensures consistent colors across video production and playback chains (cameras → editing → broadcast → TV).
- What you’ll see
- On your desktop or phone, images tagged sRGB will look “right” without extra tweaking.
- On an HDTV or video-editing timeline, footage tagged Rec. 709 will display accurate contrast and hue on broadcast-grade monitors.
2. Digging Deeper
Feature sRGB Rec. 709 White point D65 (6504 K), same for both D65 (6504 K) Primaries (x,y) R: (0.640, 0.330) G: (0.300, 0.600) B: (0.150, 0.060) R: (0.640, 0.330) G: (0.300, 0.600) B: (0.150, 0.060) Gamut size Identical triangle on CIE 1931 chart Identical to sRGB Gamma / transfer Piecewise curve: approximate 2.2 with linear toe Pure power-law γ≈2.4 (often approximated as 2.2 in practice) Matrix coefficients N/A (pure RGB usage) Y = 0.2126 R + 0.7152 G + 0.0722 B (Rec. 709 matrix) Typical bit-depth 8-bit/channel (with 16-bit variants) 8-bit/channel (10-bit for professional video) Usage metadata Tagged as “sRGB” in image files (PNG, JPEG, etc.) Tagged as “bt709” in video containers (MP4, MOV) Color range Full-range RGB (0–255) Studio-range Y′CbCr (Y′ [16–235], Cb/Cr [16–240])
Why the Small Differences Matter
(more…) - What they are


FEATURED POSTS

-
AI and the Law – This Vox article is OpenAI training data – How AI is holding the internet hostage and media is no exception
- Pros of AI Chatbots:
- Efficiency and Accessibility: AI chatbots can handle a large volume of queries simultaneously, providing quick and consistent responses, which is beneficial for customer service and support.
- 24/7 Availability: Unlike human operators, chatbots are available around the clock, ensuring that users can get assistance at any time.
- Cost-Effective: Implementing chatbots can reduce operational costs for businesses by minimizing the need for large customer service teams.
- Personalization and Scalability: Advanced AI can offer personalized responses and scale effortlessly to meet demand.
- Cons of AI Chatbots:
- Bias and Misinformation: AI chatbots can inadvertently propagate biases present in their training data, leading to inaccurate or offensive responses.
- Lack of Human Touch: Chatbots may struggle to understand and respond appropriately to nuanced human emotions and complex queries, potentially frustrating users.
- Technical Limitations: While AI is advancing, chatbots can still make errors and provide incorrect information, which can undermine user trust.
- Environmental Impact: Training and running large AI models consume significant energy, contributing to carbon emissions and environmental concerns.
The deployment of AI chatbots raises significant ethical concerns. Biases in training data can lead to the generation of skewed or harmful content, posing risks to users and undermining trust in AI systems. Additionally, the potential misuse of AI chatbots for spreading misinformation and the environmental impact of training large AI models are critical issues that require attention.
The trajectory of AI chatbot development points towards increasingly sophisticated and generalized AI capabilities. As research progresses towards Artificial General Intelligence (AGI), the potential applications of AI chatbots are expected to expand further, encompassing more complex and nuanced tasks. However, achieving AGI will require addressing current ethical and technical challenges to ensure the responsible development and deployment of AI technologies.

- Pros of AI Chatbots:
-
MiniMax-Remover – Taming Bad Noise Helps Video Object Removal Rotoscoping
https://github.com/zibojia/MiniMax-Remover
MiniMax-Remover is a fast and effective video object remover based on minimax optimization. It operates in two stages: the first stage trains a remover using a simplified DiT architecture, while the second stage distills a robust remover with CFG removal and fewer inference steps.

-
Methods for creating motion blur in Stop motion
en.wikipedia.org/wiki/Go_motion
Petroleum jelly
This crude but reasonably effective technique involves smearing petroleum jelly (“Vaseline”) on a plate of glass in front of the camera lens, also known as vaselensing, then cleaning and reapplying it after each shot — a time-consuming process, but one which creates a blur around the model. This technique was used for the endoskeleton in The Terminator. This process was also employed by Jim Danforth to blur the pterodactyl’s wings in Hammer Films’ When Dinosaurs Ruled the Earth, and by Randal William Cook on the terror dogs sequence in Ghostbusters.[citation needed]Bumping the puppet
Gently bumping or flicking the puppet before taking the frame will produce a slight blur; however, care must be taken when doing this that the puppet does not move too much or that one does not bump or move props or set pieces.Moving the table
Moving the table on which the model is standing while the film is being exposed creates a slight, realistic blur. This technique was developed by Ladislas Starevich: when the characters ran, he moved the set in the opposite direction. This is seen in The Little Parade when the ballerina is chased by the devil. Starevich also used this technique on his films The Eyes of the Dragon, The Magical Clock and The Mascot. Aardman Animations used this for the train chase in The Wrong Trousers and again during the lorry chase in A Close Shave. In both cases the cameras were moved physically during a 1-2 second exposure. The technique was revived for the full-length Wallace & Gromit: The Curse of the Were-Rabbit.Go motion
The most sophisticated technique was originally developed for the film The Empire Strikes Back and used for some shots of the tauntauns and was later used on films like Dragonslayer and is quite different from traditional stop motion. The model is essentially a rod puppet. The rods are attached to motors which are linked to a computer that can record the movements as the model is traditionally animated. When enough movements have been made, the model is reset to its original position, the camera rolls and the model is moved across the table. Because the model is moving during shots, motion blur is created.A variation of go motion was used in E.T. the Extra-Terrestrial to partially animate the children on their bicycles.
-
The Forbidden colors – Red-Green & Blue-Yellow: The Stunning Colors You Can’t See
www.livescience.com/17948-red-green-blue-yellow-stunning-colors.html

While the human eye has red, green, and blue-sensing cones, those cones are cross-wired in the retina to produce a luminance channel plus a red-green and a blue-yellow channel, and it’s data in that color space (known technically as “LAB”) that goes to the brain. That’s why we can’t perceive a reddish-green or a yellowish-blue, whereas such colors can be represented in the RGB color space used by digital cameras.
https://en.rockcontent.com/blog/the-use-of-yellow-in-data-design
The back of the retina is covered in light-sensitive neurons known as cone cells and rod cells. There are three types of cone cells, each sensitive to different ranges of light. These ranges overlap, but for convenience the cones are referred to as blue (short-wavelength), green (medium-wavelength), and red (long-wavelength). The rod cells are primarily used in low-light situations, so we’ll ignore those for now.
When light enters the eye and hits the cone cells, the cones get excited and send signals to the brain through the visual cortex. Different wavelengths of light excite different combinations of cones to varying levels, which generates our perception of color. You can see that the red cones are most sensitive to light, and the blue cones are least sensitive. The sensitivity of green and red cones overlaps for most of the visible spectrum.

Here’s how your brain takes the signals of light intensity from the cones and turns it into color information. To see red or green, your brain finds the difference between the levels of excitement in your red and green cones. This is the red-green channel.
To get “brightness,” your brain combines the excitement of your red and green cones. This creates the luminance, or black-white, channel. To see yellow or blue, your brain then finds the difference between this luminance signal and the excitement of your blue cones. This is the yellow-blue channel.
From the calculations made in the brain along those three channels, we get four basic colors: blue, green, yellow, and red. Seeing blue is what you experience when low-wavelength light excites the blue cones more than the green and red.
Seeing green happens when light excites the green cones more than the red cones. Seeing red happens when only the red cones are excited by high-wavelength light.
Here’s where it gets interesting. Seeing yellow is what happens when BOTH the green AND red cones are highly excited near their peak sensitivity. This is the biggest collective excitement that your cones ever have, aside from seeing pure white.
Notice that yellow occurs at peak intensity in the graph to the right. Further, the lens and cornea of the eye happen to block shorter wavelengths, reducing sensitivity to blue and violet light.

-
What is physically correct lighting all about?
http://gamedev.stackexchange.com/questions/60638/what-is-physically-correct-lighting-all-about
2012-08 Nathan Reed wrote:
Physically-based shading means leaving behind phenomenological models, like the Phong shading model, which are simply built to “look good” subjectively without being based on physics in any real way, and moving to lighting and shading models that are derived from the laws of physics and/or from actual measurements of the real world, and rigorously obey physical constraints such as energy conservation.
For example, in many older rendering systems, shading models included separate controls for specular highlights from point lights and reflection of the environment via a cubemap. You could create a shader with the specular and the reflection set to wildly different values, even though those are both instances of the same physical process. In addition, you could set the specular to any arbitrary brightness, even if it would cause the surface to reflect more energy than it actually received.
In a physically-based system, both the point light specular and the environment reflection would be controlled by the same parameter, and the system would be set up to automatically adjust the brightness of both the specular and diffuse components to maintain overall energy conservation. Moreover you would want to set the specular brightness to a realistic value for the material you’re trying to simulate, based on measurements.
Physically-based lighting or shading includes physically-based BRDFs, which are usually based on microfacet theory, and physically correct light transport, which is based on the rendering equation (although heavily approximated in the case of real-time games).
It also includes the necessary changes in the art process to make use of these features. Switching to a physically-based system can cause some upsets for artists. First of all it requires full HDR lighting with a realistic level of brightness for light sources, the sky, etc. and this can take some getting used to for the lighting artists. It also requires texture/material artists to do some things differently (particularly for specular), and they can be frustrated by the apparent loss of control (e.g. locking together the specular highlight and environment reflection as mentioned above; artists will complain about this). They will need some time and guidance to adapt to the physically-based system.
On the plus side, once artists have adapted and gained trust in the physically-based system, they usually end up liking it better, because there are fewer parameters overall (less work for them to tweak). Also, materials created in one lighting environment generally look fine in other lighting environments too. This is unlike more ad-hoc models, where a set of material parameters might look good during daytime, but it comes out ridiculously glowy at night, or something like that.
Here are some resources to look at for physically-based lighting in games:
SIGGRAPH 2013 Physically Based Shading Course, particularly the background talk by Naty Hoffman at the beginning. You can also check out the previous incarnations of this course for more resources.
Sébastien Lagarde, Adopting a physically-based shading model and Feeding a physically-based shading model
And of course, I would be remiss if I didn’t mention Physically-Based Rendering by Pharr and Humphreys, an amazing reference on this whole subject and well worth your time, although it focuses on offline rather than real-time rendering.