Category: composition


Types of Film Lights and their efficiency – CRI, Color Temperature and Luminous Efficacy
nofilmschool.com/types-of-film-lights
“Not every light performs the same way. Lights and lighting are tricky to handle. You have to plan for every circumstance. But the good news is, lighting can be adjusted. Let’s look at different factors that affect lighting in every scene you shoot. ”
Use CRI, Luminous Efficacy and color temperature controls to match your needs.

Color Temperature
Color temperature describes the “color” of white light by a light source radiated by a perfect black body at a given temperature measured in degrees Kelvin
http://www.pixelsham.com/2019/10/18/color-temperature/
CRI
“The Color Rendering Index is a measurement of how faithfully a light source reveals the colors of whatever it illuminates, it describes the ability of a light source to reveal the color of an object, as compared to the color a natural light source would provide. The highest possible CRI is 100. A CRI of 100 generally refers to a perfect black body, like a tungsten light source or the sun. ”
https://www.studiobinder.com/blog/what-is-color-rendering-index/


https://en.wikipedia.org/wiki/Color_rendering_index
| Light source | CCT (K) | CRI |
|---|---|---|
| Low-pressure sodium (LPS/SOX) | 1800 | −44 |
| Clear mercury-vapor | 6410 | 17 |
| High-pressure sodium (HPS/SON) | 2100 | 24 |
| Coated mercury-vapor | 3600 | 49 |
| Halophosphate warm-white fluorescent | 2940 | 51 |
| Halophosphate cool-white fluorescent | 4230 | 64 |
| Tri-phosphor warm-white fluorescent | 2940 | 73 |
| Halophosphate cool-daylight fluorescent | 6430 | 76 |
| “White” SON | 2700 | 82 |
| Standard LED Lamp | 2700–5000 | 83 |
| Quartz metal halide | 4200 | 85 |
| Tri-phosphor cool-white fluorescent | 4080 | 89 |
| High-CRI LED lamp (blue LED) | 2700–5000 | 95 |
| Ceramic discharge metal-halide lamp | 5400 | 96 |
| Ultra-high-CRI LED lamp (violet LED) | 2700–5000 | 99 |
| Incandescent/halogen bulb | 3200 | 100 |
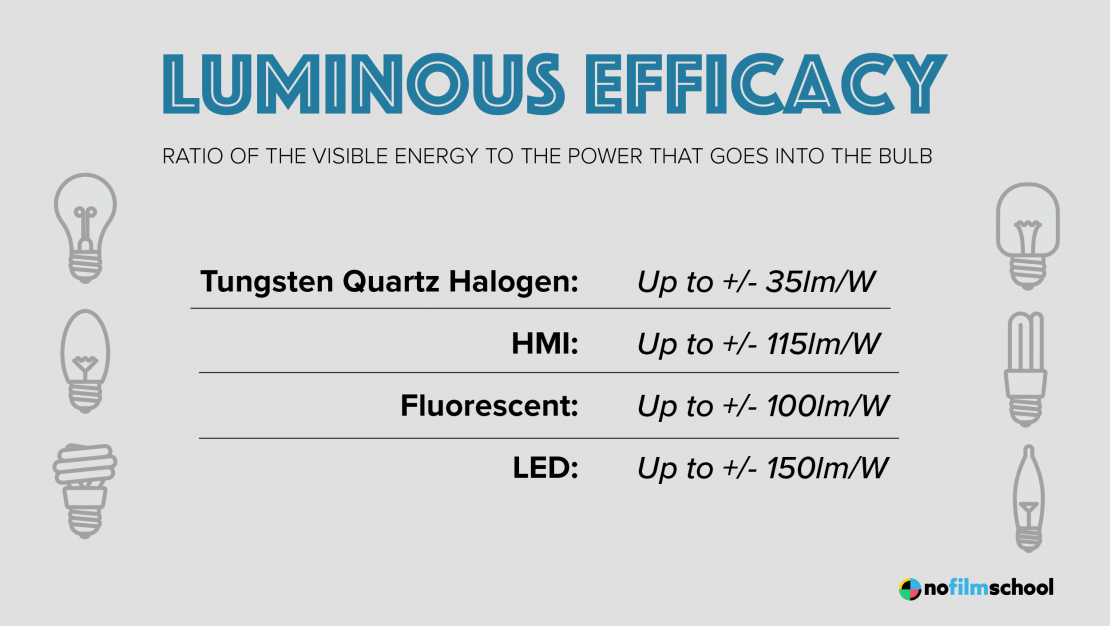
Luminous Efficacy
Luminous efficacy is a measure of how well a light source produces visible light, watts out versus watts in, measured in lumens per watt. In other words it is a measurement that indicates the ability of a light source to emit visible light using a given amount of power. It is a ratio of the visible energy to the power that goes into the bulb.
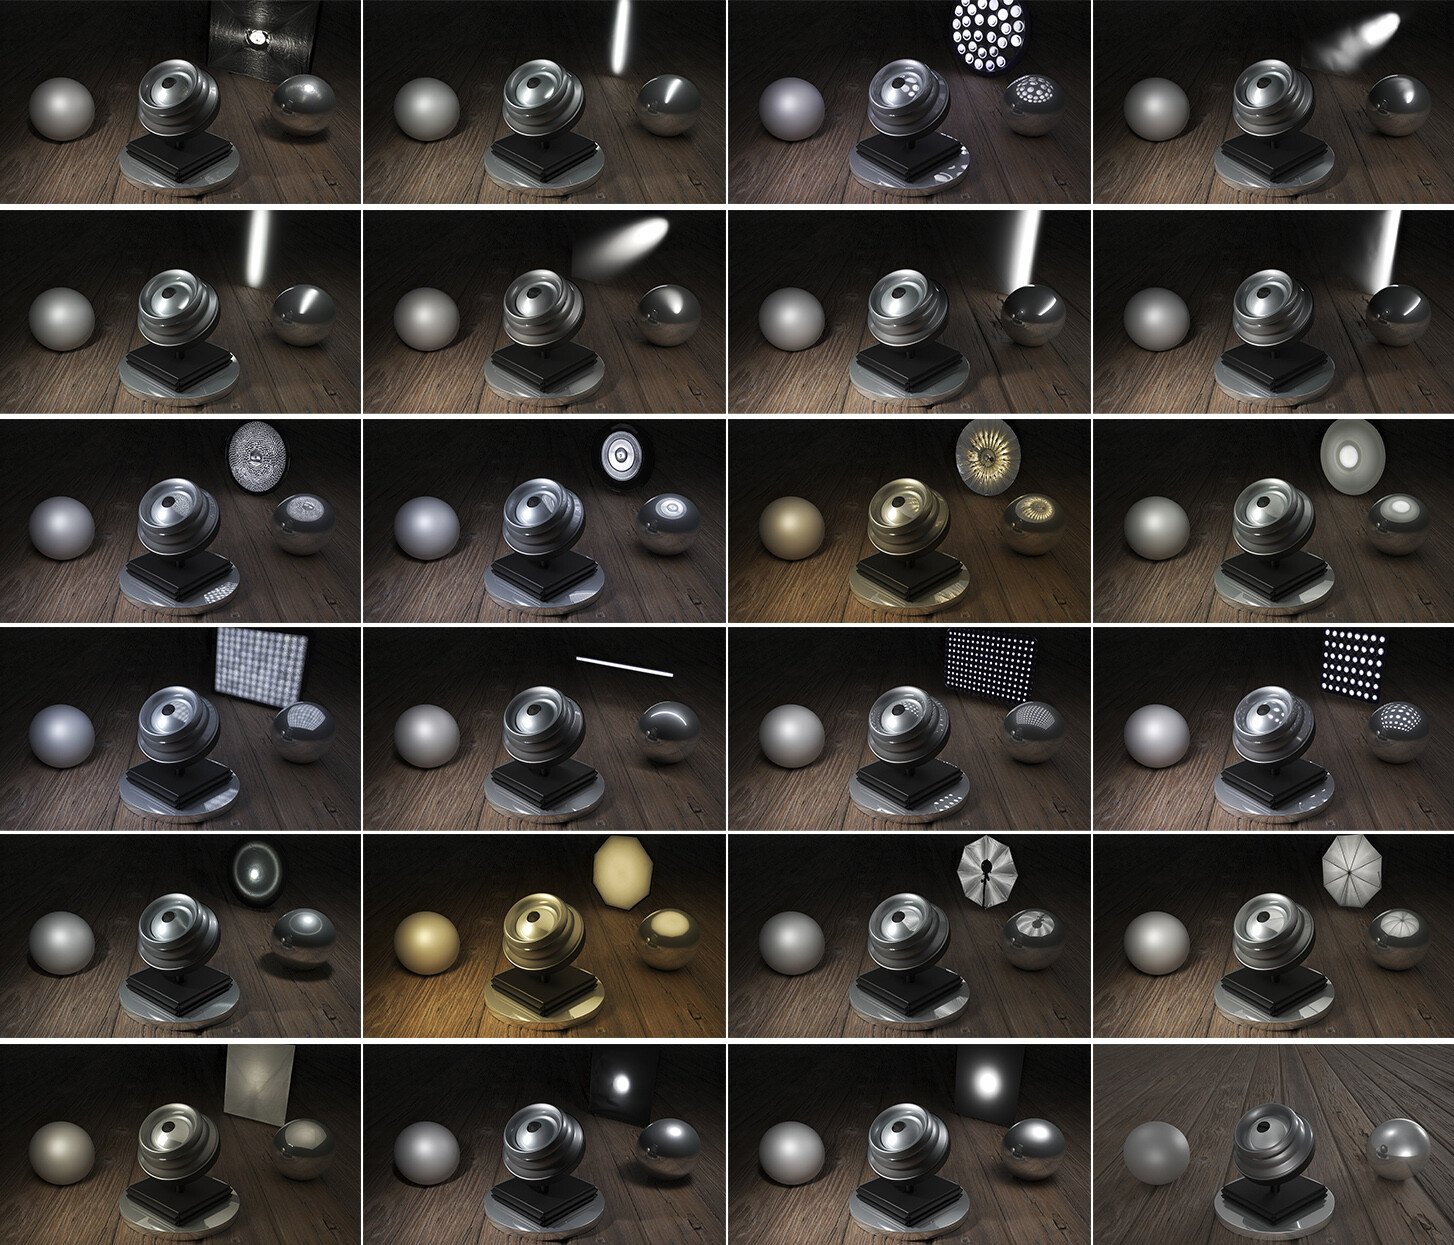
FILM LIGHT TYPES

![]()
Consumer light types


Tungsten Lights
Light interiors and match domestic places or office locations. Daylight.
Advantages of Tungsten Lights
Almost perfect color rendition
Low cost
Does not use mercury like CFLs (fluorescent) or mercury vapor lights
Better color temperature than standard tungsten
Longer life than a conventional incandescent
Instant on to full brightness, no warm-up time, and it is dimmable
Disadvantages of Tungsten Lights
Extremely hot
High power requirement
The lamp is sensitive to oils and cannot be touched
The bulb is capable of blowing and sending hot glass shards outward. A screen or layer of glass on the outside of the lamp can protect users.
Hydrargyrum medium-arc iodide lights
HMI’s are used when high output is required. They are also used to recreate sun shining through windows or to fake additional sun while shooting exteriors. HMIs can light huge areas at once.
Advantages of HMI lights
High light output
Higher efficiency
High color temperature
Disadvantages of HMI lights:
High cost
High power requirement
Dims only to about 50%
the color temperature increases with dimming
HMI bulbs will explode is dropped and release toxic chemicals
Fluorescent
Fluorescent film lighting is achieved by laying multiple tubes next to each other, combining as many as you want for the desired brightness. The good news is you can choose your bulbs to either be warm or cool depending on the scenario you’re shooting. You want to get these bulbs close to the subject because they’re not great at opening up spaces. Fluorescent lighting is used to light interiors and is more compact and cooler than tungsten or HMI lighting.
Advantages of Fluorescent lights
High efficiency
Low power requirement
Low cost
Long lamp life
Cool
Capable of soft even lighting over a large area
Lightweight
Disadvantages of Fluorescent lights
Flicker
High CRI
Domestic tubes have low CRI & poor color rendition.
LED
LED’s are more and more common on film sets. You can use batteries to power them. That makes them portable and sleek – no messy cabled needed. You can rig your own panels of LED lights to fit any space necessary as well. LED’s can also power Fresnel style lamp heads such as the Arri L-series.
Advantages of LED light
Soft, even lighting
Pure light without UV-artifacts
High efficiency
Low power consumption, can be battery powered
Excellent dimming by means of pulse width modulation control
Long lifespan
Environmentally friendly
Insensitive to shock
No risk of explosion
Disadvantages of LED light
High cost.
LED’s are currently still expensive for their total light output

https://www.artstation.com/marketplace/p/lP0V/hdri-collection-1-23-studio-lights-lamps-and-softboxes


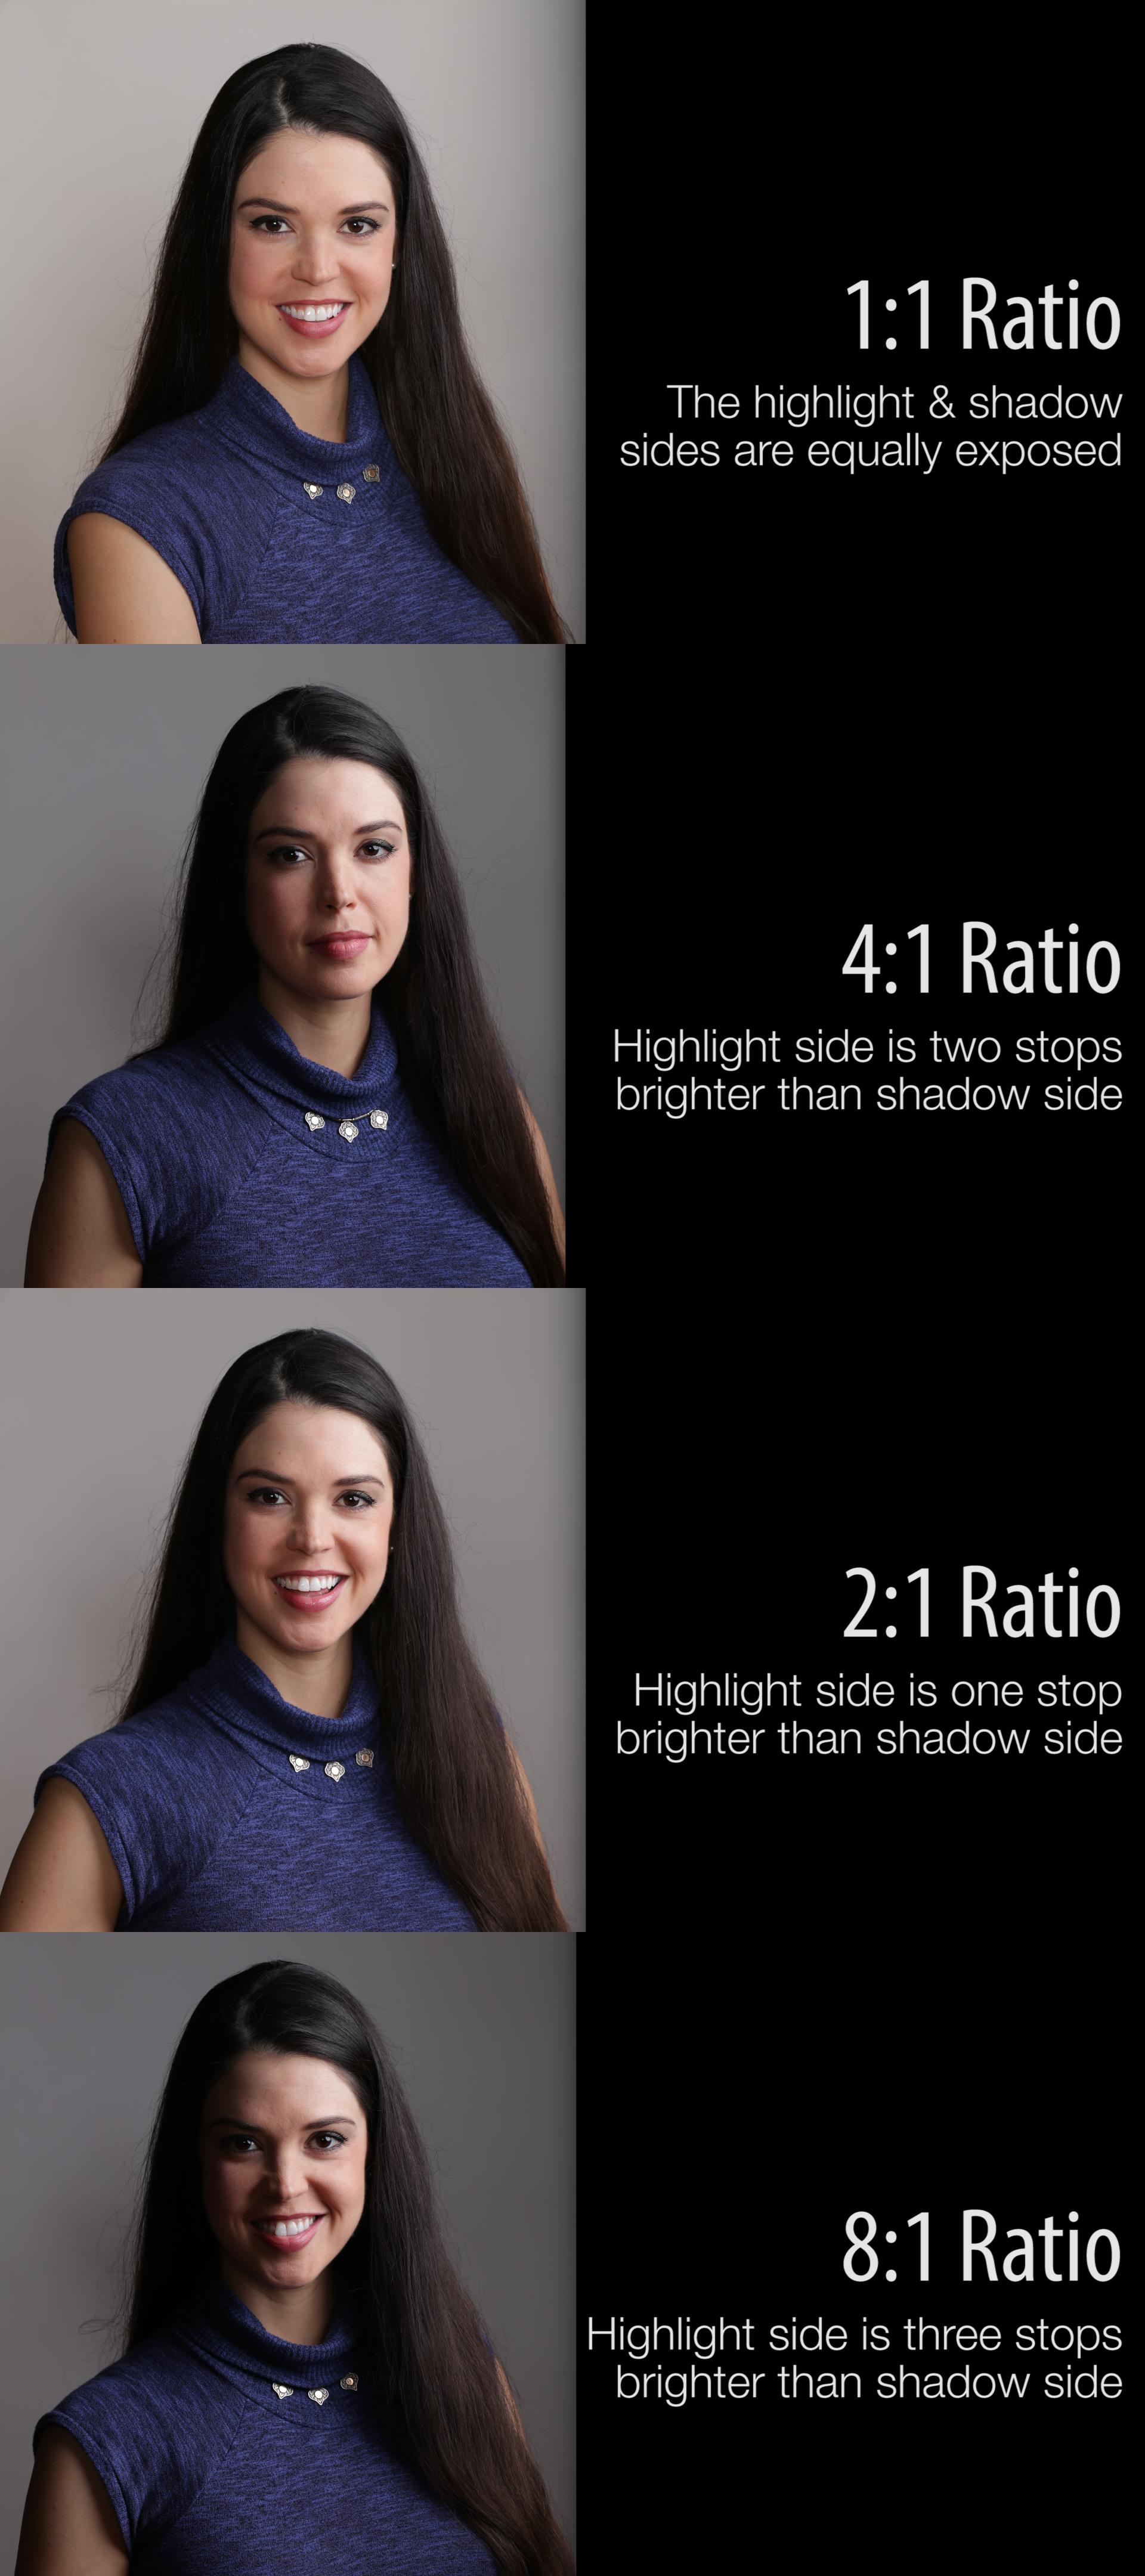
Key/Fill ratios and scene composition using false colors


To measure the contrast ratio you will need a light meter. The process starts with you measuring the main source of light, or the key light.
Get a reading from the brightest area on the face of your subject. Then, measure the area lit by the secondary light, or fill light. To make sense of what you have just measured you have to understand that the information you have just gathered is in F-stops, a measure of light. With each additional F-stop, for example going one stop from f/1.4 to f/2.0, you create a doubling of light. The reverse is also true; moving one stop from f/8.0 to f/5.6 results in a halving of the light.
Let’s say you grabbed a measurement from your key light of f/8.0. Then, when you measured your fill light area, you get a reading of f/4.0. This will lead you to a contrast ratio of 4:1 because there are two stops between f/4.0 and f/8.0 and each stop doubles the amount of light. In other words, two stops x twice the light per stop = four times as much light at f/8.0 than at f/4.0.

theslantedlens.com/2017/lighting-ratios-photo-video/
What Can’t Ratios Tell You?
Ratios are great but they don’t solve all the challenges of a lighting set up for a DP. Ratios help with the mood but there are a number of other factors that need to be considered as well.
1. Type of Lighting:
Soft light vs. Hard Light. Ratios can’t help you determine whether to use soft light or hard light. You have to know what the differences are and when to employ them.
2. Direction of Lighting
Ratios can’t help you determine where the Key light should be coming from.
3. Color
Ratios are no good for color. You have to develop your project and understand how the color temperature of lights impacts mood and feeling.
To get the most out of the images below you have to know what you are looking at. The FSI False Color is user adjustable (one of the reasons it is so powerful) and they way I have set it up reads like this.
RED = 3 Stops Over
Yellow = 2 Stops Over
Light Green = 1 Stop Over
Grey = Key
Teal = 1 Stop Under
Light Blue = 2 Stops Under
Dark Blue = 3 Stops Under
Black = 4 Stops Under

![]()

Replicating the fake color process through Foundry Nuke:
set cut_paste_input [stack 0]

version 13.2 v7

push $cut_paste_input

Expression {

expr0 "(r > 2) || (g > 2) || (b > 2) ? 3:0"

expr1 "((r > 1) && (r < 2)) || ((g > 1) && (g < 2)) || ((b > 1) && (b < 2))\n ? 2:0"

expr2 "((r > 0) && (r < 1)) || ((g > 0) && (g < 1)) || ((b > 0) && (b < 1))\n ? 1:0"

name Expression4

selected true

xpos 631

ypos 54

}

Blur {

size 100

filter quadratic

name Blur1

selected true

xpos 631

ypos 120

}
Blurring an image using the same scheme:
set cut_paste_input [stack 0]

version 13.2 v8

push $cut_paste_input

Dot {

name Dot27

selected true

xpos 446

ypos 2259

}

set N329d7800 [stack 0]

Expression {

expr0 "(r > 2) || (g > 2) || (b > 2) ? 3:0"

expr1 "((r > 1) && (r < 2)) || ((g > 1) && (g < 2)) || ((b > 1) && (b < 2))\n ? 2:0"

expr2 "((r > 0) && (r < 1)) || ((g > 0) && (g < 1)) || ((b > 0) && (b < 1))\n ? 1:0"

name Expression1

selected true

xpos 521

ypos 2167

}

set N66560500 [stack 0]

Shuffle2 {

fromInput1 {{0} B}

fromInput2 {{0} B}

mappings "4 black -1 -1 rgba.red 0 0 rgba.green 0 1 rgba.alpha 0 3 black -1 -1 rgba.blue 0 2 rgba.green 0 1 rgba.green 0 1"

name Shuffle7

selected true

xpos 621

ypos 2241

}

push $N329d7800

Copy {

inputs 2

from0 rgba.alpha

to0 rgba.alpha

name Copy1

selected true

xpos 621

ypos 2315

}

Blur {

size 50

maskChannelInput rgba.alpha

name Blur3

selected true

xpos 621

ypos 2384

}

push $N66560500

Shuffle2 {

fromInput1 {{0} B}

fromInput2 {{0} B}

mappings "4 black -1 -1 rgba.green 0 1 black -1 -1 rgba.red 0 0 rgba.blue 0 2 rgba.blue 0 2 rgba.blue 0 2 rgba.alpha 0 3"

name Shuffle1

selected true

xpos 730

ypos 2242

}

push $N329d7800

Copy {

inputs 2

from0 rgba.alpha

to0 rgba.alpha

name Copy2

selected true

xpos 793

ypos 2318

}

Blur {

size 100

maskChannelInput rgba.alpha

name Blur4

selected true

xpos 793

ypos 2380

}

Merge2 {

inputs 2

operation matte

name Merge3

selected true

xpos 621

ypos 2459

}

push $N66560500

Shuffle2 {

fromInput1 {{0} B}

fromInput2 {{0} B}

mappings "4 rgba.red 0 0 rgba.red 0 0 rgba.red 0 0 rgba.alpha 0 3 black -1 -1 rgba.blue 0 2 black -1 -1 rgba.green 0 1"

name Shuffle8

selected true

xpos 521

ypos 2241

}

push $N329d7800

Copy {

inputs 2

from0 rgba.alpha

to0 rgba.alpha

name Copy3

selected true

xpos 521

ypos 2315

}

Merge2 {

inputs 2

operation matte

name Merge5

selected true

xpos 521

ypos 2506

}
The two options together
set cut_paste_input [stack 0]
version 13.2 v8
push $cut_paste_input
Group {
 name FalseColorCompositionTest
 selected true
 xpos 389
 ypos 192
}
 BackdropNode {
  inputs 0
  name VIEWER_1
  xpos 458
  ypos -174
 }
 BackdropNode {
  inputs 0
  name VIEWER_2
  xpos 722
  ypos -108
  bdwidth 161
  bdheight 68
 }
 BackdropNode {
  inputs 0
  name VIEWER_3
  tile_color 0x8e8e8eff
  note_font_size 42
  xpos 738
  ypos 301
  bdheight 110
 }
 BackdropNode {
  inputs 0
  name VIEWER_4
  xpos 394
  ypos -43
 }
 Input {
  inputs 0
  name Input1
  xpos 467
  ypos -326
 }
 Dot {
  name DotIN
  xpos 501
  ypos -258
 }
 Dot {
  name Dot2
  label "\n"
  xpos 501
  ypos -144
 }
set N28599ad0 [stack 0]
 Dot {
  name Dot27
  xpos 611
  ypos -144
 }
set N2859e960 [stack 0]
 Expression {
  expr0 "(r > 2) || (g > 2) || (b > 2) ? 3:0"
  expr1 "((r > 1) && (r < 2)) || ((g > 1) && (g < 2)) || ((b > 1) && (b < 2))\n ? 2:0"
  expr2 "((r > 0) && (r < 1)) || ((g > 0) && (g < 1)) || ((b > 0) && (b < 1))\n ? 1:0"
  name Expression4
  xpos 828
  ypos -148
 }
push $N2859e960
 Expression {
  expr0 "(r > .6) || (g > .6) || (b > .6) ? 3:0"
  expr1 "((r > .22) && (r < .6)) || ((g > .22) && (g < .6)) || ((b > .22) && (b < .6))\n ? 2:0"
  expr2 "((r > 0) && (r < .22)) || ((g > 0) && (g < .22)) || ((b > 0) && (b < .22))\n ? 1:0"
  name Expression1
  xpos 710
  ypos -186
 }
 Switch {
  inputs 2
  name Switch1
  xpos 760
  ypos -78
 }
set N28650240 [stack 0]
 Dot {
  name Dot1
  xpos 878
  ypos 5
 }
set N286582c0 [stack 0]
 Shuffle2 {
  fromInput1 {{0} B}
  fromInput2 {{0} B}
  mappings "4 black -1 -1 rgba.red 0 0 rgba.green 0 1 rgba.alpha 0 3 black -1 -1 rgba.blue 0 2 rgba.green 0 1 rgba.green 0 1"
  name Shuffle7
  xpos 844
  ypos 41
 }
push $N2859e960
 Copy {
  inputs 2
  from0 rgba.alpha
  to0 rgba.alpha
  name Copy1
  xpos 844
  ypos 115
 }
 Blur {
  size 100
  maskChannelInput rgba.alpha
  name Blur3
  xpos 844
  ypos 184
 }
push $N286582c0
 Shuffle2 {
  fromInput1 {{0} B}
  fromInput2 {{0} B}
  mappings "4 black -1 -1 rgba.green 0 1 black -1 -1 rgba.red 0 0 rgba.blue 0 2 rgba.blue 0 2 rgba.blue 0 2 rgba.alpha 0 3"
  name Shuffle1
  xpos 953
  ypos 42
 }
push $N2859e960
 Copy {
  inputs 2
  from0 rgba.alpha
  to0 rgba.alpha
  name Copy2
  xpos 953
  ypos 111
 }
 Blur {
  size 200
  maskChannelInput rgba.alpha
  name Blur4
  xpos 953
  ypos 173
 }
 Merge2 {
  inputs 2
  operation matte
  name Merge3
  xpos 844
  ypos 259
 }
push $N286582c0
 Shuffle2 {
  fromInput1 {{0} B}
  fromInput2 {{0} B}
  mappings "4 rgba.red 0 0 rgba.red 0 0 rgba.red 0 0 rgba.alpha 0 3 black -1 -1 rgba.blue 0 2 black -1 -1 rgba.green 0 1"
  name Shuffle8
  xpos 744
  ypos 41
 }
push $N2859e960
 Copy {
  inputs 2
  from0 rgba.alpha
  to0 rgba.alpha
  name Copy3
  xpos 744
  ypos 115
 }
 Merge2 {
  inputs 2
  operation matte
  name Merge5
  xpos 744
  ypos 354
 }
push $N28650240
push $N28599ad0
 Saturation {
  saturation 0
  name Saturation1
  xpos 398
  ypos -15
 }
push $N28599ad0
 ContactSheet {
  inputs 4
  width 6100
  height 2501
  rows 1
  center true
  name ContactSheet1
  xpos 482
  ypos 437
 }
 Dot {
  name DotOUT
  xpos 512
  ypos 553
 }
 Output {
  name Output1
  xpos 478
  ypos 630
 }
end_group


Cinematographers Blueprint 300dpi poster
The 300dpi digital poster is now available to all PixelSham.com subscribers.
![]()
If you have already subscribed and wish a copy, please send me a note through the contact page.


7 Commandments of Film Editing and composition

1. Watch every frame of raw footage twice. On the second time, take notes. If you don’t do this and try to start developing a scene premature, then it’s a big disservice to yourself and to the director, actors and production crew.
2. Nurture the relationships with the director. You are the secondary person in the relationship. Be calm and continually offer solutions. Get the main intention of the film as soon as possible from the director.
3. Organize your media so that you can find any shot instantly.
4. Factor in extra time for renders, exports, errors and crashes.
5. Attempt edits and ideas that shouldn’t work. It just might work. Until you do it and watch it, you won’t know. Don’t rule out ideas just because they don’t make sense in your mind.
6. Spend more time on your audio. It’s the glue of your edit. AUDIO SAVES EVERYTHING. Create fluid and seamless audio under your video.
7. Make cuts for the scene, but always in context for the whole film. Have a macro and a micro view at all times.


