HDRI shooting and editing by Xuan Prada and Greg Zaal
/ lighting, photography, production

www.xuanprada.com/blog/2014/11/3/hdri-shooting


http://blog.gregzaal.com/2016/03/16/make-your-own-hdri/


http://blog.hdrihaven.com/how-to-create-high-quality-hdri/


Shooting checklist

  • Full coverage of the scene (fish-eye shots)
  • Backplates for look-development (including ground or floor)
  • Macbeth chart for white balance
  • Grey ball for lighting calibration
  • Chrome ball for lighting orientation
  • Basic scene measurements
  • Material samples
  • Individual HDR artificial lighting sources if required

Methodology

  • Plant the tripod where the action happens, stabilise it and level it
  • Set manual focus
  • Set white balance
  • Set ISO
  • Set raw+jpg
  • Set apperture
  • Metering exposure
  • Set neutral exposure
  • Read histogram and adjust neutral exposure if necessary
  • Shot slate (operator name, location, date, time, project code name, etc)
  • Set auto bracketing
  • Shot 5 to 7 exposures with 3 stops difference covering the whole environment
  • Place the aromatic kit where the tripod was placed, and take 3 exposures. Keep half of the grey sphere hit by the sun and half in shade.
  • Place the Macbeth chart 1m away from tripod on the floor and take 3 exposures
  • Take backplates and ground/floor texture references
  • Shoot reference materials
  • Write down measurements of the scene, specially if you are shooting interiors.
  • If shooting artificial lights take HDR samples of each individual lighting source.

Exposures starting point

  • Day light sun visible ISO 100 F22
  • Day light sun hidden ISO 100 F16
  • Cloudy ISO 320 F16
  • Sunrise/Sunset ISO 100 F11
  • Interior well lit ISO 320 F16
  • Interior ambient bright ISO 320 F10
  • Interior bad light ISO 640 F10
  • Interior ambient dark ISO 640 F8
  • Low light situation ISO 640 F5
Photography basics: Exposure Value vs Photographic Exposure vs Il/Luminance vs Pixel luminance measurements
/ Featured, lighting, photography

Also see: http://www.pixelsham.com/2015/05/16/how-aperture-shutter-speed-and-iso-affect-your-photos/


In photography, exposure value (EV) is a number that represents a combination of a camera’s shutter speed and f-number, such that all combinations that yield the same exposure have the same EV (for any fixed scene luminance).


The EV concept was developed in an attempt to simplify choosing among combinations of equivalent camera settings. Although all camera settings with the same EV nominally give the same exposure, they do not necessarily give the same picture. EV is also used to indicate an interval on the photographic exposure scale. 1 EV corresponding to a standard power-of-2 exposure step, commonly referred to as a stop


EV 0 corresponds to an exposure time of 1 sec and a relative aperture of f/1.0. If the EV is known, it can be used to select combinations of exposure time and f-number.


https://www.streetdirectory.com/travel_guide/141307/photography/exposure_value_ev_and_exposure_compensation.html

Note EV does not equal to photographic exposure. Photographic Exposure is defined as how much light hits the camera’s sensor. It depends on the camera settings mainly aperture and shutter speed. Exposure value (known as EV) is a number that represents the exposure setting of the camera.


Thus, strictly, EV is not a measure of luminance (indirect or reflected exposure) or illuminance (incidental exposure); rather, an EV corresponds to a luminance (or illuminance) for which a camera with a given ISO speed would use the indicated EV to obtain the nominally correct exposure. Nonetheless, it is common practice among photographic equipment manufacturers to express luminance in EV for ISO 100 speed, as when specifying metering range or autofocus sensitivity.


The exposure depends on two things: how much light gets through the lenses to the camera’s sensor and for how long the sensor is exposed. The former is a function of the aperture value while the latter is a function of the shutter speed. Exposure value is a number that represents this potential amount of light that could hit the sensor. It is important to understand that exposure value is a measure of how exposed the sensor is to light and not a measure of how much light actually hits the sensor. The exposure value is independent of how lit the scene is. For example a pair of aperture value and shutter speed represents the same exposure value both if the camera is used during a very bright day or during a dark night.


Each exposure value number represents all the possible shutter and aperture settings that result in the same exposure. Although the exposure value is the same for different combinations of aperture values and shutter speeds the resulting photo can be very different (the aperture controls the depth of field while shutter speed controls how much motion is captured).

EV 0.0 is defined as the exposure when setting the aperture to f-number 1.0 and the shutter speed to 1 second. All other exposure values are relative to that number. Exposure values are on a base two logarithmic scale. This means that every single step of EV – plus or minus 1 – represents the exposure (actual light that hits the sensor) being halved or doubled.

https://www.streetdirectory.com/travel_guide/141307/photography/exposure_value_ev_and_exposure_compensation.html


Formula

https://en.wikipedia.org/wiki/Exposure_value


https://www.scantips.com/lights/math.html


which means   2EV = N² / t

where

  • N is the relative aperture (f-number) Important: Note that f/stop values must first be squared in most calculations
  • t is the exposure time (shutter speed) in seconds

EV 0 corresponds to an exposure time of 1 sec and an aperture of f/1.0.

Example: If f/16 and 1/4 second, then this is:

(N² / t) = (16 × 16 ÷ 1/4) = (16 × 16 × 4) = 1024.

Log₂(1024) is EV 10. Meaning, 210 = 1024.


Collecting photographic exposure using Light Meters

https://photo.stackexchange.com/questions/968/how-can-i-correctly-measure-light-using-a-built-in-camera-meter

The exposure meter in the camera does not know whether the subject itself is bright or not. It simply measures the amount of light that comes in, and makes a guess based on that. The camera will aim for 18% gray, meaning if you take a photo of an entirely white surface, and an entirely black surface you should get two identical images which both are gray (at least in theory)

https://en.wikipedia.org/wiki/Light_meter

For reflected-light meters, camera settings are related to ISO speed and subject luminance by the reflected-light exposure equation:

where

  • N is the relative aperture (f-number)
  • t is the exposure time (“shutter speed”) in seconds
  • L is the average scene luminance
  • S is the ISO arithmetic speed
  • K is the reflected-light meter calibration constant


For incident-light meters, camera settings are related to ISO speed and subject illuminance by the incident-light exposure equation:

where

  • E is the illuminance (in lux)
  • C is the incident-light meter calibration constant


Two values for K are in common use: 12.5 (Canon, Nikon, and Sekonic) and 14 (Minolta, Kenko, and Pentax); the difference between the two values is approximately 1/6 EV.
For C a value of 250 is commonly used.


Nonetheless, it is common practice among photographic equipment manufacturers to also express luminance in EV for ISO 100 speed. Using K = 12.5, the relationship between EV at ISO 100 and luminance L is then :

L = 2(EV-3)


The situation with incident-light meters is more complicated than that for reflected-light meters, because the calibration constant C depends on the sensor type. Illuminance is measured with a flat sensor; a typical value for C is 250 with illuminance in lux. Using C = 250, the relationship between EV at ISO 100 and illuminance E is then :


E = 2.5 * 2(EV)


https://nofilmschool.com/2018/03/want-easier-and-faster-way-calculate-exposure-formula

Three basic factors go into the exposure formula itself instead: aperture, shutter, and ISO. Plus a light meter calibration constant.

f-stop²/shutter (in seconds) = lux * ISO/C


If you at least know four of those variables, you’ll be able to calculate the missing value.

So, say you want to figure out how much light you’re going to need in order to shoot at a certain f-stop. Well, all you do is plug in your values (you should know the f-stop, ISO, and your light meter calibration constant) into the formula below:

lux = C (f-stop²/shutter (in seconds))/ISO


Exposure Value Calculator:

https://www.vroegop.nu/exposure-value-calculator/


From that perspective, an exposure stop is a measurement of Exposure and provides a universal linear scale to measure the increase and decrease in light, exposed to the image sensor, due to changes in shutter speed, iso & f-stop.
+-1 stop is a doubling or halving of the amount of light let in when taking a photo.
1 EV is just another way to say one stop of exposure change.


One major use of EV (Exposure Value) is just to measure any change of exposure, where one EV implies a change of one stop of exposure. Like when we compensate our picture in the camera.


If the picture comes out too dark, our manual exposure could correct the next one by directly adjusting one of the three exposure controls (f/stop, shutter speed, or ISO). Or if using camera automation, the camera meter is controlling it, but we might apply +1 EV exposure compensation (or +1 EV flash compensation) to make the result goal brighter, as desired. This use of 1 EV is just another way to say one stop of exposure change.


On a perfect day the difference from sampling the sky vs the sun exposure with diffusing spot meters is about 3.2 exposure difference.

 ~15.4 EV for the sun
 ~12.2 EV for the sky

That is as a ballpark. All still influenced by surroundings, accuracy parameters, fov of the sensor…


EV calculator

https://www.scantips.com/lights/evchart.html#calc

http://www.fredparker.com/ultexp1.htm


Exposure value is basically used to indicate an interval on the photographic exposure scale, with a difference of 1 EV corresponding to a standard power-of-2 exposure step, also commonly referred to as a “stop”.


https://contrastly.com/a-guide-to-understanding-exposure-value-ev/


Retrieving photographic exposure from an image

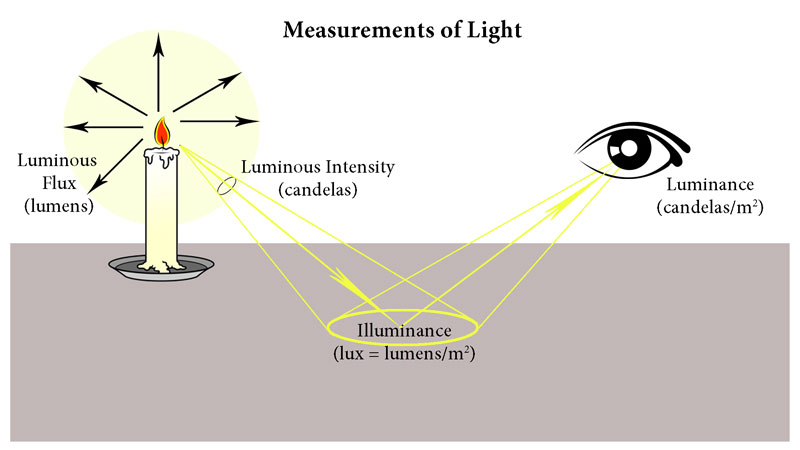
All you can hope to measure with your camera and some images is the relative reflected luminance. Even if you have the camera settings. https://en.wikipedia.org/wiki/Relative_luminance


If you REALLY want to know the amount of light in absolute radiometric units, you’re going to need to use some kind of absolute light meter or measured light source to calibrate your camera. For references on how to do this, see: Section 2.5 Obtaining Absolute Radiance from http://www.pauldebevec.com/Research/HDR/debevec-siggraph97.pdf


IF you are still trying to gauge relative brightness, the level of the sun in Nuke can vary, but it should be in the thousands. Ie: between 30,000 and 65,0000 rgb value depending on time of the day, season and atmospherics.


The values for a 12 o’clock sun, with the sun sampled at EV 15.5 (shutter 1/30, ISO 100, F22) is 32.000 RGB max values (or 32,000 pixel luminance).
The thing to keep an eye for is the level of contrast between sunny side/fill side.  The terminator should be quite obvious,  there can be up to 3 stops difference between fill/key in sunny lit objects.


Note: In Foundry’s Nuke, the software will map 18% gray to whatever your center f/stop is set to in the viewer settings (f/8 by default… change that to EV by following the instructions below).
You can experiment with this by attaching an Exposure node to a Constant set to 0.18, setting your viewer read-out to Spotmeter, and adjusting the stops in the node up and down. You will see that a full stop up or down will give you the respective next value on the aperture scale (f8, f11, f16 etc.).
One stop doubles or halves the amount or light that hits the filmback/ccd, so everything works in powers of 2.
So starting with 0.18 in your constant, you will see that raising it by a stop will give you .36 as a floating point number (in linear space), while your f/stop will be f/11 and so on.

If you set your center stop to 0 (see below) you will get a relative readout in EVs, where EV 0 again equals 18% constant gray.
Note: make sure to set your Nuke read node to ‘raw data’


In other words. Setting the center f-stop to 0 means that in a neutral plate, the middle gray in the macbeth chart will equal to exposure value 0. EV 0 corresponds to an exposure time of 1 sec and an aperture of f/1.0.


To switch Foundry’s Nuke’s SpotMeter to return the EV of an image, click on the main viewport, and then press s, this opens the viewer’s properties. Now set the center f-stop to 0 in there. And the SpotMeter in the viewport will change from aperture and fstops to EV.


If you are trying to gauge the EV from the pixel luminance in the image:
– Setting the center f-stop to 0 means that in a neutral plate, the middle 18% gray will equal to exposure value 0.
– So if EV 0 = 0.18 middle gray in nuke which equal to a pixel luminance of 0.18, doubling that value, doubles the EV.

.18 pixel luminance = 0EV
.36 pixel luminance = 1EV
.72 pixel luminance = 2EV
1.46 pixel luminance = 3EV
...


This is a Geometric Progression function: xn = ar(n-1)

The most basic example of this function is 1,2,4,8,16,32,… The sequence starts at 1 and doubles each time, so

  • a=1 (the first term)
  • r=2 (the “common ratio” between terms is a doubling)

And we get:

{a, ar, ar2, ar3, … }

= {1, 1×2, 1×22, 1×23, … }

= {1, 2, 4, 8, … }

In this example the function translates to: n = 2(n-1)
You can graph this curve through this expression: x = 2(y-1)  :

You can go back and forth between the two values through a geometric progression function and a log function:

(Note: in a spreadsheet this is: = POWER(2; cell# -1)  and  =LOG(cell#, 2)+1) )

2(y-1) log2(x)+1
x y
1 1
2 2
4 3
8 4
16 5
32 6
64 7
128 8
256 9
512 10
1024 11
2048 12
4096 13


Translating this into a geometric progression between an image pixel luminance and EV:

(more…)

HDRI Median Cut plugin
/ Featured, lighting, software

www.hdrlabs.com/picturenaut/plugins.html


Note. The Median Cut algorithm is typically used for color quantization, which involves reducing the number of colors in an image while preserving its visual quality. It doesn’t directly provide a way to identify the brightest areas in an image. However, if you’re interested in identifying the brightest areas, you might want to look into other methods like thresholding, histogram analysis, or edge detection, through openCV for example.


Here is an openCV example:


# bottom left coordinates = 0,0
import numpy as np
import cv2

# Load the HDR or EXR image
image = cv2.imread('your_image_path.exr', cv2.IMREAD_UNCHANGED)  # Load as-is without modification

# Calculate the luminance from the HDR channels (assuming RGB format)
luminance = np.dot(image[..., :3], [0.299, 0.587, 0.114])

# Set a threshold value based on estimated EV
threshold_value = 2.4  # Estimated threshold value based on 4.8 EV

# Apply the threshold to identify bright areas
# The luminance array contains the calculated luminance values for each pixel in the image. # The threshold_value is a user-defined value that represents a cutoff point, separating "bright" and "dark" areas in terms of perceived luminance.
thresholded = (luminance > threshold_value) * 255 

# Convert the thresholded image to uint8 for contour detection 
thresholded = thresholded.astype(np.uint8) 

# Find contours of the bright areas 
contours, _ = cv2.findContours(thresholded, cv2.RETR_EXTERNAL, cv2.CHAIN_APPROX_SIMPLE) 

# Create a list to store the bounding boxes of bright areas 
bright_areas = [] 

# Iterate through contours and extract bounding boxes for contour in contours: 
x, y, w, h = cv2.boundingRect(contour) 

# Adjust y-coordinate based on bottom-left origin 
y_bottom_left_origin = image.shape[0] - (y + h) bright_areas.append((x, y_bottom_left_origin, x + w, y_bottom_left_origin + h)) 

# Store as (x1, y1, x2, y2) 
# Print the identified bright areas 
print("Bright Areas (x1, y1, x2, y2):") for area in bright_areas: print(area)


More details


Luminance and Exposure in an EXR Image:

  • An EXR (Extended Dynamic Range) image format is often used to store high dynamic range (HDR) images that contain a wide range of luminance values, capturing both dark and bright areas.
  • Luminance refers to the perceived brightness of a pixel in an image. In an RGB image, luminance is often calculated using a weighted sum of the red, green, and blue channels, where different weights are assigned to each channel to account for human perception.
  • In an EXR image, the pixel values can represent radiometrically accurate scene values, including actual radiance or irradiance levels. These values are directly related to the amount of light emitted or reflected by objects in the scene.


The luminance line is calculating the luminance of each pixel in the image using a weighted sum of the red, green, and blue channels. The three float values [0.299, 0.587, 0.114] are the weights used to perform this calculation.


These weights are based on the concept of luminosity, which aims to approximate the perceived brightness of a color by taking into account the human eye’s sensitivity to different colors. The values are often derived from the NTSC (National Television System Committee) standard, which is used in various color image processing operations.


Here’s the breakdown of the float values:

  • 0.299: Weight for the red channel.
  • 0.587: Weight for the green channel.
  • 0.114: Weight for the blue channel.


The weighted sum of these channels helps create a grayscale image where the pixel values represent the perceived brightness. This technique is often used when converting a color image to grayscale or when calculating luminance for certain operations, as it takes into account the human eye’s sensitivity to different colors.


For the threshold, remember that the exact relationship between EV values and pixel values can depend on the tone-mapping or normalization applied to the HDR image, as well as the dynamic range of the image itself.


To establish a relationship between exposure and the threshold value, you can consider the relationship between linear and logarithmic scales:

  1. Linear and Logarithmic Scales:
    • Exposure values in an EXR image are often represented in logarithmic scales, such as EV (exposure value). Each increment in EV represents a doubling or halving of the amount of light captured.
    • Threshold values for luminance thresholding are usually linear, representing an actual luminance level.
  2. Conversion Between Scales:
    • To establish a mathematical relationship, you need to convert between the logarithmic exposure scale and the linear threshold scale.
    • One common method is to use a power function. For instance, you can use a power function to convert EV to a linear intensity value.
    threshold_value = base_value * (2 ** EV)

    Here, EV is the exposure value, base_value is a scaling factor that determines the relationship between EV and threshold_value, and 2 ** EV is used to convert the logarithmic EV to a linear intensity value.

  3. Choosing the Base Value:
    • The base_value factor should be determined based on the dynamic range of your EXR image and the specific luminance values you are dealing with.
    • You may need to experiment with different values of base_value to achieve the desired separation of bright areas from the rest of the image.


Let’s say you have an EXR image with a dynamic range of 12 EV, which is a common range for many high dynamic range images. In this case, you want to set a threshold value that corresponds to a certain number of EV above the middle gray level (which is often considered to be around 0.18).

Here’s an example of how you might determine a base_value to achieve this:


# Define the dynamic range of the image in EV
dynamic_range = 12

# Choose the desired number of EV above middle gray for thresholding
desired_ev_above_middle_gray = 2

# Calculate the threshold value based on the desired EV above middle gray
threshold_value = 0.18 * (2 ** (desired_ev_above_middle_gray / dynamic_range))

print("Threshold Value:", threshold_value)
How are Energy and Matter the Same?
/ lighting, quotes

www.turnerpublishing.com/blog/detail/everything-is-energy-everything-is-one-everything-is-possible/

www.universetoday.com/116615/how-are-energy-and-matter-the-same/

As Einstein showed us, light and matter and just aspects of the same thing. Matter is just frozen light. And light is matter on the move. Albert Einstein’s most famous equation says that energy and matter are two sides of the same coin. How does one become the other?

Relativity requires that the faster an object moves, the more mass it appears to have. This means that somehow part of the energy of the car’s motion appears to transform into mass. Hence the origin of Einstein’s equation. How does that happen? We don’t really know. We only know that it does.

Matter is 99.999999999999 percent empty space. Not only do the atom and solid matter consist mainly of empty space, it is the same in outer space

The quantum theory researchers discovered the answer: Not only do particles consist of energy, but so does the space between. This is the so-called zero-point energy. Therefore it is true: Everything consists of energy.

Energy is the basis of material reality. Every type of particle is conceived of as a quantum vibration in a field: Electrons are vibrations in electron fields, protons vibrate in a proton field, and so on. Everything is energy, and everything is connected to everything else through fields.

Cinematographers Blueprint 300dpi poster

The 300dpi digital poster is now available to all PixelSham.com subscribers.


If you have already subscribed and wish a copy, please send me a note through the contact page.

Photography basics: Lumens vs Candelas (candle) vs Lux vs FootCandle vs Watts vs Irradiance vs Illuminance
/ colour, Featured, lighting, photography

https://www.translatorscafe.com/unit-converter/en-US/illumination/1-11/


The power output of a light source is measured using the unit of watts W. This is a direct measure to calculate how much power the light is going to drain from your socket and it is not relatable to the light brightness itself.

The amount of energy emitted from it per second. That energy comes out in a form of photons which we can crudely represent with rays of light coming out of the source. The higher the power the more rays emitted from the source in a unit of time.

Not all energy emitted is visible to the human eye, so we often rely on photometric measurements, which takes in account the sensitivity of human eye to different wavelenghts


https://pllight.com/understanding-lighting-metrics/

Candela is the basic unit of measure of light intensity from any point in a single direction from a light source. It measures the total volume of light within a certain beam angle and direction.
While the luminance of starlight is around 0.001 cd/m2, that of a sunlit scene is around 100,000 cd/m2, which is a hundred millions times higher. The luminance of the sun itself is approximately 1,000,000,000 cd/m2.


https://www.hdrsoft.com/resources/dri.html#bit-depth

To make it easier to represent values that vary so widely, it is common to use a logarithmic scale to plot the luminance. The scanline below represents the log base 10 of the luminance, so going from 0.1 to 1 is the same distance as going from 100 to 1000, for instance. A scene showing the interior of a room with a sunlit view outside the window, for instance, will have a dynamic range of approximately 100,000:1.


Lumen (lm) is the basic unit of measure for a light that is visible to the human eye. It indicates the total potential amount of light from a light source. If a uniform point source of 1 candela is at the center of a sphere with a 1ft2 radius with an opening of 1 ft2 at its surface, the quantity of light that passes through that opening is equal to 1 lumen. Since lumens are a photometric measurement for humans, we do not use this unit of measure for describing horticultural lighting.


Technically speaking, a Lumen is the SI unit of luminous flux, which is equal to the amount of light which is emitted per second in a unit solid angle of one steradian from a uniform source of one-candela intensity radiating in all directions.


Illuminance refers to the density of light over a given surface area, and is expressed in mostly LUX or lumens/m2.
Luminance refers to the amount of light emitted under various circumstances, and it is expressed mostly in LUMENS or candela/m2.


Lux (lx) or often Illuminance, is a photometric unit along a given area, which takes in account the sensitivity of human eye to different wavelenghts. It is the measure of light at a specific distance within a specific area at that distance. Often used to measure the incidental sun’s intensity. Its default unit describes the number of lumens visible in a square meter (lumen/m2). 100 lumens spread out over an area of 1 m2 will have an illuminance of 100 lx. The same 100 lumens spread out over 10 m2 produces a dimmer illuminance of only 10 lx.


The core difference between lux and lumens can be summarized as follows:

  • Lux is a measure of illuminance, the total amount of light that falls on a surface at a given distance
  • Lumens is a measure of luminous flux, the total amount of light emitted in all directions.


A footcandle describes the number of lumen per square foot. Therefore, one footcandle is equal to approximately 10.764 lx. This measure is only relevant for how we perceive light and is irrelevant for plant growth. Like lumens, lux and footcandles are not useful for describing horticultural lighting.


Color Rendering Index, or CRI, describes the ability of a light source to show an object’s color accurately in comparison to standardized colour samples under a reference light source. The highest value a light can achieve is a CRI of 100. Lower CRI values result in objects appearing unnatural or discolored. Under a light with a CRI of 100, an orange appears bright orange; under a light with a CRI of 70, the orange appears darker and bluer. This measure is dependent on how the human eye sees light, and so it is not a useful parameter for choosing horticultural lighting.


Correlated Color Temperature, or CCT, describes the color of a light source vs. a reference source when heated to a particular temperature, and is measured in degrees Kelvin (°K). The higher the CCT of a light source, the cooler the light’s color. For example, a very red light achieves a CCT of about 1000 K while a very blue light can achieve a CCT of about 10,000 K. Warm white lights will have a CCT around 2700 K (since they emit more energy at the red end of the spectrum), neutral white will be around 4000 K, and cool white around 5000 K (emitting more energy at the blue end of the spectrum). Similar to CRI, this measure is dependent on light perception by the human eye, and, once again, is not useful for describing or choosing horticultural lighting.


http://www.lumis.co.nz/reference-information/lighting-terminology

Light is a visible portion of electromagnetic radiation. Watts isn’t a measure of light output. Watts is actually a measure of total power output. Not all of the energy emitted by a light source is visible light – heat and invisible light waves (ex. infrared light) are also emitted. Lumens, on the other hand, will tell you the total visible light output of a source. For this reason, lumens (not watts) is the relevant unit of measure when you’re concerned about visibility. The higher the power the more rays emitted from the source in a unit of time.


Irradiance (radiant flux emitted by a surface per unit area aka watt per square meter) is a radiometric unit. As such also actually a measure of total power output.
Radiometric units are based on physical power, that means all wavelengths are weighted equally, while photometric units take into account the sensitivity of human eye to different wavelengths.
The weighting is determined by the luminosity function (which was measured for human eye and is an agreed-upon standard).


Converting Irradiance and Illuminance
http://www.dfisica.ubi.pt/~hgil/Fotometria/HandBook/ch07.html
There is a different conversion factor for every wavelength, so the spectral composition of light must be known to make the conversion.

At the most sensitive wavelegth to the human eye the conversion factor is

1.0 W/m2 = 683.002 lumen/m2 # at wavelength = 555nm (green)

That means the irradiance (power) to make 1 lumen is at it’s minimum at this wavelength (just 1.464 mW/m2).
Luminous efficiency is then the ratio between the actual number of lumens per watt and the theoretical maximum.
Incandescent light bulb has a luminous efficiency of 2% which is very poor. It’s because lot of it’s irradiance is only heat which is not visible. The luminosity function is zero for wavelengths outside the visible spectrum.


https://www.rapidtables.com/calc/light/lux-to-lumen-calculator.html


https://www.projectorpoint.co.uk/news/how-bright-should-my-projector-be/


https://dracobroadcast.eu/blogs/news/continuous-light-converting-guide


  • Watts (halogen) – A measure of energy consumed
  • Watts (HMI) – A measure of energy consumed
  • Watts (LED) – A measure of energy consumed
  • Lux – Lumens per square meter, illuminance at target
  • Footcandles – Lumens per square foot
  • Stops – Size of lens aperture
  • EV – Exposure Value
  • Lumens – Measure of amount of visible light, luminance from source
  • Candela – Measure of entire volume of lighting
  • NIT = Candela per square meter but is not part of the International System of Units
Photography basics: Solid Angle measures
/ Featured, lighting, photography

http://www.calculator.org/property.aspx?name=solid+angle


A measure of how large the object appears to an observer looking from that point. Thus. A measure for objects in the sky. Useful to retuen the size of the sun and moon… and in perspective, how much of their contribution to lighting. Solid angle can be represented in ‘angular diameter’ as well.

http://en.wikipedia.org/wiki/Solid_angle


http://www.mathsisfun.com/geometry/steradian.html


A solid angle is expressed in a dimensionless unit called a steradian (symbol: sr). By default in terms of the total celestial sphere and before atmospheric’s scattering, the Sun and the Moon subtend fractional areas of 0.000546% (Sun) and 0.000531% (Moon).


http://en.wikipedia.org/wiki/Solid_angle#Sun_and_Moon


On earth the sun is likely closer to 0.00011 solid angle after athmospheric scattering. The sun as perceived from earth has a diameter of 0.53 degrees. This is about 0.000064 solid angle.

http://www.numericana.com/answer/angles.htm


The mean angular diameter of the full moon is 2q = 0.52° (it varies with time around that average, by about 0.009°). This translates into a solid angle of 0.0000647 sr, which means that the whole night sky covers a solid angle roughly one hundred thousand times greater than the full moon.


More info


http://lcogt.net/spacebook/using-angles-describe-positions-and-apparent-sizes-objects

http://amazing-space.stsci.edu/glossary/def.php.s=topic_astronomy


Angular Size

The apparent size of an object as seen by an observer; expressed in units of degrees (of arc), arc minutes, or arc seconds. The moon, as viewed from the Earth, has an angular diameter of one-half a degree.


The angle covered by the diameter of the full moon is about 31 arcmin or 1/2°, so astronomers would say the Moon’s angular diameter is 31 arcmin, or the Moon subtends an angle of 31 arcmin.

Convert between light exposure and intensity
/ lighting, software
import math,sys

def Exposure2Intensity(exposure): 
    exp = float(exposure)
    result = math.pow(2,exp)
    print(result)

Exposure2Intensity(0)

def Intensity2Exposure(intensity):
    inarg = float(intensity)
    
    if inarg == 0:
        print("Exposure of zero intensity is undefined.")
        return
    
    if inarg < 1e-323:
        inarg = max(inarg, 1e-323)
        print("Exposure of negative intensities is undefined. Clamping to a very small value instead (1e-323)")
    
    result = math.log(inarg, 2)
    print(result)

Intensity2Exposure(0.1)


Loading...